Table of Contents
Advertisement
Quick Links
Advertisement
Table of Contents

Subscribe to Our Youtube Channel
Related Manuals for Ultima 250 Series

Summary of Contents for Ultima 250 Series
- Page 1 ULTIMA 250 SERIES Owners Manual www.UltimaDentalSystems.com (888) 900-8584...
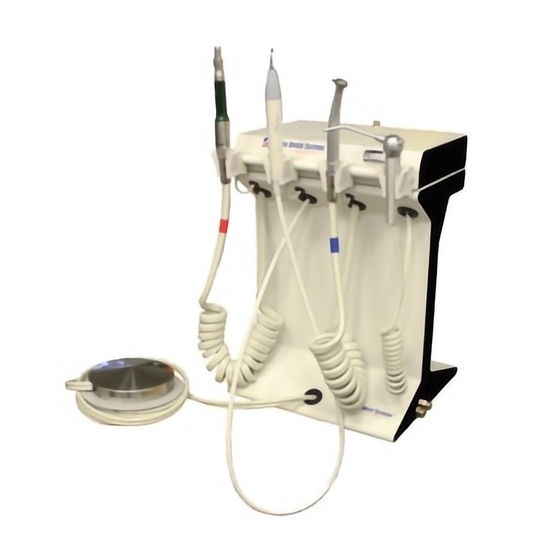
- Page 2 Ultima 250 Table-Top Inside the units’ removable top are two male quick disconnect fittings one with shut-off and one without, along with Suction feet for the table-top unit. Un-screw the sliver thumb screw located at the top of the unit. The two suction feet provided are to ensure more stability for the unit on a table top surface, even if the water bottles are empty.
-
Page 3: Wall Mount
OUNT When installing the wall mount for the Ultima 250 Arm unit, it is best if the wall mount is screwed into and secured to a wall beam. Use a stud finder, which can be found in most hardware stores, to locate a beam in the area the Ultima 250 will be installed. -
Page 4: Pole Mount
Both Table-Top and Arm units include a standard 12” arm attachment. Additional 6”, 8”, 12” and 16” arm attachments are also available. The Ultima 250 Arm units make it possible to connect to as many arm attachments as needed to achieve the correct length necessary for any practice environment. -
Page 5: Setup And Installation
Air Source OMPRESSED To begin working with the Ultima 250 dental unit using an air compressor, you will need ¼ outside diameter tubing. Cut the ¼” tubing to the length needed between the compressor and where the unit will be used. Connect the male quick disconnect fittings provided with the unit to the ¼” tubing, connect the male quick disconnect without shut-off to the compressor. - Page 6 ITROGEN To begin working with the Ultima 250 dental unit using nitrogen, you will need ¼ outside diameter tubing. Cut the ¼” tubing to the length needed between the nitrogen source and the location the unit will be used. Connect the male quick disconnect fittings provided with the unit to the ¼” tubing, connect the male quick disconnect without the shut-off valve to the nitrogen source.
-
Page 7: Operation
Piezo Scaler. You will also find the Ultima 250 units to be extremely user/repair friendly. On the top of the unit there is an easy to remove lid secured by a silver thumb screw. To gain access to the U250 components simply un-do the silver thumb screw. - Page 8 Operation On the Ultima 250 units only one hand piece can be run at a time. They are activated by an automatic holder when removed from its place. The hand piece must be placed in the same holder to de-activate the hand piece in order to allow another hand piece to function. The holders and hand piece tubing has been color coded for your convenience.
- Page 9 Operation To refill water bottles it is not necessary to disconnect the Ultima 250 unit from the air source. To refill the water bottles, simply un-screw the bottles slowly until air begins to escape, wait two seconds and un-screw the bottle the rest of the way off the pressure head, refill and then re- attach.
- Page 10 Ultima! For technical assist or questions, simply call (888) 900-8584 and one of our knowledgeable customer support members will help you with what you need Monday through Friday 9am to 5pm Est.
- Page 11 10P Perio – Part # 54130 Ultima dental units with built in Satelec piezo scaler come standard with 3 scaling tips. The #1 Universal tip is recommended for simple cases and gross debridement. The #2 tip is recommended for the removal of heavy calculus and the 10P tip is recommended for scaling shallow pockets.
- Page 12 Technique Cavitron users are accustomed to utilizing magnetorestrictive tip differently from the way a Satelec tip should be used. With the elliptical motion a cavitron provides, the technican is accustomed to using the front, side or back of the tip to bang the tooth to remove calculus. With piezo the process is different because the tip vibrates on the same plane as the handpiece.
- Page 13 Visit www.UltimaDentalSystems.com to watch the instructional video on how to remove the scaler you’re your Ultima 500 series dental unit. Contact the Electrical contacts on cord are loose Tip worn or distorted UDS Technical support team for further instructions on where to send the...
- Page 14 Basic Trouble Shooting Guide No water - Scaler/High-speed Drill 1. Check the water on/off toggle switch and make sure it is in the on position. 2. Check the water increase/decrease knob and make sure it is turned up. 3. Grab the 3-way syringe and check to see if you get water from the handpiece. 4.
- Page 15 The nose cone chuck will need to be repaired or replaced. will not seat properly onto Prophy angle stem has broken inside of Contact Ultima Dental Systems to send in your handpiece in the polisher nose cone the nose for repair and receive a loaner handpiece while you wait, call (888) 900-8584.
- Page 16 Ultima! For technical assist or questions, simply call (888) 900-8584 and one of our knowledgeable customer support members will help you with what you need Monday through Friday 9am to 5pm Est.
- Page 17 5 hole handpiece gasket, commonly used on fiber optic handpieces. Use Part # UD0315 to order a 4 hole handpiece gasket. If you have any questions, please call (888) 900-8584 to speak with a knowledgeable Ultima dental technician. 16 | P a g e www.UltimaDentalSystems.com...
- Page 18 Lubricating the High-speed Drill To oil the drill simply turn it upside down. On the bottom of the drill there are four metal barbs, two small barbs and two big ones. Add two to three drops of handpiece oil to the smaller of the two larger barbs located on the bottom of the drill.
- Page 19 Replacement spare parts for T64 highspeed drills are still available for purchase. If you have any questions or need assistance ordering parts for T64 highspeed drills contact Ultima Dental Systems at (888) 900-8584. TEK USA T65 LED Drill Part # 54162...
-
Page 20: Warranty
The Fiber Glass and Aluminum shells for the dental units are only covered under warranty if defective out of the box and damaged during shipping. All parts on Ultima compressors are covered for 5 years if defective. The Lowspeed Polisher is covered under warranty for 1 year if defective.
Need help?
Do you have a question about the 250 Series and is the answer not in the manual?
Questions and answers