Table of Contents
Advertisement
Quick Links
Advertisement
Table of Contents

Related Manuals for SereneLife SLSFE18FP


Summary of Contents for SereneLife SLSFE18FP
- Page 1 FINGERPRINT-ENABLED ELECTRONIC SAFE USER MANUAL Models: SLSFE18FP | SLSFE24FP...
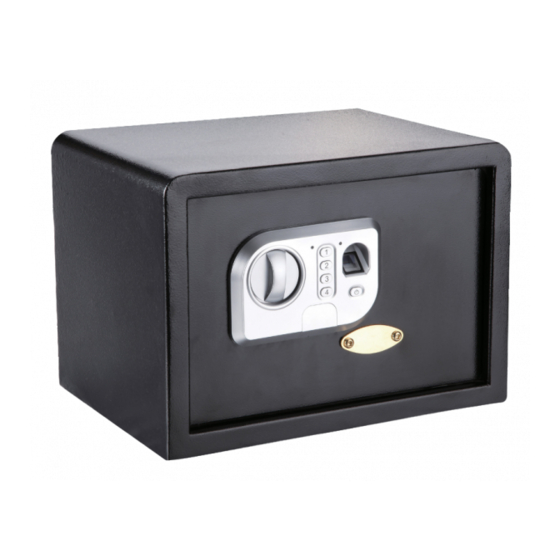
- Page 2 DIAGRAM Please do not keep emergency keys in your safe! FUNCTION • Locks: using high-quality anti-drilling locking bolts, high-theft proof performance. • Initialization/Add key: add fingerprint registration or delete fingerprint record • Unlock key: open the safe • Finger collector screen: fingerprint registration • Number keys on the panel: representing 1, 2, 3, 4 separately • Key "1": set use code • Gilded badge: remove the cover and open emergency lock • Power supply: 4 X AA batteries FEATURES • This safe is a high-tech product, and plays a strong role in psecurity. • Use fingerprint recognition instead of a key or digital code for greater convenience • Maximum of 20 fingerprints can be registered • Constructed from solid materials to resist attack from hand & power tools • User-friendly product, original design, unique structure...
- Page 3 PREPARATION • The safe on delivery comes with no registered fingerprints. • The safe is not loaded with batteries, you may insert the emergency key into the emergency keyhole to open the door . • Uncover the battery compartment cover at the back of door. And put in 4 X AA batteries. Please pay attention to the polarity of the batteries. For normal use, the batteries last up to one year. • The preset code of safe on delivery is "1234", the user may open the door with the preset code when batteries are placed and tested normal. NOTE: For security of your property, you will need to change the preset code. POWER SUPPLY • Pull the door open. • Pull out the battery compartment cover. • Replace 4 fresh batteries by lining them up in a manner as indicated by the "+" and "-" signs. NOTE: If the red light activates, it means the batteries are low. So you can plug the emergency battery boxes into the jack to power.
- Page 4 SET USER CODE • Fingerprint unlock: Press unlock key, the red light at finger collector screen is on. Don't remove any fingerprint registered at finger collector screen until the red light off. After hearing a long "Bleep", the green light shinning, motor drives. Please turn the knob clockwise, then unlock succeed. • Password unlock: Input code (4 to 8 digits) and press unlock key to confirm. After hearing a long "Bleep", the green light shinning, motor drives. Please turn the knob clockwise, and unlock succeed. NOTE: In order to improve the success rate of finger identification, users can refer to the following advice: Avoid using the finger collector screen in bright light. It’s suggested that each user registers 2-3 fingerprints. Women and children should try to register with thumb and middle finger.
- Page 5 SYSTEM INITIALIZATION/DELETION Press the Initialization/Add key for around 5 seconds, the green indicator light will blink about 12 times. Let go of the key when it stops blinking. After hearing a long "tick", all fin- gerprints records in the module will be eliminated and return to factory setting. IMPORTANT NOTES • Do not use liquid or a sprayer to clean the safe. Use a wet cloth instead. • Do not place the product in an insecure and elevated place, lest it may fall over and damage the product or hurt people. Never spill liquid over the control panel, or it may cause electrical shock to the electronic parts inside and disable their proper functions. • Never try to dismantle the product by yourself. Unguided Dismantling and incorrect reassembly of the inside of back cover may damage the electrical circuit and affects its performance. Where maintenance is required, please contact the local service center or local distributor. For additional help, please consult the local distributor...
Need help?
Do you have a question about the SLSFE18FP and is the answer not in the manual?
Questions and answers