Table of Contents
Advertisement
Quick Links
DDAC-1
deluxe digital
atmosphere controller
Specs
1
Basic Description
1
2
3-4
5
6
7
12
12
How to recalibrate CO2
13
14
14
15
Page 1
Specs
Input voltage
Maximum amperage
Remote COMBO probe cable length
Temperature control range
Temperature accuracy
Temperature dead-band (hysteresis)
Humidity control range
Humidity accuracy
Humidity dead-band (hysteresis)
CO2 control range
CO2 accuracy
Weight
Dimensions
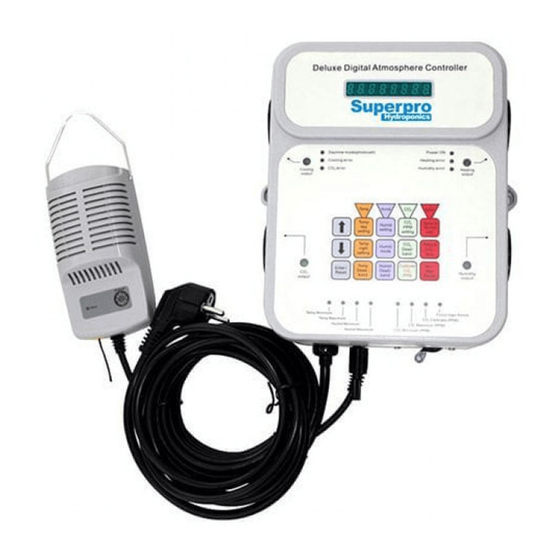
Basic description
The DDAC-1 is designed to control humidity, temperature
and CO2. The controller has four (4) receptacles and a remote
combination probe with highly accurate temperature, humidity,
light and CO2 sensors. The fan-ventilated remote combination
sensor is designed to quickly react to changes in the growing
area and to resist EMI / EFI from electronic ballasts. The
remote sensor can be placed up to 15 feet from the controller.
Note: An optional 15 ft extension cable can be
purchased to allow the user to place the remote
sensor up to 30ft from the controller.
DDAC-1
120 Volts AC
14.5 amps @ 120 VAC
15 ft
41º to 113º F
+/- 1'F
adjustable
5% to 95% rH
+/- 3% rH
adjustable
380-2500 PPM
+/- 50 PPM
5 lbs
9" x 7" x 3.75"
Advertisement
Table of Contents

Related Manuals for SuperPro DDAC-1

Summary of Contents for SuperPro DDAC-1
-
Page 1: Table Of Contents
9” x 7” x 3.75” Factory Settings Basic description Overview The DDAC-1 is designed to control humidity, temperature How to customize settings 8-12 and CO2. The controller has four (4) receptacles and a remote Photocell sensitivity combination probe with highly accurate temperature, humidity, light and CO2 sensors. -
Page 2: Installation
Page 2 DDAC-1 Page 3 DDAC-1 Installation Button Functions Secure the unit to a wall. The fifteen (15) buttons located on the front face control all the functions. Pressing each button will display a function Determine the best location for the remote probe. Place the and/or current setting(s) in the green LED window. -
Page 3: Error Leds
CO2 Parts Per Million (PPM) setting. with any of the devices connected to the DDAC-1. Here is how CO2 dead-band - Press button to set the CO2 dead-band set- it works. -
Page 4: Factory Settings
Page 7 DDAC-1 Factory Settings Overview The DDAC-1 comes pre-programmed with factory settings. The individual push- These settings may be adjusted by the user. For best results buttons on the DDAC- verify any changes after adjusting settings. The controller can 1 makes changing be easily reset to factory settings. -
Page 5: How To Customize Settings
Page 8 DDAC-1 Page 9 DDAC-1 How to customize settings... Temp dead-band - There are two (2) dead band settings. One for cooling and one for heating. Up - Press button to increase setting 1) To set the cooling dead band, press Temp dead band. - Page 6 Page 10 DDAC-1 Page 11 DDAC-1 CO2 PPM setting - Press CO2 PPM, The current PPM setting 1) Select connect mode (COnnEct) if using ventilating fans (inside-to-outside growing area air exchange) for cooling and a will be displayed. To change settings press the Up or Down compressed CO2 setup.
-
Page 7: Photocell Sensitivity
Page 12 DDAC-1 Page 13 DDAC-1 Photocell Sensitivity “HOW TO calibrate” CO2 PPM 1) Place the controller outdoors in a shaded area. Do not The sensitivity of the photocell may be adjusted. place in direct sunlight. Keep away from people, animals and * Press both Enter/Reset and Up buttons and hold for 3 other CO2 emitting areas. -
Page 8: Sulfur Vaporizer Warning
ON. What if there is no power? Reset the power switch (circuit The DDAC-1 has the capability to being connected to a PC / breaker). If this continues reduce the number of devices Laptop. When connected using our special USB interface... - Page 9 Page 16 DDAC-1 This product conforms to USA and Canada standards as listed below. made in china...
Need help?
Do you have a question about the DDAC-1 and is the answer not in the manual?
Questions and answers