
Summary of Contents for SCENAR-COSMODIC EX715Ag
- Page 1 Neuroadaptive Electrostimulator SCENAR-COSMODIC EX715Ag User’s Guide Issue 1.4 August 2012...
- Page 2 Before operating the device, please read this User’s Guide thoroughly, and retain it for further reference. Neuroadaptive electrostimulators SCENAR-COSMODIC are approved for practical application by the Federal Agency for Public Health and Social Development of the Russian Federation. Registration Certificate No. ФС 02012006/4959-06.
-
Page 3: Table Of Contents
Table of Contents Introduction ......................5 About this Guide ....................6 Read this First ......................7 Copyright Notice..................7 Safety Requirements and Precautions ............... 7 Using Applications, Attachments and Accessories ......... 8 Operating the Device .................. 8 Using the Batteries ................... 12 Checking the Contents .................. - Page 4 Conducting the Procedure ............... 25 Active Area Search ................... 25 Timer ......................26 Action energy level ................... 27 Dosage ....................... 29 Body Reaction ................... 29 Activity of the Treated Area ..............30 Choosing the Action Mode ............... 30 Menu ........................33 Timer ......................
-
Page 5: Introduction
SCENAR-COSMODIC series models are intended for use at home, at medical and rehabilitative institutions, at emergency stations, for first aid on board of ships, airplanes, trains and other transport, in beauty salons for cosmetic purposes (rejuvenation, smoothing out scars, etc.), tissue... -
Page 6: About This Guide
This User’s Guide describes main features, basic elements of the device and theirs purposes, operation of SCENAR- COSMODIC EX715Ag model, as well as typical observations and explanations, which should help the user understand the displays on the screen and effectively operate the device,... -
Page 7: Read This First
Read this First Copyright Notice Research Laboratory of Medical Electronics “LET Medical” L.L.C. (Taganrog, Russia) is the inventor, patent owner, developer and manufacturer of SCENAR and COSMODIC series models. “LET Medical” ®, “ЛЭТ Медикал” ®, “COSMODIC” ®, “КОСМОДИК” ®, “SCENAR” ® and “СКЭНАР” ® are trademarks and service marks registered and owned by “LET Medical”. -
Page 8: Using Applications, Attachments And Accessories
+10ºС (50ºF) to +35ºС (95ºF) and relative humidity to 80% at +25ºС (77ºF). SCENAR-COSMODIC series devices refer to Group 2 of GOST R 50444 for exposure to mechanical damages; to Class V of GOST R 50444 for failure effects; to Class V of GOST R 50444 and RD 50-707 for reliability. - Page 9 Do not attempt to disassemble or alter the whole device or any part of it, or the batteries. Disassembly or alteration may result in irreparable damage to the device or cause short circuit and fire. All internal inspections, alterations and repairs should be only conducted by qualified service personnel authorized by “LET Medical”.
- Page 10 Do not touch the device with wet or moist hands or other parts of the body. Do not allow the device to come in contact with, or become immersed in, water or other liquids. Do not allow the liquids to enter the interior. If water or other foreign substances enter the interior, immediately stop operating the device and remove the batteries.
- Page 11 Do not use, leave or store the device in places subject to strong sunlight or high temperature. Exposure to intense sunlight and heat may lead to deformation of the casing or cause the batteries to overheat resulting in fire. Do not store the device in humid or dusty areas. Do not use substances containing benzene, thinners, acetone and other flammable and solvent substances to clean the casing and electrodes.
-
Page 12: Using The Batteries
device. You can only resume using the device after the moisture evaporates completely. Using the Batteries We recommend using AAA type rechargeable batteries or AAA type alkaline batteries, as power source for the device. Do not use saline batteries as a power source for the device! Do not place the batteries near a heat source or expose them to direct flame or heat. -
Page 13: Checking The Contents
Discard the batteries in specialized waste facilities if available in your area To charge the rechargeable batteries, use only the battery charger specified by the manufacturer. Checking the Contents Model EX715Ag: Device User’s Guide Quick Start Install the batteries into the battery section of the device. -
Page 14: Components Guide
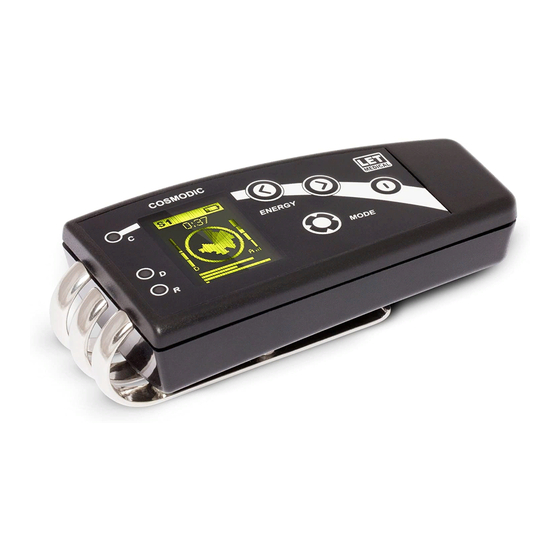
The device will switch off automatically if it is not in use for approximately 2 minutes. Components Guide Electrodes Model EX715Ag employs a new technology of manufacturing of removable electrodes. The electrodes are made of silver of the 925 standard, which preserves the natural structure of silver. -
Page 15: Indication
Indication Graphic gray-shade OLED display shows action modes, action energy, activity of the area being acted upon, dosage, time of action upon the certain area and full time of action, menu, and battery charge level. Additional LED and sound indication allows you to evaluate if the area you have chosen for action is the appropriate one, activation of dynamic adaptation block and proper contact of the electrodes with skin. -
Page 16: Casing
The case is made of high-quality genuine leather. It protects the device from damage, dust and dirt during transportation and storage. Gold Electrodes For model EX715Ag you can additionally order electrodes made of gold of the 958 or 999.9 standard, hardened and structured according to special technology. -
Page 17: Remote Electrode Probes
Remote Electrode Probes You can attach remote electrodes probes to the device. Remote probe with electrodes made of stainless steel is intended for action upon small areas. Remote probe with silver electrodes is mainly used for treatment of children, especially new-born babies, and for cosmetic purposes. -
Page 18: Arrangement And Operation
Arrangement and Operation The device consists of a casing and removable electrodes. Model EX715Ag has a special construction of removable silver electrodes. It allows taking the electrodes out of the casing (which makes disinfection and cleaning easier) and replacing the silver electrodes with gold ones. -
Page 19: Indicators C, D And R
A connector allowing attachment of remote electrode probe is placed at the end of the casing. Indicators C, D and R Indicators placed under the keyboard provide additional monitoring during action. Flashing LEDs make action control easier if the display of the device is out of sight. C is a LED indication of the contact of electrodes with skin. -
Page 20: Getting Started
The dynamic adaptation block is activated in mode S1. It allows you to automatically regulate actions and pauses between actions, without removing the electrodes from skin. It is necessary for prolonged actions, when eliminating pain, or when the patient is lying on the electrodes, and in many other cases. -
Page 21: Installing The Batteries
Installing the Batteries The devices are supplied without any batteries. When you need to install the new or replace the old batteries, open the casing of the device. 1. To open the casing, hold the device so that the upper cover looks towards your palm, without touching it. - Page 22 4. Remove the batteries. 5. On the bottom of the battery section you can see a (+) sign. Insert the batteries so that the sign (+) on the battery aligned with the (+) sign on the bottom of the battery section. Please be careful and observe the polarity! Misplaced batteries will cause damage to the device.
-
Page 23: Battery Discharge Level
Battery Discharge Level This icon displays battery discharge level. Fully filled battery icon means the battery is 100% charged. Empty icon means fully discharged battery. Note: When using fresh rechargeable batteries the battery sign may be filled partially but when using fresh alkaline batteries the battery sign is filled completely. -
Page 24: Switching The Device On And Off
The base electrodes of the device switch off automatically after connecting the remote electrode probe. Operating the Device Switching the Device On and Off Switching On The device switches on automatically or with the “ON/OFF” button. 1. The device switches on automatically when the electrodes are placed on the skin. -
Page 25: Conducting The Procedure
Conducting the Procedure In the working mode the screen looks as follows: Active Area Search Active area search mode allows defining the preferred part of the area which the treatment should be started from. During 1 second it measures the activity level of the area which contacts the electrodes. -
Page 26: Timer
necessary to measure the activity levels in the whole area which is going to be treated. The higher the vertical bar, the more active is the area part. This way, the highest vertical bar indicates the most active area part the treatment should be started from. As a rule, the most active part of the area is represented with a vertical bar which is 2–3 (or more) times as higher than the neighbouring ones. -
Page 27: Action Energy Level
Action energy level This icon displays action energy level. Automatic regulation Automatic regulation is indicated with “A” letter with three vertical bars near it on the display: There are three modes of automatic energy regulation: Minimum — children. This mode is recommended for treatment of children and people with increased sensitivity. - Page 28 Manual regulation You can increase or decrease the action energy manually, with the help of “up” and “down” buttons. “A” letter will be replaced by “E” letter in this case. Minimal action energy level is approximately 5%, maximal level is approximately 100%. If you quickly press and release the “up”...
-
Page 29: Dosage
When treating elderly and senile patients, you can use maximal action energy level. Increased action energy levels are also used for urgent care, quick relief or elimination of the problem (e.g. pain, shock conditions, frostbite, burn, etc.). Decreased action energy levels are also used for cosmetic purposes. -
Page 30: Activity Of The Treated Area
Activity of the Treated Area Segments inside the circle graphically display the dynamics of the body activity at every second of the action. This makes it easier to visualize estimation of the condition of the area being treated during action, since they allow monitoring the change of activity during a certain time period. - Page 31 Energy control – automatic and manual. Modes S2, S3 These are massaging and treatment action modes. They are used for massage, cosmetological procedures and also when you have to act on the same area for a long time when treating various conditions. During action the circle is filled from the centre towards the edges.
- Page 32 In this action mode all options selected in the menu are accessible, but the activity graphic and dosage are not displayed. When device switches into the SENSO mode it continues acting even if there is no contact with skin. To get back to usual treatment modes, unplug the remote electrode probe from the device.
-
Page 33: Menu
Menu You can work with the menu with the help of the following buttons: ON/OFF — is used to enter and exit the menu, return to the previous levels of the menu “Up”, “Down” — are used to move around the list of the menu MODE —... -
Page 34: Modes
This menu element allows setting the time after which the device with switch off automatically. To set the necessary time after which the device will switch off, select the “clock” icon. You will see the timer menu on the screen. You can set the necessary switch-off time with the help of “Up”... -
Page 35: Sound And Vibrosignal
The changes will be saved after exiting this menu. After that, when you switch over the modes with the MODE button, you will only see those action modes which are switched on in the menu. Sound and vibrosignal This function allows switching sound and vibrosignal on and off. -
Page 36: Options
Setting the brightness level of the display may be useful when working at different lighting or when the level of the screen decreases with the time. It is recommended to choose low level of brightness. This will prolong the service life of the display and significantly save charge in the batteries. -
Page 37: Language
Language In this setting you can select the language for your device — English or Russian. Information This menu contains information about your device: manufacturer, statistical data (total time of work, time of action), version, sale date, warranty, resource, etc. Note: All the changes made in the menu during the procedure are saved after finishing treatment and switching the device off. -
Page 38: How To Place The Electrode
due to insufficient battery charge, all the changes made in the menu during the procedure will not be saved. How to Place the Electrode Along muscles and skin folds. On projection of the treated organ. Along the segment. It is recommended to press the electrode to the skin surface firmly to obtain best effect of action. -
Page 39: Session Intervals
Physical condition, abilities, body potential and age of the patient. The procedure should not be exhausting. Stage of recovery — how many procedures have been already conducted. The more procedures have been done before, the more areas can be treated during one procedure. - Page 40 Everyday procedures are usually recommended in the following cases: Acute conditions; Pronounced active complaints; There may occur pronounced exacerbations during the first procedures. Procedures every other day are usually recommended in the following conditions: Chronic compensated pathological conditions in middle-aged and elderly patients;...
-
Page 41: Number Of Procedures In A Course
Number of Procedures in a Course A course of treatment can make up from 1 to 25 procedures, but typically it is 10 to 14 procedures. The number of procedures in a course of treatment depends on how the patient’s body responds to action and how fast its normal functioning is restored. -
Page 42: Positions Of The Patient During Action
Positions of the Patient During Action Positions of the patient can be varied. First of all, the position of the patient during action should be most comfortable and least painful for the patient and at the same time provide optimal accessibility to the areas, which should be acted upon. - Page 43 Sitting position This position is very convenient to act on the cervical section of the spine and head. Advantage In this position the cervical section is more moveable, than in the lying position. The head of the patient can be easily bent in various directions. Disadvantage Buttocks, back surface of knees and inguinal areas are inaccessible for...
-
Page 44: Primary Conditions For Action
The sooner you start SCENAR-therapy, the better will be the result of it. SCENAR and SCENAR-COSMODIC devices can often turn the fastest and most effective means than any other actions or methods of treatment, which can effectively and timely help in rehabilitation of health. - Page 45 Any cases of extreme injuries or severe conditions occurring in the body: traumas (any injuries, especially sporting accidents, their complications and after- effects, multitrauma, fracture of the spinal column and fracture of ribs, etc.), vascular disorders (acute disorders of cerebral circulation, intracerebral bleeding, cardiac infarction, acute occlusive vascular damage, trombophlebitis, phlebothrombosis, etc.) , physicochemical injuries (burns, frostbites, poisoning,...
-
Page 46: Specifications
Specifications Type of the device Device for personal use for medication-free therapy. Acting impulse Bipolar two-phase spike without constant component. Duration of the first phase: 5–100 mcsec, Duration of the second phase – not more than 300 mcsec. Amplitude of the first phase: 16.5 V Amplitude of the second phase –... - Page 47 Size 74.5х47х24 mm Weight (without 75 g batteries) Accessories Remote probe with steel electrodes. Remote probe with silver electrodes. Remote probe with silver electrodes for rectal action. Remote probe with silver electrodes for vaginal action. Genuine leather case for the device...
-
Page 48: Appendices
Appendices Transportation The devices can be transported by any kind of enclosed vehicle, except aircraft non-heated bays, in accordance with the requirements of GOST R 50444 and rules of freight. Climatic category of the devices is UHL 4.2. During transportation the package enclosing the device should be protected from atmospheric precipitation and mechanical damage. -
Page 49: Cleaning The Device
4. When you start calibration and during the whole process of calibration Do not touch the electrodes! 5. After the calibration is finished, the device will save the setting automatically and will switch over to the treatment mode. In case of need, you can do calibration for the base electrodes of the device. - Page 50 Unique construction of the removable silver electrodes in model EX715Ag allows taking them out of the casing. This is very convenient if the dirt cannot be easily removed while the electrodes are in the casing. It also allows easy replacement of the silver electrodes with gold ones.
-
Page 51: Disposal Of The Device
After the electrodes have been cleaned, insert them back one by one, each exactly in the same place it was in before cleaning: the left-side electrode should be inserted in the openings on the left side, the middle electrode — in the openings in the middle, and the right-side electrode —... - Page 52 equipment. By ensuring this device is disposed of correctly, you will help prevent potential negative consequences for the environment and human health which could otherwise be caused by inappropriate waste handling of the device. For more detailed information about recycling of this product please contact your local Civic Office, your household waste disposal service or the shop where you purchased the product.
-
Page 53: Troubleshooting
Troubleshooting Problem Cause Solution The device will No batteries in the Insert or replace not turn on battery section or the batteries the battery charge is insufficient The device will Poor batteries Replace the turn off during batteries with high- operation power ones The device will... - Page 56 © Research Laboratory of Medical Electronics “LET Medical” LLC Taganrog, Russia. All rights reserved. Printed in Russia.
Need help?
Do you have a question about the EX715Ag and is the answer not in the manual?
Questions and answers