Advertisement
Available languages
Available languages
Quick Links
B. Mounting bracket
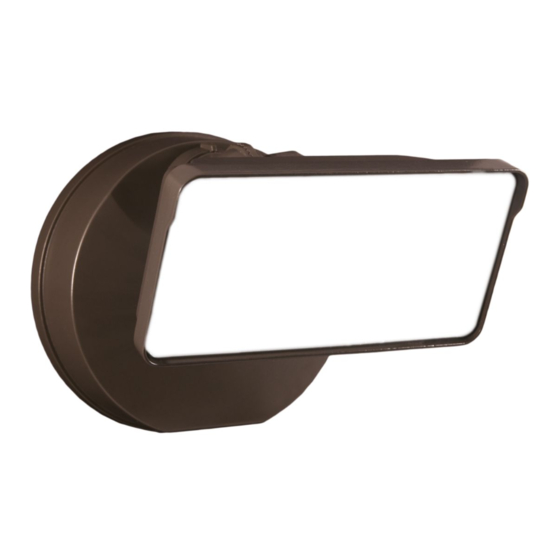
A. Light fixture
A. Light fixture
TGS3S401DSRB
TGS3S401DSRW
TGS2S402DRRB
TGS2S402DRRW
TGS2S402DSRB
TGS2S402DSRW
TGS3S403DRRB
TGS3S403DRRW
D. (2) #6-32 x 3/4 in. and (2) #8-32 x 3/4 in. junction box screws
D. (2) #6-32 x 3/4 in. and (2) #8-32 x 3/4 in. junction box screws
TGS3S301DSRB
(use the size that fits your junction box)
(use the size that fits your junction box)
D. (2) #6-32 x 3/4 in. and (2) #8-32 x 3/4 in. junction box screws
tion box screws
(use the size that fits your junction box)
TGS3S301DSRW
TGS2S302DRRB
TGS2S302DRRW
TGS2S302DSRB
TGS2S302DSRW
TGS3S303DRRB
TGS3S303DRRW
ENGLISH
ITEMS REQUIRED
(Purchase separately)
• Phillips screwdriver
• Outdoor weatherproof silicone caulking
IMPORTANT SAFETY INSTRUCTIONS
When using product, basic precautions should always be followed, including the following:
• Heed all warnings, including below warnings AND those included on product.
• Save these instructions and warnings.
• For outdoor use only.
• cULus LISTED for wet location.
• Disassembling your fixture will void the warranty.
• Your fixture is prewired and preassembled for easy installation.
WARNING
• Read and follow these instructions.
• Risk of fire/electric shock. If not qualified, consult an electrician.
• Disconnect power at fuse or circuit breaker before installing or servicing.
CAUTION
• Connect fixture to a 120 volt, 60 Hz power source. Any other connection voids
the warranty.
• Fixture should be installed by persons with experience in household wiring or by
a qualified electrician. The electrical system, and the method of electrically con-
necting the fixture to it, must be in accordance with the National Electrical Code
and local building codes.
• Fixture designed for wall or eave mount to a junction box only. Mount fixture
to a grounded, recessed-mounted standard junction box marked for use in wet
locations.
• Fixture can be mounted to an outdoor rated surface mount junction box when
used with the adapter plate kit (sold separately TGS-KIT-MTG). See kit instruc-
tions for proper installation methods.
• Suitable for wall mount or eave mount only. NOT suitable for ground mount installation.
FCC DECLARATION OF CONFORMITY
This device complies with part 15 of the FCC Rules. Operation is subject to the following
2 conditions: (1) This device may not cause harmful interference, and (2) this device must
accept any interference received, including interference that may cause undesired operation.
NOTE: This equipment has been tested and found to comply with the limits for a Class B
digital device, pursuant to part 15 of the FCC Rules. These limits are designed to provide
reasonable protection against harmful interference in a residential installation. This
Questions?/ Des questions? / ¿Preguntas? 1-800-334-6871 ConsumerProducts@cooperlighting.com
PACKAGING CONTENTS / CONTENU DE L'EMBALLAGE/ CONTENIDO DEL PAQUETE
A. Light fixture
B. Mounting bracket
PACKAGING CONTENTS
PACKAGING CONTENTS
PACKAGING CONTENTS
Appareil d'éclairage
Support de montage
Accesorio
Soporte de montaje
A. Light fixture
B. Mounting bracket
B. Mounting bracket
A. Light fixture
B. Mounting bracket
E. Adapter Plate Kit (Sold Separately)
Trousse de plaque d'adaptation
D. (2) #6-32 x 3/4 in. and (2) #8-32 x 3/4 in. junction box screws
E. Adapter Plate Kit
E. Adapter Plate Kit
(use the size that fits your junction box)
(vendue séparément)
E. Adapter Plate Kit
Kit de placa adaptadora
(se vende por separado)
#TGS-KIT-MTG
Instruction Manual / Manuel d'instructions/ Instrucciones
C. Gasket
PACKAGING CONTENTS
C. Gasket
Joint d'étanchéité
Junta
B. Mounting bracket
C. Gasket
C. Gasket
C. Gasket
F. Decorative screw cover cap
Cache-vis décoratif
E. Adapter Plate Kit
F. Decorative screw cover caps
F. Decorative screw cover caps
Cubierta tapatornillos decorativa
F. Decorative screw cover caps
F. Decorative screw cover caps
E. Adapter Plate Kit
equipment generates uses and can radiate radio frequency energy and, if not installed
and used in accordance with the instructions, may cause harmful interference to radio
communications. However, there is no guarantee that interference will not occur in a
particular installation. If this equipment does cause harmful interference to radio or tele-
vision reception, which can be determined by turning the equipment off an on, the user is
encouraged to try to correct the interference by one or more of the following measures:
• Reorient or relocate the receiving antenna.
• Increase the separation between the equipment and receiver.
• Connect the equipment into an outlet on a circuit different from
that to which the receiver is connected.
• Consult the dealer or an experienced radio/TV technician for help.
WARNING: FCC Regulations state that any unauthorized changes or
modifications to this equipment not expressly approved by the manufacturer
could void the user's authorization to operate this equipment.
SAVE THESE INSTRUCTIONS.
FOR BEST RESULTS
• Install light 8-16 feet above the ground.
• Do not mount fixture close to reflective surfaces such as windows, white walls,
white surfaces and water.
• When installing two fixtures on one switch, make sure the switch is rated for at
least a 1 A inductive load.
• When mounting the fixture, make sure the photo sensor orientation is at the
bottom.
• When mounting to a wall, make sure the fixture is 7 inches on center away from
eave and 13 inches on center away from inside corner of the exterior wall .
ADJUSTING THE LUMEN OUTPUT
• This product features selectable lumen output.
Choose between three preset lumen outputs
on the dial of the base housing before, during,
or after installation (fig. 1)
• These settings are designated by the
abbreviations located on the center dial on the
base housing (fig. 1):
- High = 3000lm (Triple Head and Single Head) or 2500lm (Twin Head Fixtures)
- Med = 2500lm (Triple Head), 2200lm (Single Head), or 2000lm (Twin Head)
- Low = 2000lm (Triple Head), 1500lm (Single Head and Twin Head)
• Use a flathead head screwdriver to rotate the dial so the arrow points toward the
desired setting.
• DO NOT USE a power tool or over-rotate the dial.
1
D. (2) #6-32 x 3/4 in. and (2) #8-32 x 3/4 in. junction box screws
2 vis nº 6 de 32 x 3/4 po et 2 vis nº 8 de 32 x 3/4 po pour boîtier
de jonction
C. Gasket
(2) cajas de empalmes de 6-32 x 3/4 pulgadas y de 8-32 x 3/4
pulgadas tornillos
G. Wire connector
Serre-fil
F. Decorative screw cover caps
Conectores de cable
1
FLOOD
FIG.1
Advertisement

Related Manuals for Cooper Lighting Halo TGS3S401DSRB


Summary of Contents for Cooper Lighting Halo TGS3S401DSRB
- Page 1 B. Mounting bracket Instruction Manual / Manuel d’instructions/ Instrucciones C. Gasket Questions?/ Des questions? / ¿Preguntas? 1-800-334-6871 ConsumerProducts@cooperlighting.com PACKAGING CONTENTS / CONTENU DE L’EMBALLAGE/ CONTENIDO DEL PAQUETE PACKAGING CONTENTS A. Light fixture B. Mounting bracket C. Gasket D. (2) #6-32 x 3/4 in. and (2) #8-32 x 3/4 in. junction box screws PACKAGING CONTENTS PACKAGING CONTENTS PACKAGING CONTENTS...
- Page 2 WARRANTY OF MERCHANTABILITY OR FITNESS FOR ANY PARTICULAR PURPOSE. so it is recessed within the back surface of the Cooper Lighting Solutions warrants to customers that, for a period of five years from the date fixture. (Figs. 6 & 7) of purchase, Cooper Lighting Solutions products will be free from defects in materials and 5.
- Page 3 IMPORTANTES INSTRUCTIONS DE SÉCURITÉ RÉGLAGE DU RENDEMENT LUMINEUX Ce produit comporte des caractéristiques de rendement Des précautions de base doivent être suivies lors de l’utilisation de ce produit, incluant : lumineux sélectionnables. Choisissez l’un des trois • Le respect de tous les avertissements incluant les avertissements ci-dessous ET rendements lumineux préréglés sur le cadran du boitier de ceux indiqués sur le produit.
- Page 4 El sistema eléctricoy el método Cooper Lighting Solutions garantit à ses clients, pendant une période de cinq ans à compter de la date de conexión eléctrica del portalámparas debe cumplir con el Código eléctrico nacio- d’achat, que ses produits Cooper Lighting Solutions sont exempts de tout défaut de matériaux et de...
- Page 5 8. Conecte la alimentación en el fusible principal/ presentar un reclamo. La reproducción de este documento sin la aprobación previa por escrito de Cooper Lighting Solutions está estrictamente prohibida. caja del disyuntor. Para solicitar ayuda, llame al 1-800-334-6871 o envíe un correo electrónico a ConsumerProducts@cooperlighting.com Impreso en China.