Advertisement
Advertisement
Table of Contents

Related Manuals for OXO Good Grips


Summary of Contents for OXO Good Grips
- Page 1 Expandable Wall-Mounted Organizer MOUNTING INSTRUCTIONS...
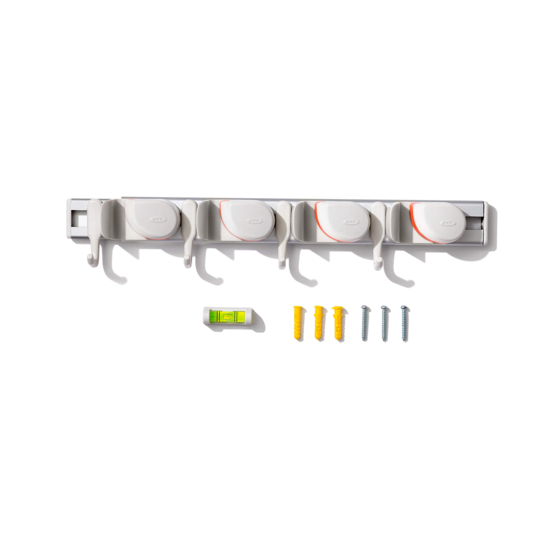
- Page 2 INCLUDES Hooks x4 Outer Rail Aluminum Inner Rail Endcap Rail Endcap CamLock™ Holders x4 Drywall Screws x4 Anchors x4...
- Page 3 DRYWALL OPTION 1” 1” 1” Determine a location for the organizer. Please Mark hole on the left side of mounting plate (A). If not mounting directly into a stud, use drywall note that the aluminum rail (B) extends past the Level mounting plate using built-in level and mark anchors (I).
- Page 4 2” min Attach aluminum rail (B) to mounting plate (A) Line up mounting plate (A) with pencil marks. Slide outer rail (B) to desired length. Be sure to by hooking from top and pushing until it clicks Arrows on mounting plate should be in up maintain a minimum 2"...
- Page 5 DRYWALL OPTION 1 ” If not mounting directly into a stud, use drywall Slide outer rail (B) back and insert support plate Fasten support plate (C) to mounting surface (C) into outer rail (B). Support plate (C) must anchors (I). TIP: Put a starter hole in the wall using screws (H) provided.
- Page 6 Side View Slide CamLock holders (F) onto aluminum rail (B). Hooks (G) attach from top of rail and snap into Insert endcaps (D & E). ™ place.
- Page 7 REMOVING/ADJUSTING HOOKS Lift hooks (G) from bottom to remove or adjust www.oxo.com their positions. Note: Camlock ™ holders (F) can only be removed by sliding them off of the rails.
Need help?
Do you have a question about the Good Grips and is the answer not in the manual?
Questions and answers