Chapters
Table of Contents

Related Manuals for Chord Symphonic


Summary of Contents for Chord Symphonic
- Page 1 Chord Electronics The Pumphouse, Farleigh Lane, East Farleigh, Kent, ME16 9NB. Great Britain. Product Communication | English +44 (0) 1622 721 444 info@chordelectronics.co.uk chordelectronics.co.uk Symphonic V.1.0 Manual...
-
Page 2: Table Of Contents
Protection against liquids & heat your purchase Dismantling & Radio Making a claim & warranty exclusions frequency interference Connecting your equipment 3.0 Getting to know Symphonic 4.0 Setting up Symphonic Placement Getting to know Symphonic Connecting an input to The top panel... -
Page 3: Safety Instructions
Chord Electronics Symphonic| Manual Safety instructions Introduction Protection against liquids & heat Dismantling & Radio Frequency interference Connecting your equipment Safety instructions 3 // 28... -
Page 4: Introduction
Dismantling & radio frequency USymphonic | Manual Protection against interference liquids & heat Connecting your equipment Introduction Our Symphonic phonostage brings advanced features and our proprietary technology to vinyl, enabling the easy integration of turntables into any system as our flagship MC phono stage. -
Page 5: Protection Against Liquids & Heat
It is advised that you do not operate the Be aware that liquids, including Symphonic in an area of direct water that has dried, can leave sunlight or on top of significant minerals that can affect the heat- producing devices. -
Page 6: Dismantling & Radio
Symphonic and its power However, for optimal and television reception. If this supply, posing a severe risk of performance, it is recommended occurs, please reconsider your electrocution and/or fire. -
Page 7: Connecting Your Equipment
Connecting your equipment Connecting your equipment Before connecting the If the power supply is Never disconnect the power cable during Symphonic to any equipment, prematurely disconnected operation. Only disconnect when Symphonic consult the manufacturer’s user Symphonic may still remain is off. If the power cable guide to confirm compatibility. -
Page 8: Warranty
Chord Electronics Symphonic | Manual Warranty Warranty period & registering your purchase Making a claim & warranty exclusions Warranty 8 // 28... -
Page 9: Warranty Period & Registering
Making a claim & warranty Symphonic | Manual your purchase exclusions Warranty period & registering your purchase At point of sale, Chord Please use the form Electronics Ltd. provides the below to record the Symphonic with a comprehensive details of your purchase... -
Page 10: Making A Claim & Warranty Exclusions
& warranty exclusions WARRANTY EXCLUSIONS: The In the unlikely event of a warranty does not cover connected claim, you must provide Chord equipment, personal injury or Electronics with the details of development natural patina of the metalwork and will be null and void... -
Page 11: Getting To Know Symphonic
Chord Electronics Symphonic | Manual Getting to know Symphonic Getting to know Symphonic The top panel The back panel Getting to know Symphonic 11 // 28... - Page 12 The top panel Getting to know Symphonic Nestling in the Choral range, To get the very most from the the Symphonic is our flagship device we recommend that you MC phono stage. The high- familiarise yourself with the user performance Symphonic uses manual.
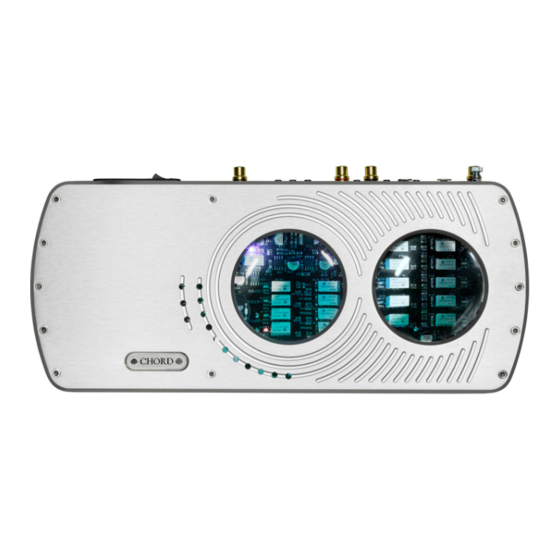
- Page 13 Chord Electronics Getting to know Symphonic The rear panel Symphonic | Manual The top panel The top panel The top panel has no user configurable options. Instead, there are 2 viewing portals. This is where you will see the LED changes when pressing the buttons on the back of the unit.
-
Page 14: The Rear Panel
Chord Electronics Getting to know Symphonic The rear panel Symphonic | Manual The top panel The rear panel The rear panel has 2 sets of inputs and output each as well as several buttons for fine tuning your sytem for optimun use. -
Page 15: Setting Up Symphonic
Chord Electronics Symphonic | Manual Setting up Symphonic Placement Connecting an input to Symphonic Connecting Symphonic to a pre amplifier Setting up Symphonic 15 // 28... - Page 16 Connecting an input to pre amplifier Symphonic Placement Whilst the Symphonic operates normally within a stack of Chord Electronics Emsable stands along with units such as the DAVE and Etude, it is recommended that you allow the device to breathe.
-
Page 17: Connecting An Input To
Connecting an input to Symphonic In order to connect up 3) Ensure that you pay attention Symphonic to a source, you to the left and right channels must connect the cables from for your device. The left your Vinyl player to one of the output from your vinyl player inputs listed below. -
Page 18: Connecting Symphonic
Symphonic to equipment including the a pre amplifer. Left channel Symphonic. connections are on the left, right 4) Allow both the Symphonic channel connections are on the right, each output is identical. to and other units to power begin;... -
Page 19: How To Navigate Symphonic
Chord Electronics Symphonic | Manual How to navigate Symphonic Basic navigation Selecting the correct gain Selecting the correct impedence Selecting input Rumble filter The LED window How to navigate Symphonic 19 // 28... - Page 20 Rumble filter Selecting the correct The LED window impedance Basic navigation Symphonic has no display but 2 viewing portals which will light LEDs with the selected features of Symphonic. To access those features use the buttons on the back of the unit.
-
Page 21: Selecting The Correct Gain
Chord Electronics Basic navigation Selecting input Symphonic | Manual Selecting the correct gain Rumble filter Selecting the correct The LED window impedance Selecting the correct gain The set of 4 buttons located above the outputs can be used to select the correct input gain for pairing your vinyl player with Symphonic perfectly. -
Page 22: Selecting The Correct Impedence
The set of 6 buttons located above the inputs can be used to select the correct input impedance for pairing your vinyl player with Symphonic perfectly. Using the illustration below and the manual from your vinyl player, select the optimum input impedance by pressing the appropriate switch in. -
Page 23: Selecting Input
The LED window impedance Selecting input To select the input on your Symphonic locate the button on the left hand most side of the unit. This button will allow you to switch between the Balanced and unbalanced inputs on your Symphonic. -
Page 24: Rumble Filter
Chord Electronics Basic navigation Selecting input Symphonic | Manual Selecting the correct gain Rumble filter Selecting the correct The LED window impedance Rumble filter The rumble filter is a form of Rausch filter. This is essentially a high pass filter that is used to... -
Page 25: The Led Window
Symphonic. For each setting that you make on the selector switches on the back of the Symphonic, a pair of coloured LEDs will light on the boards through the viewing portals. Each pair represent the left and right channls of each selection. -
Page 26: Special Features
Chord Electronics Symphonic | Manual Special features Earthing Special features 26 // 28... -
Page 27: Earthing Point
Use the earthing point on your Symphonic to connect to the earth connection on your turntable. The earthing point is situated just above the right phono output on the Symphonic.
Need help?
Do you have a question about the Symphonic and is the answer not in the manual?
Questions and answers