
Related Manuals for RCF RDNET CONTROL 8


Summary of Contents for RCF RDNET CONTROL 8
- Page 1 OWNER MANUAL MANUALE D’USO RDNET CONTROL 8 - ‘RDNET’ CONTROL UNIT - UNITA’ DI CONTROLLO DELLA RETE “RDNET”...
- Page 3 INDEX INDICE ENGLISH SAFETY PRECAUTIONS INSTALLATION DESCRIPTION FRONT PANEL REAR PANEL SUBNET CONNECTION NOTES ABOUT THE RDNET SOFTWARE RDNET SOFTWARE INSTALLATION LOUDSPEAKER BYPASS SWITCH RDNET SOFTWARE (release 1.0.0.68) ASSIGN AN OBJECT TO A GROUP ASSIGN AN OBJECT TO AN ALGORITHM ASSIGNING MULTIPLE OBJECTS TO AN ALGORITHM EXAMPLE OF ANOTHER OBJECT RDNET SOFTWARE REPAIR AND REMOVE...
- Page 4 (screw anchors, screws, brackets not supplied by RCF etc.), which must guarantee the security of the system / installation over time, also considering, for example, the mechanical vibrations normally generated by transducers.
- Page 5 Also check the suitability of the support surface to which the product is anchored (wall, ceiling, structure, etc.), and the components used for attachment (screw anchors, screws, brackets not supplied by RCF etc.), which must guarantee the security of the system / installation over time, also considering, for example, the mechanical vibrations normally generated by transducers.
- Page 6 PC software. The audio device overall configuration can be saved as file in the PC and later reloaded. It is possible to synchronize all parameter values of the RDNET CONTROL 8 unit to the ones of the PC software preset.
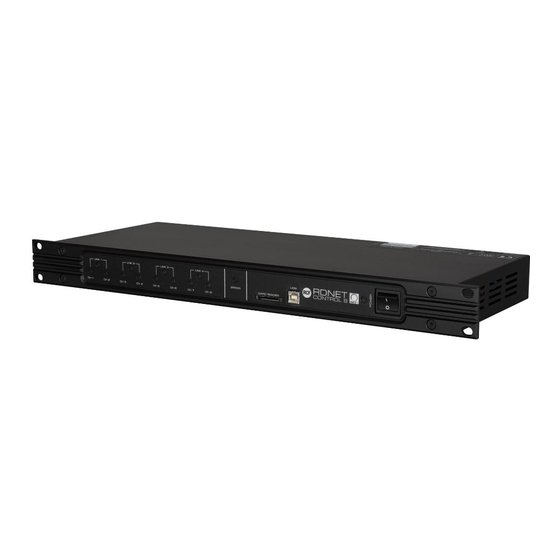
- Page 7 When using 4 subnet pairs, the max. total quantity of EIA RS-485 audio devices that can be connected is 128. USB / ETHERNET RDNET CONTROL 8 ex.: 4 SUBNET PAIRS LINKED IN RINGS FRONT PANEL CH 1 LED indicating (when flashing) data transmission / reception in the subnet 1.
- Page 8 REAR PANEL ‘Powercon’ connector for the power cable. Operating voltage: 100 ÷ 240 V ac (50 – 60 Hz). ETH ETHERNET port (to link a remote computer). RJ45 CONNECTOR (CAT5 cable): | 1 | 2 | 3 | 4 | 5 | 6 | 7 | 8 | 1- TX+ 2- VDD 3- TX–...
- Page 9 32 compatible audio devices (linked in ‘daisy-chain’). Example: the RDNET CONTROL 8 port 1 is connected to the DATA IN input of a RCF TTL-55A loudspeaker, of which DATA LINK parallel output is linked to the input of the following TTL55-A loudspeaker.
- Page 10 It is not allowed to modify or change or try to decompile this software. In no event shall RCF S.p.A. be liable to end-users for any damage whatsoever, including but not limited to financial damages for loss of business profits or business information due to the software use or inability to use this product.
- Page 11 If internet is available, click the YES button to open the web page where it is possible to download the last release of the ‘.NET Framework’ software, then install it. If ‘.NET Framework 4.0’ has been previously installed, the RDNET software wizard starts. Click the NEXT >...
- Page 12 Click the NEXT > button to proceed. The wizard reminds you that it is necessary to disconnect the USB cable between the computer and the RDNET CONTROL 8 unit in order to install USB drivers properly. Check if the USB cable is actually disconnected before proceeding.
- Page 13 As soon as the installation ends (no error), the ‘Installation Complete’ window will appear. Click the CLOSE button to exit. Connect the USB cable or ETHERNET between the computer and the RDNET CONTROL 8 unit before running the software.
- Page 14 LOUDSPEAKER BYPASS SWITCH In every RDNET compatible loudspeaker, when pressing the BYPASS switch, it is possible to recall a previously stored preset and disable the loudspeaker keyboard. The following flowchart indicates the BYPASS function: Loudspeaker not linked to RDNET (device not listed, the ‘LINK’ LED is off) The BYPASS switch is pressed ? The keyboard configuration is applied The loudspeaker loads its stored preset...
- Page 15 10 times a second, each device is checked in a single daisy-chain and (when required) the current status is sent to the PC software. Run the software (in Windows: Start > Programs > RCF Group > RDNet > RDNet): it appears the main window with 8 menus: ‘File’, ‘Synoptic’, ‘Options’, ‘View’, ‘Mode’, ‘Algorithm’, ‘Advanced’, ‘?’.
- Page 16 SYNOPTIC Add Object: it opens a window where it is possible to add one or more objects (among all available, which correspond to different loudspeakers, e.g. RCF TTL55A) to the synoptic. First choose the line (to which the loudspeaker is linked), then the loudspeaker (double-click the respective object): the object is added to the synoptic.
- Page 17 Save All: it stores all configurations to all loudspeaker memories. Net Config: it opens the ‘NetConfigView’ window, in which it is possible to connect the RDNET CONTROL 8 unit via Ethernet after setting both the IP address (‘Server IP’) and the port (‘Server Port’).
- Page 18 he assIgNmeNT of aN obJecT To aN aLgoRIThm aND ITs cReaTIoN caN be maDe fRom The obJecT ITseLf ‘a ’ see The ssIgN aN obJecT To aN aLgoRIThm maNuaL secTIoN ID: it indicates the progressive number (starting from 0) of current algorithms. Kind: algorithm kind.
- Page 19 BUTTONS up: it moves up (one location) the selected line (corresponding to an object), function that is useful to sort more lines. dw: it moves down (one location) the selected line (corresponding to an object), function that is useful to sort more lines. del: it deletes the selected line (corresponding to an object), attention: the object will no longer be affected by the algorithm settings! send: it sends the algorithm settings to the loudspeaker corresponding to the...
- Page 20 The 3 parameters (to be set) in the window on the right: Group: quantity of subwoofers grouped at the same position Distance: distance (in metres) between a subwoofer group axis and those adjacent Radius: curve radius (in metres). In each line (corresponding to an object): Loc.Delay: audio signal delay value (indicated in the equivalent distance in metres, max.
- Page 21 CONTROL 8 unit. Router Firmware Upgrade: RDNET CONTROL 8 unit firmware upgrade. 1. Link the RDNET CONTROL 8 unit to the computer through the USB cable and turn it on without connecting any loudspeaker. 2. Wait until its front panel LEDs stop flashing (after c.10-15 seconds).
- Page 22 SYNOPTIC When online, the RDNET CONTROL 8 unit sequentially scans all audio devices, which are automatically assigned to digital addresses. The software synoptic is compared to the real settings and any difference is pointed out: the loudspeaker objects (or of any other audio device) shown in the software without...
- Page 23 The first line on the top includes the Group parameter, the Mute and Solo commands e the Recall indicator. Click the double arrow >> to open the equalization setting window. Note: This button is disabled if the loudspeaker is assigned to a group. At the centre: pairs of level bars, a pair per each loudspeaker way: Low, Low, Mid, High.
- Page 24 It is possible to set up to 8 selectable filters: DISABLED: the filter is disabled. SHELVING_HIGH: increase or decrease the level of all frequencies above the selected frequency by the specified amount. L (+) SHELVING_LOW: increase or decrease the level of all frequencies below the selected frequency by the specified amount.
- Page 25 ASSIGN AN OBJECT TO A GROUP Each object can be assigned to a group in order to get parameter value changes common to all objects that belong to the same group. Right-click on the object and choose ‘Assign to Group’, then the proper group (from A to S, for example ‘A’).
- Page 26 It is possible to rename the group of the selected object by choosing ‘Group rename’. In the ‘Group Rename’ window, write a name in the ‘Alias’ text line and then click OK. ASSIGN AN OBJECT TO AN ALGORITHM Every object can be assigned to an algorithm, so that it is affected by its parameters (common to all assigned objects).
- Page 27 ASSIGNING MULTIPLE OBJECTS TO AN ALGORITHM It is possible to select more objects at the same time drawing a rectangle (with the mouse, press and hold its left button) that includes all necessary objects. Then, all selected objects can be assigned to the same algorithm (right-click one object). For instance, if choosing the CURVE algorithm (suitable for subwoofers), the loudspeaker list is properly sorted, example: when selecting 3 subwoofers, the second (the central one) will not be delayed.
- Page 28 - Select ‘Repair RDNet’ to repair the software - Select ‘Remove RDNet’ to remove the software. Then click the Finish button to proceed. An alternative way to remove the software (in Windows): Start > Programs > RCF Group > RDNet > Uninstall Click ‘Sì’ (Yes) to confirm.
- Page 29 SPECIFICATIONS Network: - EIA RS-485 standard connection - up to 8 managed subnets - max. 32 audio devices connected to each subnet RDNET connections: - 8 RJ 45 connectors (EtherCon) for CAT 5 cable - 8 three-pole XLR plugs (as alternative to RJ 45) PC connection: - local: USB (type B) - remote (alternative to USB): Ethernet (RJ 45)
-
Page 31: Table Of Contents
INDICE ITALIANO AVVERTENZE PER LA SICUREZZA INSTALLAZIONE DESCRIZIONE PANNELLO FRONTALE PANNELLO POSTERIORE COLLEGAMENTO DELLE SOTTORETI NOTE SUL SOFTWARE RDNET INSTALLAZIONE DEL SOFTWARE RDNET FUNZIONAMENTO DEL TASTO BYPASS DEI DIFFUSORI UTILIZZO DEL SOFTWARE RDNET (rif. ver. 1.0.0.68) ASSEGNAZIONE DI UN MODULO AD UN GRUPPO ASSEGNAZIONE DI UN MODULO AD UN ALGORITMO ASSEGNAZIONE MULTIPLA DI MODULI AD UN ALGORITMO ESEMPIO DI UN ALTRO MODULO... -
Page 32: Avvertenze Per La Sicurezza
L’installazione e l’utilizzo errati del prodotto esimono la RCF S.p.A. da ogni responsabilità. ATTENZIONE ATTENZIONE: Per prevenire i rischi di fiamme o scosse elettriche, non esporre mai questo prodotto alla pioggia o all’umidità. - Page 33 Verificare inoltre l’idoneità del supporto (parete, soffitto, struttura ecc., al quale è ancorato il prodotto) e dei componenti utilizzati per il fissaggio (tasselli, viti, staffe non fornite da RCF ecc.) che devono garantire la sicurezza dell’impianto / installazione nel tempo, anche considerando, ad esempio, vibrazioni meccaniche normalmente generate da un trasduttore.
-
Page 34: Installazione
TTL31-A, ecc.) ad un computer (PC avente sistema operativo Microsoft Windows®) per effettuarne la verifica del funzionamento ed ottenerne il controllo remoto. I dispositivi audio sono collegati all’unità di controllo RDNET CONTROL 8 che svolge la funzione principale di indirizzamento dei dati tra il PC ed i dispositivi stessi. -
Page 35: Pannello Frontale
Nella configurazione con 4 coppie di sottoreti ad USB / ETHERNET anello, il numero massimo di dispositivi audio è 128. RDNET CONTROL 8 es.: 4 COPPIE DI SOTTORETI AD ANELLO PANNELLO FRONTALE CH 1 LED indicante, tramite lampeggio, la trasmissione o ricezione dei dati nella sottorete 1. -
Page 36: Pannello Posteriore
PANNELLO POSTERIORE Connettore di tipo “Powercon” per il collegamento del cavo d’alimentazione. Tensione di funzionamento: 100 ÷ 240 V ac (50 – 60 Hz). ETH Porta ETHERNET per il collegamento ad un computer. CONNETTORE RJ45 (uso con cavo CAT5): 1- TX+ 2- VDD 3- TX–... -
Page 37: Collegamento Delle Sottoreti
32 dispositivi audio compatibili posti in cascata. Ad esempio: la porta nr.1 dell’unità di controllo RDNET CONTROL 8 è collegata all’ingresso DATA IN di un diffusore RCF TTL55-A, la cui uscita parallela DATA LINK è inviata all’ingresso del successivo diffusore TTL55-A. -
Page 38: Note Sul Software Rdnet
Prima di installare una nuova versione del software, è necessario disinstallare quella precedente (se presente) eseguendo Start > Programmi > RCF Group > RDNet > Uninstall ed eventualmente scollegare il cavo USB tra il computer e l’unità di controllo RDNET CONTROL 8. Per iniziare l’installazione del software, eseguire il file setup.exe (presente nella cartella “setup”). - Page 39 Se il collegamento a Internet è disponibile, cliccare su YES per accedere alla pagina web dove si può scaricare la versione più recente del programma “.NET Framework” per poi installarla. Se “.NET Framework 4.0” è presente, si procede con la procedura guidata (“wizard”) dell’installazione.
- Page 40 Cliccare su NEXT > per procedere. È mostrata una nota informativa sulla necessità di scollegare il cavo USB tra il computer e l’unità di controllo RDNET CONTROL 8 per l’installazione ottimale dei driver USB. Verificare che il cavo USB sia effettivamente scollegato prima di procedere.
- Page 41 Nell’attesa è visualizzata una barra indicante lo stato dell’installazione. Al termine dell’installazione (se andata a buon fine), apparirà la finestra “Installation Complete” (installazione completata). Cliccare su CLOSE per terminare la procedura d’installazione. Collegare il cavo USB oppure la rete ETHERNET tra il computer e l’unità...
-
Page 42: Funzionamento Del Tasto Bypass Dei Diffusori
FUNZIONAMENTO DEL TASTO BYPASS DEI DIFFUSORI In ciascun diffusore compatibile con RDNET, premendo il tasto “BYPASS” è possibile richiamare una precedente configurazione salvata in memoria e disabilitare l’intervento della tastiera. Il seguente schema logico indica il principio di funzionamento del tasto “BYPASS”: Diffusore non collegato alla rete RDNET (dispositivo non enumerato, il LED “LINK”... -
Page 43: Utilizzo Del Software Rdnet (Rif. Ver. 1.0.0.68)
Circa 10 volte al secondo viene verificato lo stato di ciascun dispositivo nella singola catena e, alla richiesta, è inviata al software la situazione corrente. Eseguire il programma (in Windows: Start > Programmi > RCF Group > RDNet > RDNet): è visualizzata la finestra principale con 8 menù: “File”, “Synoptic”, “Options”, “View”, “Mode”, “Algorithm”, “Advanced”, “?”. - Page 44 SYNOPTIC (quadro sinottico) Add Object: si apre una finestra dove è possibile aggiungere più moduli (tra quelli disponibili, corrispondenti a diversi tipi di diffusori, ad es. RCF TTL55A) al quadro sinottico. Scegliere prima la sottorete (“line”, alla quale il diffusore è collegato) e poi il diffusore (doppio clic sul modulo): il modulo sarà...
- Page 45 Save All: salva tutte le configurazioni nelle memorie dei diffusori acustici. Net Config: apre la finestra “NetConfigView”, nella quale è possibile effettuare il collegamento all’unità RDNET CONTROL 8 via Ethernet dopo aver impostato sia l’indirizzo IP (“Server IP”) sia la porta (“Server Port”).
- Page 46 L’ assegNazIoNe DI uN moDuLo aD uN aLgoRITmo e La sua cReazIoNe sI effeTTua DaL moDuLo sTesso “a ”). veDeRe La sezIoNe DeL maNuaLe ssegNazIoNe DI uN moDuLo aD uN aLgoRITmo ID: indica la numerazione progressiva (partendo dal numero 0) degli algoritmi presenti. Kind: tipo di algoritmo.
- Page 47 BOTTONI up: sposta in alto (di una sola locazione) la linea selezionata (corrispondente ad un modulo); funzione utile per ordinare più linee. dw: sposta in basso (di una sola locazione) la linea selezionata (corrispondente ad un modulo); funzione utile per ordinare più linee. del: cancella la linea selezionata (corrispondente ad un modulo);...
- Page 48 Nella finestra sono mostrati 3 parametri sulla destra: Group: impostazione del numero di subwoofer raggruppati in un punto. Distance: distanza (in metri) tra l'interasse di un gruppo di subwoofer e di quelli adiacenti. Radius: raggio (in metri) della curvatura. Nelle righe corrispondenti a ciascun modulo: Loc.Delay: indicazione del singolo ritardo del segnale audio (espresso nella distanza equivalente in metri, max.
- Page 49 Firmware Upgrade: procedura di aggiornamento del firmware di un diffusore acustico (o di un altro dispositivo). 1. Collegare l’unità di controllo RDNET CONTROL 8 al computer tramite il cavo USB oppure effettuare il collegamento ETHERNET. Accenderla senza collegare alcun diffusore ed attendere fino al termine del lampeggio dei LED (dopo circa 10-15 secondi).
- Page 50 ’ riferirsi sempre aL rispeTTivo maNuaLe d Come esempio, è mostrato a fianco il modulo relativo al diffusore RCF TTL55-A. Nell’angolo in alto a sinistra, sono mostrati (nell’ordine): il punto esclamativo (se presente) indicante differenze tra i dati presenti sul software e quelli reali, la sottorete (linea) a cui il dispositivo audio è...
- Page 51 In alto sono mostrati i comandi relativi al gruppo di appartenenza Group, la disattivazione Mute, l’ascolto singolo Solo e l’indicatore Recall (richiamo delle impostazioni precedenti alle modifiche). Il pulsante con la doppia freccia >> apre la finestra relativa all’equalizzazione; nota: questo pulsante è...
- Page 52 È possibile impostare fino ad 8 filtri e, per ciascuno, selezionarne il tipo: DISABLED: filtro disabilitato. SHELVING_HIGH: aumenta o diminuisce il livello (secondo un valore specifico) di tutte le frequenze sopra quella selezionata. L (+) SHELVING_LOW: aumenta o diminuisce il livello (secondo un valore specifico) di tutte le frequenze sotto quella selezionata.
-
Page 53: Assegnazione Di Un Modulo Ad Un Gruppo
ASSEGNAZIONE DI UN MODULO AD UN GRUPPO Ciascun modulo può essere assegnato ad un gruppo in modo da ottenere modifiche dei parametri comuni a tutti i moduli appartenenti allo stesso gruppo. Cliccare con il pulsante destro del mouse sul modulo e scegliere “Assign to Group”, poi il gruppo (da A a S) di assegnazione (es. -
Page 54: Assegnazione Di Un Modulo Ad Un Algoritmo
È possibile abbinare un nome al gruppo del modulo selezionato tramite la funzione “Group rename”. Nella finestra “Group Rename”, inserire un nome nella riga di testo “Alias” e poi cliccare su OK. ASSEGNAZIONE DI UN MODULO AD UN ALGORITMO Ciascun modulo può essere assegnato ad un algoritmo, in modo che sia soggetto ai parametri (comuni a tutti i moduli assegnati) dello stesso algoritmo. -
Page 55: Assegnazione Multipla Di Moduli Ad Un Algoritmo
ASSEGNAZIONE MULTIPLA DI MODULI AD UN ALGORITMO È possibile selezionare più moduli contemporaneamente creando un rettangolo con il mouse (tenendo premuto il tasto sinistro) che comprenda tutti i moduli necessari Successivamente, tutti i moduli selezionati possono essere assegnati allo stesso algoritmo (cliccando con il tasto destro del mouse su uno dei moduli). -
Page 56: Esempio Di Un Altro Modulo
- scegliere “Repair RDNet” per riparare il software; - scegliere “Remove RDNet” per disinstallarlo. Successivamente, cliccare su Finish per procedere. Un altro modo per disinstallare il software (selezionare in Windows): Start > Programmi > RCF Group > RDNet > Uninstall Cliccare su “Sì” per confermare. -
Page 57: Dati Tecnici
DATI TECNICI Rete: - standard EIA RS-485 - gestione di max. 8 sottoreti - max. 32 dispositivi audio collegati a ciascuna sottorete Collegamenti RDNET: - 8 connettori RJ 45 (EtherCon) con cavo CAT 5 - 8 connettori XLR tripolari femmine (alternativi agli RJ 45) Collegamento al PC: - locale: USB (tipo B) - remoto (alternativo a quello USB): Ethernet (RJ 45) - Page 60 HEADQUARTERS: RCF S.p.A. Italy tel. +39 0522 274 411 e-mail: info@rcf.it RCF UK tel. 0844 745 1234 Int. +44 870 626 3142 e-mail: info@rcfaudio.co.uk RCF France tel. +33 1 49 01 02 31 e-mail: france@rcf.it RCF Germany tel. +49 2203 925370 e-mail: germany@rcf.it...
Need help?
Do you have a question about the RDNET CONTROL 8 and is the answer not in the manual?
Questions and answers