Advertisement
Table of Contents
- 1 Warranty and Disclaimer
- 2 Table of Contents
- 3 Features and Specifications
- 4 The Terminal Strip
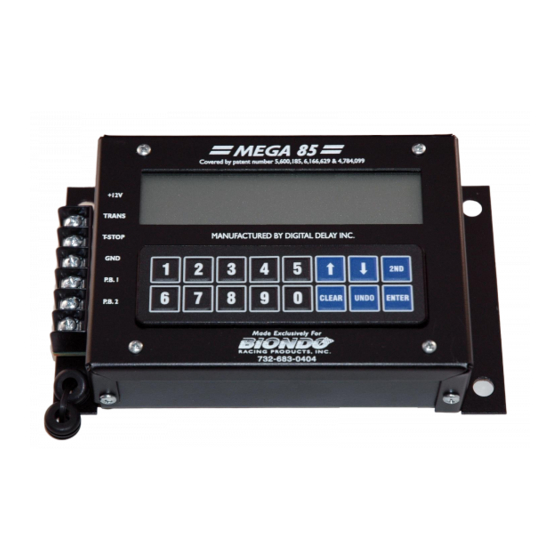
- 5 The Keypad
- 6 Setting Dial-Ins and Delay Times
- 7 Setting and Displaying the Tap Up/Down
- 8 How Late
- 9 Understanding the Drivers Reaction Tester
- 10 Setting Push-Button Mode and Interrupt Time
- 11 Understanding and Connecting a By-Pass Push-Button
- 12 Setting Stage Times
- 13 Setting & Using Starting Line Enhancer Time (S.L.E.)
- 14 Mounting and Wiring the Unit
- Download this manual
Mega
WARRANTY AND DISCLAIMER
DIGITAL
MANUFACTURES AGAINST DEFECTS IN MATERIALS AND WORKMANSHIP
FOR A PERIOD LIMITED TO 1 YEAR FROM THE DATE OF SHIPMENT,
PROVIDED THE PRODUCTS HAVE BEEN STORED, HANDLED, INSTALLED,
AND USED UNDER PROPER CONDITIONS.
The company's liability under this limited warranty shall extend only to the
repair or replacement of a defective product, at the company's option. DIGITAL DELAY
INC. disclaims all liability for any affirmation, promise, or representation with respect to
the products.
The customer agrees to hold DIGITAL DELAY INCORPORATED harmless
from, defend, and indemnify DIGITAL DELAY INC. against damages, claims, and
expenses arising out of subsequent sales of or use of DIGITAL DELAY INC. products, or
products containing components manufactured by DIGITAL DELAY INC. and based
upon personal injuries, deaths, property damage, lost profits, and other matters which
BUYER, its employees, or sub-contractors are or may be to any extent liable, including
without limitation, penalties imposed by the Consumer Product Safety Act (P.L. 92-573)
and liability imposed upon any person pursuant to the Magnuson-Moss Warranty Act (P.L.
93-637), as now in effect or as amended hereafter.
No warranties expressed or implied, are created with respect to the company's
products except those expressly contained herein.
disclaimers and limitations contained and rely on no other warranties or affirmations.
60
and Mega 85 w/ 4 Stage Timer
DELAY
INC.
2036 Fillmore Street
Davenport, Ia. 52804
www.racedigitaldelay.com
WARRANTS
THE
The customer acknowledges the
1
563-324-1046
PRODUCTS
IT
Advertisement
Table of Contents

Related Manuals for DIGITAL DELAY Mega 60


Summary of Contents for DIGITAL DELAY Mega 60
-
Page 1: Warranty And Disclaimer
The customer agrees to hold DIGITAL DELAY INCORPORATED harmless from, defend, and indemnify DIGITAL DELAY INC. against damages, claims, and expenses arising out of subsequent sales of or use of DIGITAL DELAY INC. products, or products containing components manufactured by DIGITAL DELAY INC. and based... -
Page 2: Table Of Contents
Digital Delay, Inc., the company that invented and patented the Crossover, designed and manufactured the Mega 60 & Mega 85 w/ 4 Stage Timer simply to be the best and one of the most advanced multi-function box on the market. The Mega 60 has one output and the Mega 85 w/4 Stage Timer has two separate outputs, they both have two separate push-button inputs. -
Page 3: Features And Specifications
Features and Specifications Features: • Microprocessor controlled timing • Discrete I/O (input - output) construction • Retains all numbers even with power disconnected from unit • Large illuminated display for easy reading of information day or night • Self-test mode on all display functions •... -
Page 4: The Keypad
The Keypad The keypad is made up of numerical and function keys that are used to control the information that is either entered into the unit or shown on the displays. The numerical keys 0-9 are used in conjunction with the function keys to enter new information. -
Page 5: Setting Dial-Ins And Delay Times
Setting Dial-In Times To set a new Dial-In time, press the 1 key, then check the location of arrows on the screen, press the 2ND key to move the arrows to the desired side of the screen you want to change. Press the CLEAR key and the selected display side will go blank indicating the unit is ready to accept the new time. -
Page 6: Setting Push-Button Mode And Interrupt Time
Setting Push-button Mode and the Push-button Interrupt Time To set the Push-button Mode, press the 4 key, the Push-button Mode is shown on the left screen. The left most digit shows “1”, “ 2” or “3” to indicate which Push-button Mode the unit is in, when in Push-button Mode 3, the P.B. 1 on terminal strip starts both the primary and secondary delays, this is done by pressing and then releasing the pushbutton on the first desired yellow light to start delay one. -
Page 7: Setting Stage Times
Setting Stage One and Two Times To set a new stage time, press the 5 key to display the current stage times. Then check for the location of arrows on the screen, press the 2ND key to move the arrows to the desired side of screen you what to change. Press the CLEAR key and the selected display side will go blank indicating the unit is ready to accept the new time. -
Page 8: Setting & Using Starting Line Enhancer Time (S.l.e.)
Setting & Using the Starting Line Enhancer Press the 4 key, to bring up the Starting Line Enhancer on the right side of the screen. If 1 thru 5 is displayed the Starting Line Enhancer is turned on, if a 6 displayed, the Starting Line Enhancer will be turned off. To set the Starting Line Enhancer mode, with arrows displayed on the right side of the screen, press the arrow keys until the desired number is displayed. -
Page 9: Mounting And Wiring The Unit
Mounting the Unit For complete viewing of the large LCD, care should be taken when mounting the unit to make sure that the display is angled towards the driver’s eyes. Before mounting the unit, place box in the desired location and check the legibility of the display in both day and night conditions.
Need help?
Do you have a question about the Mega 60 and is the answer not in the manual?
Questions and answers