
Related Manuals for Agrident APR600


Summary of Contents for Agrident APR600
- Page 1 Agrident GmbH, Steinklippenstr. 10, D-30890 Barsinghausen Phone +49 5105 582573-10 - Fax +49 5105 582573-17 APR600 User Manual F i r m w a r e v 0 . 3 5 a n d h i g h e r...
- Page 2 Agrident GmbH. Agrident GmbH reserves the right to make changes to any and all parts of this documentation without obligation to notify any person or entity of such changes.
-
Page 3: Table Of Contents
APR600 User Manual Content Introduction ......................5 Before you start ....................5 Reader Hardware ....................6 Parts of the APR600 ..................6 Accessories ....................7 Connecting the USB cable ................8 Controlling the APR600 ..................8 APR600 Display ................... 9 4.1.1... - Page 4 APR600 User Manual Print ......................31 7.5.1 Print Last Group .................. 31 7.5.2 Select Group ..................32 7.5.3 Print All Groups ................... 32 7.5.4 Print Barcode ..................32 7.5.5 Setup Printer ..................32 7.5.5.1 Set Printer Type ................32 7.5.5.2 Search BT Printer ................33 Setup ......................
-
Page 5: Introduction
Magnetic-USB cable and any USB power source. Please note that computers can usually not supply more than 500mA on USB ports, hence charging the APR600 over a USB port of a computer takes longer than charging it from the Agrident USB power supply. -
Page 6: Reader Hardware
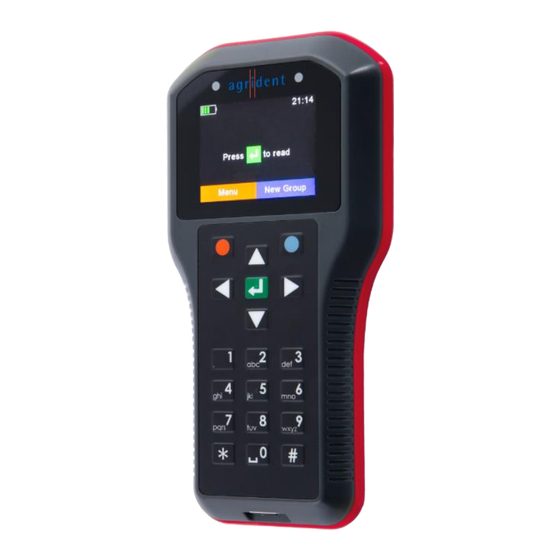
This chapter describes the APR600 hardware including all accessories. 3.1 Parts of the APR600 The dimensions of the APR600 are 190x98x40 millimeters and it has a weight of only 280 grams. It provides a good reading performance, a large 2.4 inch color TFT display, two status LEDs above the display, a speaker and a vibrating motor. -
Page 7: Accessories
USB is five meter and this can already lead to problems in practice (slower charging or USB failures). In addition, the APR600 Kit contains the transport box 'ATB400', an USB power supply 'APS500' for charging the reader from the mains and the car charger 'ACC500' that allows to charge the device from a cigarette lighter socket. -
Page 8: Connecting The Usb Cable
For disconnecting USB, just pull the cable away from the device (3). 4 Controlling the APR600 The APR600 has a large color display and 19 keys which are used for controlling the device. The Reader is activated by pressing the key in the middle of the directional pad. -
Page 9: Apr600 Display
APR600 User Manual 4.1 APR600 Display 4.1.1 Home Screen After the reader is switched on, the following home screen appears: Battery status Connection status Current time indicator USB, BT, WLAN Current function of Current function of the left soft-key * the right soft-key * * A 'Softkey' is a key that performs different functions depending on the associated screen display. -
Page 10: The Status Symbols At The Top Of The Display
APR600 User Manual 4.1.2 The status symbols at the top of the display There is a status bar in the first display line. Beside the time (on the right side) it provides information about the battery status and the different interfaces. -
Page 11: Wlan Status
The USB status is shown in the middle at the top of the display: When the APR600 is connected to the USB port of a computer or to a stand- ard USB power supply, the white USB symbol is shown. Charging the battery takes longer here compared to using the Agrident USB power supply. -
Page 12: The Status Leds Above The Display
Solid Battery is fully charged The multicolor LEDs are only used when the APR600 is in Suspend-Mode (display is switched off but the device is connected to USB and hence is being charged). When switched on, the battery symbol in the display indicates the charging status. -
Page 13: Using The Keyboard
4.3 Using the keyboard The APR600 has 19 keys in order to allow the easy and convenient operation of the reader. There is a directional pad with an ENTER key in the middle and there are two additional soft-keys below the display which change their function depending on the current action. - Page 14 Switches on the APR600. Starts a reading attempt from the home screen. Enters menu items and confirms selections there. Moves to the next field in Task-Mode.
- Page 15 APR600 User Manual The following examples show some more details on the keyboard usage: Beside the usage of the alphanumeric keys, it is possible to change the character of the currently selected position using the button for simple text input fields.
-
Page 16: Operating States
60 seconds. If the APR600 is connected to USB while it is switched off, the MSC mode is activated. Then the reader is attached to the computer as a mass storage device and file transfer is possible. Once key is pressed, the device will switch on and use CDC-Mode right away. -
Page 17: Reading Transponders
APR600 User Manual 6 Reading Transponders 13/02/20 Page 17 of 52... - Page 18 APR600 User Manual 13/02/20 Page 18 of 52...
- Page 19 APR600 User Manual After a tag has been read, the display will show the information as in the following screenshot: VID – Visual ID EID – Electronic ID Name of the current group, here: ‘group 9’ Number of records in the current group, here: ‘20’...
-
Page 20: Menu Items
APR600 that allows the collection of comprehensive data. For further information about this operating mode please contact your local distributor. For the navigation through the APR600 menus, all seven keys might be used. The directional keys have the following functions here: Operation... -
Page 21: Menu Structure
APR600 User Manual 7.1 Menu structure The following table shows the menu structure of the APR600 including submenus and options. Options or actions are shown in italic and the default values for options are marked with ‘ * ’. Main Menu... - Page 22 APR600 User Manual Main Menu sub menu submenu submenu submenu Setup Reader Settings Volume & Vibrator Set Volume 0% (OFF) 60% * 100% Vibrator On/Off Vibrator ON * Vibrator OFF Display Set Date/Time [set values manually] Set Switch Off Time...
-
Page 23: New Group
APR600 User Manual 7.2 New Group In the memory of the APR600, records are organized in groups. One group can contain up to 10.000 records maximum. A new record is created for every transponder which has been read. If you do not wish to create new records for duplicate reads, please enable the ‘Animal Counter’ –... -
Page 24: Tasks
If no Task-Definitions have been uploaded, this menu item will not be shown at all. Please contact your local distributor for further details about Task-Mode. If Task-Definitions are present on the APR600, this menu item will be visible automatically. When entering the submenu ‘Tasks’, the following entries are shown:... - Page 25 … Decrease number … Next field … Previous field … Confirm input When this field is shown, the APR600 will start scanning for a transponder after has been pressed. After a tag has been read successfully, the display will show the EID and ask for a confirmation. By pressing ‘OK’...
-
Page 26: Data
APR600 User Manual 7.4 Data The ‘Data’ menu contains items for showing and deleting data. It is also possible to search an uploaded Database for a particular entry based on either the input of the VID or an EID (read transponder), but only if a Database has been uploaded. - Page 27 (FDX-B or HDX) is shown as well. Please press in order to open the appropriate Database record. If there is no Database entry available for this record, the APR600 will not show in the display. You may also edit fields by selecting them and pressing if they are allowed to be editable in the Database definition.
-
Page 28: Clear Data
APR600 User Manual 7.4.2 Clear data It is possible to delete collected data on the APR600. There are different options for erasing data, also depending on the way they have been collected in. As already explained earlier in this man- ual, the standard records are saved in groups. -
Page 29: Memory Info
APR600 User Manual 7.4.3 Memory Info This menu item shows information concerning the amount of collected data (how many records in how many groups), the number of entries in the currently uploaded Linklist or Database and how many Task definitions have been up- loaded. -
Page 30: Search Eid In Db
This menu item searches the Database for a matching entry on the basis of the electronic ID. As soon as the transponder was read, the APR600 will start looking up this number in the Database. Please note that this menu item is only visible, if a Database has been uploaded. -
Page 31: Print
Bluetooth printer. After the ‘Print’ menu was left, the connection to the printer will be dropped and the APR600 tries to re-connect to the configured primary Bluetooth partner again (if in Master Mode). The huge advantage is that the user does not need to select a different Bluetooth device just for printing. -
Page 32: Select Group
It is also possible to print a barcode of a particular EID. This can be useful if you want to label blood samples, for example. In order to be able to print the EID as a barcode, the APR600 has to read the transponder first. -
Page 33: Search Bt Printer
APR600 User Manual 7.5.5.2 Search BT Printer Before you can start printing via Bluetooth, the APR600 has to be paired with a printer. Therefore, the reader has to scan for available Bluetooth devices first. Once this menu item has been se- lected, the APR600 will start the scan. -
Page 34: Setup
EID within the same group again. If not activated, it is possible to do that - the APR600 does not check for double reads then. Decide whether the Animal Counter should be activated or... -
Page 35: Set Read Mode
The APR600 also allows to use the ‘Continuous Read’ mode. The RFID engine will not be de- activated after a tag has been read. It will continue scanning until the ‘Continuous Read Time’... -
Page 36: Wireless Sync On/Off
HDX transponders. Since it is not possible to synchronize mobile readers wired in the field, Agrident readers offer a feature called ‘Wireless Synchronization’. This function was mainly invented in order to allow mo- bile devices the operation close to stationary readers without interfering with them. -
Page 37: Volume & Vibrator
APR600 User Manual 7.6.1.5 Volume & Vibrator The APR600 provides a speaker and a vibrating handle for signalization in addition to the LEDs and the display. These can be configured in this menu. After selecting ‘Volume & Vibrator’, a new menu is shown. -
Page 38: Set Date/Time
7.6.2.2 Set Switch Off Time The ‘Switch Off Time’ determines after which period (of no action) the APR600 enters suspend mode. Any action, like a key press, will reset this timer. Please also see chapter 5 for further details. The maximum possible time is 60 minutes, but please keep in mind that this reduces the op- erating time. -
Page 39: Set Language
7.6.3.1 Setup Scale The APR600 is able to receive the weight from indicators which can send it via Bluetooth. There are different scale types supported, also from the major brands on the market. This function can only be used for Task-Mode and the Data-Base-Function, where the so called ‘Weight-from-... -
Page 40: Setup Printer
The Bluetooth Mode determines if the APR600 should initiate the connection to another device (Master Mode) or if other devices should be able to connect to the APR600. Per default, Bluetooth is not activated (OFF), so it must be switched on first. Then you have to decide whether the APR600 should be the device initiating the connection (Master) or the other device (Slave). - Page 41 Bluetooth partner and will try to connect to it automatically and permanently, if the reader is configured to Master Mode. Usually there should not be too many Bluetooth devices in use with the APR600. In order to prevent unnecessary scans when switching from one Bluetooth partner to another one, the reader stores a ‘Bluetooth Device History’.
- Page 42 HID is used for ‘typing in’ the EID sent via Bluetooth into text fields of applications running on the host device. This removes the need to develop a serial interface for the reader. The APR600 is connected to the host as a ‘virtual keyboard’. When the cursor is in a text field in the app running on the host, the EID is filled into this field after a transponder has been read.
- Page 43 Mode: Bluetooth Mode plus Bluetooth Profile in brackets Status: Connection Status, here: tries to connect to remote device In this case the APR600 is connected to the remote device. When the connection would drop, the reader would try to reconnect to the configured Bluetooth partner until suc- cessful.
-
Page 44: Wlan
If WPA2 is selected as authentication method, the ‘passphrase’ config- ured for the Access Point has to match with the one set for the APR600. Please note that the passphrase is also case-sensitive! The easiest way for allowing the APR600 to join the Access Point is to let the Access Point work as a DHCP server. - Page 45 When the APR600 joined an Access Point or another device has joined the APR600 (in case the reader creates the Access Point), this does not mean that communication is possible already. In addition, a UDP or TCP connection must...
- Page 46 Host do not show anything yet because there is no con- nection. The Status ‘connecting AP’ means that the APR600 is trying to connect to the configured Access Point but this was not successful yet. By pressing , the display switches to the next screen.
-
Page 47: Configuration
‘Set Factory Configuration’ puts all settings back to the fac- tory default values. This might be useful if particular set- tings have been changed and the APR600 is not operating as intended anymore. Please note that this action cannot be undone. Settings different from the factory defaults have to be made again. -
Page 48: Show Battery Info
When fully charged, the battery info shows ‘100%’. Below the charging indication, the display shows rough es- timates concerning the remaining operating time in standby mode (APR600 running but RFID engine is off), here 22 hours, and in continuous read mode, here 7 hours and 10 minutes. -
Page 49: Battery Precautions
APR600 User Manual 8 Battery precautions There are some important things to consider concerning the rechargeable battery pack. The al- lowed charge temperature is between 0°C to +45°C (32°F to 113°F). Discharging is allowed within the range of -20°C to +60°C (-4°F to 140°F) – this is the allowed operating temperature for the battery. -
Page 50: Safety And Care
The manufacturer accepts no liability for damage resulting from improper use or use not con- sistent with that described in these operating instructions. ▪ The APR600 Reader contains no parts that can be repaired by the user. For this reason the Reader Electronic may only be repaired by authorized customer service personnel. -
Page 51: Warranty
11 International approvals CE marking Hereby, Agrident GmbH declares that the APR600, if used according to the instructions, is in compliance with the essential requirements and other relevant provisions of the Radio Equip- ment Directive (RED) 2014/53/EU. For use in all countries of the EU. -
Page 52: Trouble Shooting
APR600 User Manual 12 Trouble shooting For any problem please contact us: Agrident GmbH Steinklippenstr. 10 30890 Barsinghausen Germany Telephone +49 5105 582573-10 +49 5105 582573-17 Mail: support@agrident.com 13/02/20 Page 52 of 52...
Need help?
Do you have a question about the APR600 and is the answer not in the manual?
Questions and answers