Tylo Steam Home Manual
Steam room
Hide thumbs
Also See for Steam Home:
- Installation & user manual (65 pages) ,
- Installation & user manual (17 pages)
Table of Contents
Advertisement
Advertisement
Table of Contents

Related Manuals for Tylo Steam Home


Summary of Contents for Tylo Steam Home
- Page 1 1609 Steam Home/Commercial Art.nr. 2900 4160...
-
Page 2: Table Of Contents
Table of contents General ..................................20 Steam room .................................... 20 Location of steam generator ..............................21 Control panel ..................................21 Temperature cut-out ................................21 Main power switch .................................. 21 Floor and drain..................................22 Ventilation ....................................22 The steam generator functions: .............................. 22 Automatic emptying ................................ -
Page 3: General
IMPORTANT! General • The steam piping must not have any sharp bends. Installation diagram of Steam Home and Commercial • Do not direct the steam jet against walls, seats or (Fig. 1) other objects. Always keep a space of at least 80 cm clear in front of the steam nozzle. -
Page 4: Location Of Steam Generator
Location of steam generator The steam generator must be installed horizontally, at such a Installation must be carried out by an authorized electrician height above the floor so that the drainage pipe will have a and authorized plumber. The steam generator must be good fall to its drain. -
Page 5: Floor And Drain
The steam generator functions: All Tylö steam generators of the Home and Commercial type are equipped with: • A stainless steel water tank Acid-proof stainless steel tube elements • • Automatic emptying 60 minutes after the steam bath has been switched off •... -
Page 6: Dimensional Information
Manual descaling must be performed regularly in accordance with the following table. Operating time in hours before descaling. Operating hours at different water Tylö hardnesses (dH) Tylö liquid Solvent Sulphamic descaling (number (grams) agent (ml) 0.01-1°dH 1-4°dH of bags) 250* 12-15 250ml for home 500ml for commercial... -
Page 7: Pipework Installation
To avoid banging, the water connection between the copper Pipework installation piping (internal dia. min. 12 mm) and the steam generator to consist of approx. 1 meter of flexible armored rubber hose. Important! Before the incoming water connection is made to To be done by an authorized plumber. -
Page 8: Drainage
The steam pipe should have as few bends as possible, and with a reduced reaction ability or similar, there must be these must be smoothly rounded with a minimum of 5 cm protection present that will prevent unintentional contact with radius. -
Page 9: Electrical Installation
Electrical installation Electrical installation may only performed by an authorized electrician. The steam generator power supply line comes directly from the electrical distribution board. In this line it is an advantage to install a circuit breaker to be able to temporarily switch off the steam generator during servicing. The circuit breaker may be switched off no sooner than 90 minutes after completed use of the steam room.. -
Page 10: Steam Room Wiring Diagram
Steam room wiring diagram (Fig. 14.) Fig. 14 Steam generator Thermistor Control panel Optional external switch 5 = Electrical distribution board. Optional circuit breaker (must always be switched on!) Connection terminals To connect the temperature sensor, etc., to the control panel with quick connectors, refer to the circuit board overview (Fig. 19) All the connectors must be in place before the power is switched on. -
Page 11: Lighting
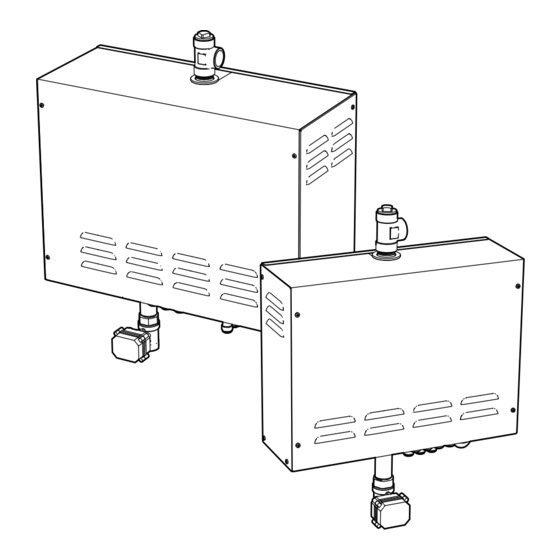
COMPLETELY WITHOUT VOLTAGE! Multisteam Steam Home and Steam Commercial 9/12/15kW offer the possibility of expanding and connecting together up to three facilities served by the same control panel. This creates the possibility of unbroken steam production in all circumstances. When more than one generator is connected together, one of them is set up to be the "Primary" (factory setting) and is the one which controls the other generators. -
Page 12: Modular Connector Description
During operation the steam generator is emptied automatically after 4 hours (factory setting, via settings > auto emptying can be altered) in order to ensure good water quality. When 2 or 3 generators are connected together, the ”Secondary”-generators are emptied at 20 minute intervals after the ”Primary” has been emptied. The connections between the generators use a low power cable (4 core) with an RJ10 connector, (Fig. - Page 13 Connecting components to the modular contacts (maximum cable cross-sectional area for RJ10. 0.9mm/ 0.2mm², AWG24) Unit Position Comment Temp. sensor (10 kΩ) Must be NTC type. May also be connected at Position 4. External switch without LED Both constant and impulse deactivation work. indication External switch with LED indication 2-3-4...
-
Page 14: Spare Parts List
Spare parts list Home Commercial... -
Page 15: Troubleshooting
Troubleshooting Neither steam nor heat are present in the steam room. Fault cause: Fuses in the distribution board have blown/tripped. Checks and troubleshooting. Remedy: Change the fuse(s). In the case of incorrect operation, first check: Fault cause: Water is not leaving the steam generator. Remedy: Open the tap that is connected to the pipe for That the control panel and steam generator are •... -
Page 16: Error Codes
Loud banging in the water lines when the solenoid valve opens or closes. TEST 1. Fault cause: The incoming water piping to the steam Inspecting the build-up of limescale in the water tank. generator is not satisfactorily secured. Unscrew the lock nut at the top of the steam generator. Use Remedy: Using clamps, firmly secure the incoming water a torch to see inside the tank. - Page 17 About 5 seconds of continuous failure is required to trigger an error code. Check that the electrode pins Operation is interrupted and error During are touching the electrode tube or alternatively the code clearing takes place operation cables. Error code may be triggered by water with a immediately.
- Page 18 Operation is interrupted and Shown when the primary has lost contact with the rebooting takes place. For steam connected secondary unit, system cures itself. During production, emptying takes place Check, does the secondary unit have voltage? Test operation immediately after rebooting is by removing and refitting the RJ10 synchronization completed in case there is water in Contact lost with the heater...
Need help?
Do you have a question about the Steam Home and is the answer not in the manual?
Questions and answers