Advertisement
Available languages
Available languages
Quick Links
Advertisement

Related Manuals for Risco VUpoint RVCM52P13


Summary of Contents for Risco VUpoint RVCM52P13
- Page 1 VUpoint Bullet Varifocal P2P PoE Network Camera Model: RVCM52P13 Quick Guide...
- Page 2 Language Page...
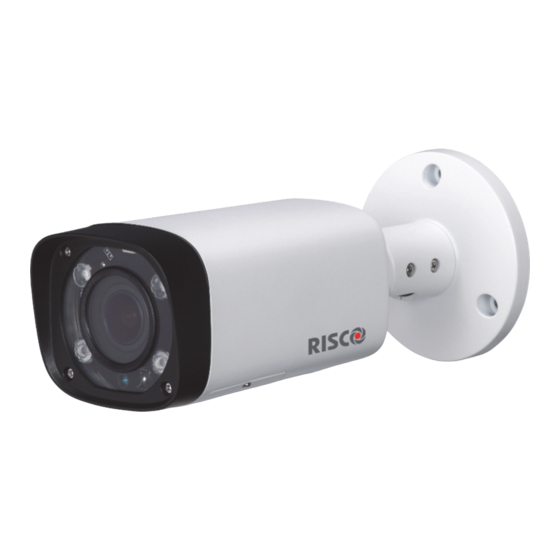
- Page 3 Bullet Varifocal Network Camera Components Note: Note: The camera settings to factory default mode), long press the Reset for 10 seconds; the light turns off...
-
Page 4: Defining Ip Camera Settings
Defining IP Camera Settings Step 1 Your PoE supported camera can be used without electrical connection by using only the Ethernet cable. To achieve this, connect one end of the Ethernet cable (LAN) to the camera Ethernet port and the other side to: 1. -
Page 5: Setting The Focal Length
Setting the Focal Length This feature allows you to set the appropriate focal length of the video according to the required field-of-view. Step 1 From the IP Cameras screen, click the “…” button below according to the MAC address. Figure 1 IP Camera Settings Step 2 In the screen that opens, select the UI/CGI checkbox and click “Save”. - Page 6 Step 5 Open the Config Tool to view the camera list on your network. Click the (refresh) button at the top of the screen to refresh the Camera list Step 6 Click the (Explorer) button according to the MAC address of the camera or open another Internet browser and enter the IP address of the camera in the address bar.
- Page 7 Step 7 In the screen below you can make changes to the focal length of the video. Click the “Zoom and Focus” button. Zoom and Focus button Step 8 On the right hand side of the screen below you can zoom in or zoom out (set the focal length) by clicking on the “+“/”-“...
- Page 8 Composants de la caméra IP PoE P2P varifocale (avec objectif à focale variable) Remarque : Remarque : pour réinitialiser la caméra (c'est-à-dire rétablir ses paramètres par défaut), appuyez Logement pour carte SD sur le bouton de réinitialisation pendant 10 secondes ; le voyant s'éteint.
- Page 9 À un injecteur PoE connecté à votre réseau ou 2. À un routeur ou un switch compatible PoE. Vous pouvez également alimenter votre caméra IP à l'aide d’un adaptateur 12 V CC fourni par RISCO. Étape 2 Connectez-vous à l'application Installateur Admin sur la page www.riscocloud.com/installer.
- Page 10 L’installateur peut maintenant accéder à l'interface Web de la caméra IP pour une durée d'une heure. Étape 3 Accédez au site Internet de RISCO Group, cliquez sur l'onglet « SUPPORT », puis sélectionnez « Téléchargement ». Étape 4 Cliquez deux fois sur « VUpro Config Tool » pour télécharger l’outil ConfigTool sur votre...
- Page 11 Étape 5 Ouvrez l'outil de configuration pour afficher la liste des caméras sur votre réseau. Cliquez sur le bouton (actualiser) situé en haut de l'écran pour actualiser la liste des caméras. Étape 6 Cliquez sur le bouton (Explorateur) en fonction de l'adresse MAC de la caméra, ou ouvrez une autre fenêtre de navigateur Internet et saisissez l'adresse IP de la caméra dans la barre d'adresses.
- Page 12 Étape 7 Dans l'écran ci-dessous, vous pouvez modifier les réglages de focale de la vidéo. Cliquez sur le bouton « Zoom and Focus ». Bouton Zoom et mise au point Étape 8 La zone située à droite de l'écran ci-dessous vous permet d'effectuer un zoom avant ou arrière (c'est-à-dire de régler la focale) ;...
- Page 13 Componentes de la cámara de red varifocal Bullet Nota: Nota: Para activar los ajustes de fábrica de la cámara, mantenga presionado el botón Reset Ranura para durante 10 segundos y la luz se tarjeta SD apagará. Botón Reset Superficie de montaje Taco Plantilla de...
- Page 14 Definir la configuración de la cámara IP Paso 1 Su cámara compatible con PoE se puede utilizar sin conexión eléctrica, solo mediante el cable Ethernet. Para ello, conecte un extremo del cable Ethernet (LAN) al puerto Ethernet de la cámara y el otro extremo a: Un inyector PoE conectado a la red, o bien 2.
- Page 15 Ajustar la distancia focal Esta función permite ajustar la distancia focal del vídeo apropiada según el campo de visión requerido. Paso 1 Desde la pantalla de cámaras IP, pulse el botón “…” correspondiente a la dirección MAC. Figura 5 Ajuste de la cámara IP Paso 2 En la pantalla que aparece, seleccione la casilla de verificación UI/CGI y pulse “Save”.
- Page 16 Paso 5 Abra la herramienta de configuración para ver la lista de cámaras de su red. Pulse el botón (actualizar) en la parte superior de la pantalla para actualizar la lista de cámaras Paso 6 Pulse el botón (Explorer) correspondiente a la dirección MAC de la cámara o abra otra ventana de Internet e introduzca la dirección IP de la cámara en la barra de direcciones.
- Page 17 Paso 7 En la siguiente pantalla puede hacer cambios en la distancia focal del vídeo. Pulse el botón “Zoom and Focus”. Botón Zoom and Focus Paso 8 A la derecha, en la pantalla siguiente, puede alejar o acercar la imagen (ajustar la distancia focal) pulsando los botones “+“/”-“, respectivamente, o deslizando la barra central.
- Page 18 Telecamera IP P2P PoE da Esterno – Componenti Note: Nota: Per le impostazioni di fabbrica della telecamera, Alloggiamento premere il pulsante di Reset per Scheda SD circa 10 secondi fino a quando la luce non si spegne Pulsante di reset Telecamera Viti Autofilettanti Tasselli Dima Superfice...
- Page 19 Configurazione della Telecamera IP Passo 1 La telecamera supporta il PoE e può essere utilizzata senza connessione elettrica utilizzando solo il cavo Ethernet. Per ottenere ciò, collegare un'estremità del cavo Ethernet (LAN) alla porta Ethernet della telecamera e l'altro lato a: Un Iniettore PoE connesso sulla propria rete oppure 2.
- Page 20 Impostazione della Lunghezza Focale Questa funzione consente di impostare la lunghezza focale appropriata della Telecamera in base al campo di vista richiesto. Passo 1 Dalla Schermata Telecamere IP premere “…” accanto al MAC Address della telecamera alla quale modificare il campo visivo. Figura 7 Settaggio Telecamera IP Passo 2 Nella schermata che appare mettere il flag su UI/CGI e cliccare su “Salva”.
- Page 21 Passo 5 Aprire lo strumento di configurazione per visualizzare l'elenco delle telecamere sulla rete. Fare clic sul pulsante (Aggiorna) nella parte superiore dello schermo per aggiornare l'elenco. Passo 6 Fare clic sul pulsante (Esplora risorse) di fianco all'indirizzo MAC della telecamera o aprire un altro browser Internet e inserire l'indirizzo IP della telecamera nella barra degli indirizzi.
- Page 22 Bottone Zoom e messa a fuoco Passo 8 Sul lato destro dello schermo (vedere immagine sotto riportata) si può ingrandire o ridurre l’immagine (impostare la lunghezza focale) facendo click rispettivamente sui pulsanti "+" / "-", o facendo scorrere la barra al centro. Nota: Non è...
- Page 24 RISCO, for a period of (i) 24 months from the date of delivery of the Product ( the “Warranty Period”). This Limited Warranty covers the Product only within the country where the Product was originally purchased and only covers Products purchased as new.
- Page 25 Software and applications distributed or made available by RISCO in conjunction with the Product (with or without the RISCO brand), including, but not limited to system software, as well as P2P services or any other service made available by RISCO in relation to the Product, are not covered under this Limited Warranty.
- Page 26 WERE FORESEEABLE OR RISCO HAS BEEN INFORMED OF THEIR POTENTIAL EMC Compliance Statement: Hereby, RISCO Group declares that this equipment is in compliance with the essential requirements and other relevant provisions of Directive 2014/30/EU. For the CE Declaration of Conformity please refer to our website: www.riscogroup.com...
- Page 27 Contacting RISCO RISCO Group is committed to customer service and Product support. You can contact us through our website (www.riscogroup.com) or at the following telephone and fax numbers: United Kingdom Belgium (Benelux) Israel Tel: +44-(0)-161-655-5500 Tel: +32-2522-7622 Tel: +972-3-963-7777 support-uk@riscogroup.com support-be@riscogroup.com...
- Page 28 Increase the separation between the equipment and receiver. Connect the equipment into an outlet on a circuit different from that to which the receiver is connected. Consult the dealer or an experienced radio/TV technician for help. © RISCO Group, 03/2018. All rights reserved. 5IN2741 B...
Need help?
Do you have a question about the VUpoint RVCM52P13 and is the answer not in the manual?
Questions and answers