
Related Manuals for Clear Vue Cyclones CV1800


Summary of Contents for Clear Vue Cyclones CV1800
- Page 1 Clear Vue Cyclones CV1800 and CVMAX Installation Guide Clear Vue Cyclones 145 Nix Road Liberty, SC 29657 888-299-0221 www.clearvuecyclones.com...
-
Page 2: Disclaimers & Warnings
Disclaimers & Warnings WARNING: All persons, by purchasing a motorized dust collection system, motor, or individual parts from CLEAR VUE CYCLONES, or using these instructions which are provided as suggestions only, agree to the following disclaimer: Installing and/or operating this motorized dust collection system, or use of individual parts, involves the risk of serious bodily injury or even death. - Page 3 This page is intentionally left blank.
-
Page 4: Table Of Contents
Installing the Filter Stack Assembly (filtered systems only) ......22 Modifying the Collection Drum Lid ..............23 Installing the Collection Drum and Final Adjustments ........24 Electrical – Single-Phase Motors ..............25 Electrical – Three-Phase Motors ..............27 CV1800 and CVMAX Installation Guide © Clear Vue Cyclones 2018... -
Page 5: Dimensional Drawing
Dimensional Drawing CV1800 and CVMAX Installation Guide © Clear Vue Cyclones 2018... -
Page 6: Cyclone Components
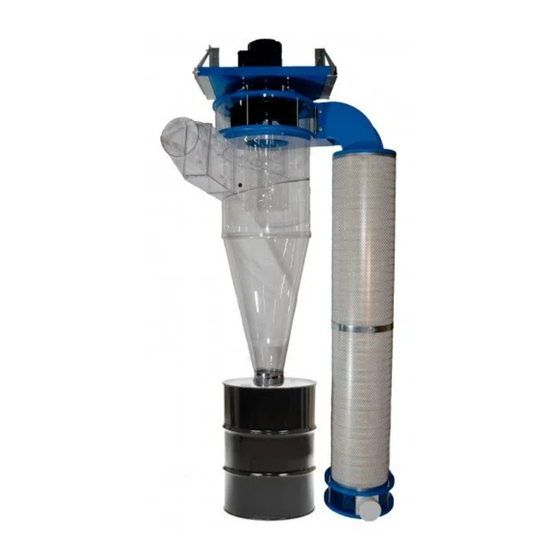
8” Exhaust on non- filtered systems) Intake Chute Cyclone Body Filters 6” Flex Hose Collection Drum* Filter Clean Out Box* *Collection Drum, Wall Mounting Brackets and Filter Clean Out Box sold separately. CV1800 and CVMAX Installation Guide © Clear Vue Cyclones 2018... -
Page 7: Specifications
** Lower ceiling height installations available. Please contact Customer Service at 888-299-0221 for more details. *** System weight only. Collection drum, Wall Mounting Brackets and Filter Clean Out Box not included. CV1800 and CVMAX Installation Guide © Clear Vue Cyclones 2018... -
Page 8: Installation Tools
• (½) sheet of ¾” plywood or MDF • Wood glue • Nails • ½” thick by 1” wide gasket or weather stripping *Wall Mounting Brackets and Filter Clean Out Box are available for purchase at www.clearvuecyclones.com. CV1800 and CVMAX Installation Guide © Clear Vue Cyclones 2018... -
Page 9: Box Contents
(4) ¼”-20 x 1-½” hex bolts • Taper-lock bushing with (3) bolts Motor Box: • Leeson motor o Motor key will be taped to motor – do not discard! CV1800 and CVMAX Installation Guide © Clear Vue Cyclones 2018... -
Page 10: Installing Clear Vue Wall Mounting Brackets
*For brackets purchased after 02/01/2016. Please contact Customer Service for assembly instructions for brackets purchased prior to this date. CV1800 and CVMAX Installation Guide © Clear Vue Cyclones 2018... -
Page 11: Building Your Own Wall Mounting Brackets
5. Attach the assembled bracket sides to the mounted bracket back using (4) #12 x 2-¼” screws. The tops and outside edges of the components should align. CV1800 and CVMAX Installation Guide © Clear Vue Cyclones 2018... -
Page 12: Constructing The Hanger Plate & Motor Assembly
” x 1” rubber a. Leave the ¼”-20 nuts above and ¼”-20 flat bushing washer below the hanger plate loose as they will be used to level the cyclone after it is hung. CV1800 and CVMAX Installation Guide © Clear Vue Cyclones 2018... - Page 13 Do NOT turn the motor on until the system is completely assembled, including the collection drum. Doing so may cause the circuit breaker to trip, physical damage to the system and/or bodily harm. CV1800 and CVMAX Installation Guide © Clear Vue Cyclones 2018...
-
Page 14: Attaching The Impeller
There may also be up to a ∕ ∕ ” – ” gap between the taper-lock bushing and the impeller hub. ∕ 6. Firmly tighten the setscrew against the motor key using a ” hex key. CV1800 and CVMAX Installation Guide © Clear Vue Cyclones 2018... -
Page 15: Hanging The Motor/Impeller Assembly
Do NOT turn the motor on until the system is completely assembled, including the collection drum. Doing so may cause the circuit breaker to trip, physical damage to the system and/or bodily harm. CV1800 and CVMAX Installation Guide © Clear Vue Cyclones 2018... -
Page 16: Assembling The 90° Filter Transition (Filtered Systems Only)
Attach the transition end plate using (4) #6 x 1-¼” sheet rock screws. Do not caulk the seams of the 90° Filter Transition until it is installed on the blower housing. CV1800 and CVMAX Installation Guide © Clear Vue Cyclones 2018... -
Page 17: Attaching The 90° Filter Transition (Filtered Systems Only)
Do not remove the white block of wood mounted to the inside of your blower housing. This block counters the sound as the impeller blade passes by the larger opening of the blower housing, reducing noise. CV1800 and CVMAX Installation Guide © Clear Vue Cyclones 2018... -
Page 18: Attaching The Straight 8" Exhaust (Non-Filtered Systems Only)
Do not remove the white block of wood mounted to the inside of your blower housing. This block counters the sound as the impeller blade passes by the larger opening of the blower housing, reducing noise. CV1800 and CVMAX Installation Guide © Clear Vue Cyclones 2018... -
Page 19: Attaching The Blower Housing To The Cyclone Body
The motor plate will not sit flush with the top of the blower housing by design. It is not necessary to seal the seam between the cyclone and blower housing, or the seam between the blower housing and motor plate, with silicone. CV1800 and CVMAX Installation Guide © Clear Vue Cyclones 2018... -
Page 20: Installing The Intake And Leveling The Cyclone
This hole allows for a small amount of air movement in the area above the inner ramp in order to prevent dust from accumulating over time. Do not plug this hole! CV1800 and CVMAX Installation Guide © Clear Vue Cyclones 2018... -
Page 21: Building Your Own Filter Clean Out Box (Filtered Systems Only)
Use ½” thick by 1” wide gasket or weather stripping around the inside edge of the cover plate for an airtight seal. e. Use wood screws to secure the cover plate in place during use. CV1800 and CVMAX Installation Guide © Clear Vue Cyclones 2018... -
Page 22: Assembling The Flangeless Filter Stack (Filtered Systems Only)
6. If you purchased a filter clean out box from us, it will be caulked once the filter stack is installed. Filter Clean Out Box available for purchase at www.clearvuecyclones.com CV1800 and CVMAX Installation Guide © Clear Vue Cyclones 2018... -
Page 23: Installing The Filter Stack Assembly (Filtered Systems Only)
3. If you purchased a Filter Clean Out Box from us, caulk the seams where the PETG wrapper meets the MDF top and bottom. Completed Filter Stack Assembly CV1800 and CVMAX Installation Guide © Clear Vue Cyclones 2018... -
Page 24: Modifying The Collection Drum Lid
It is recommended to have at least 1” of distance between the base of the cyclone and top of the collar to allow for room to remove the lid. You may need to shorten the height of your collar accordingly. CV1800 and CVMAX Installation Guide © Clear Vue Cyclones 2018... -
Page 25: Installing The Collection Drum And Final Adjustments
Pre-drill holes in the hanger plate. b. Screw the hanger plate to the horizontal member of the wall mounting brackets using either 1-¼” sheet rock screws or ¼”-20 x 1-¼” bolts (not included). CV1800 and CVMAX Installation Guide © Clear Vue Cyclones 2018... -
Page 26: Electrical - Single-Phase Motors
Electrical – Single-Phase Motors Clear Vue Cyclones highly recommends the use of a professional, licensed electrician to complete the wiring and any electrical work associated with this installation. Significant damage to your system and/or bodily harm can result. The Leeson 5HP motor is designed to rotate either clockwise or counter-clockwise. - Page 27 2. If you did not purchase the prewired Electrical Box and wish to use a 110v switch to power your system, we have included a relay with your shipment for this purpose. Please use the following wiring diagram: CV1800 and CVMAX Installation Guide © Clear Vue Cyclones 2018...
-
Page 28: Electrical - Three-Phase Motors
Electrical – Three-Phase Motors Leeson recommends the use of wire lugs in lieu of wire nuts to secure all connections. CV1800 and CVMAX Installation Guide © Clear Vue Cyclones 2018...
Need help?
Do you have a question about the CV1800 and is the answer not in the manual?
Questions and answers