Table of Contents
Advertisement
Quick Links
Advertisement
Table of Contents

Related Manuals for Hide-A-Hose HS5000


Summary of Contents for Hide-A-Hose HS5000
- Page 1 HS5000 INSTALLATION GUIDE 14490 167th Ave SE Monroe, WA 98272 (360) 863-0775...
-
Page 2: Table Of Contents
This Manual assumes that the installer has working knowledge and experience installing traditional Central Vacuum Systems. It is critical that only parts supplied by Hide-a-Hose Inc. be used in the installation. Parts include screws, seals, washers, hoses, sweep 90’s, 45’s, etc. -
Page 3: Plan The Installation
Placement of the inlets should, if possible, be located in a hallway or in other areas that do not have high visibility. Plan pipe runs Carefully read the section in this guide on “pipe runs”. There are also diagrams showing four typical pipe runs. HS5000 INSTALLATION GUIDE - 1 -... -
Page 4: Rough-In
Up Orientation In an up orientation (hose exiting the valve towards the ceiling), most people find it Align more convenient with the valve mounted at the height of the light switch outlet. Light Switch - 2 - HS5000 INSTALLATION GUIDE... -
Page 5: New Construction
1.5 inches (3.8 cm). Install the pipe into the fitting. Glue the pipe into the fitting, making sure it seats all the way to the ridge of the pipe fitting. Install the mud cover. HS5000 INSTALLATION GUIDE - 3 -... -
Page 6: Pipe Run Dos & Don'ts
Carefully inspect the pipe to make sure the inside is smooth and that the pipe is round and undamaged. Only Hide-a-Hose special sweep 90’s, 45’s, and 22.5’s can be in the section of pipe that stores the hose. - Page 7 Try to avoid back to back 90’s, if at all possible. It is important to design the pipe runs so the hose is stored on one plane. End of hose Hose stored on two different planes. HS5000 INSTALLATION GUIDE - 5 -...
-
Page 8: Low Voltage Wire
Using a portable source of vacuum, check the system for sealed vacuum. Sealed vacuum at the valve should not vary more than three to five inches from the sealed vacuum at the power unit. - 6 - HS5000 INSTALLATION GUIDE... -
Page 9: Typical Pipe Runs
It is important to keep the hose stored on the same plane. Only Hide-a-Hose special sweep 90’s, 45’s, and 22.5’s can be in the section of pipe that stores the hose. HS5000 INSTALLATION GUIDE - 7 -... - Page 10 Up two floors needs a strong power unit. Align valve with top of electrical switch - 8 - HS5000 INSTALLATION GUIDE...
-
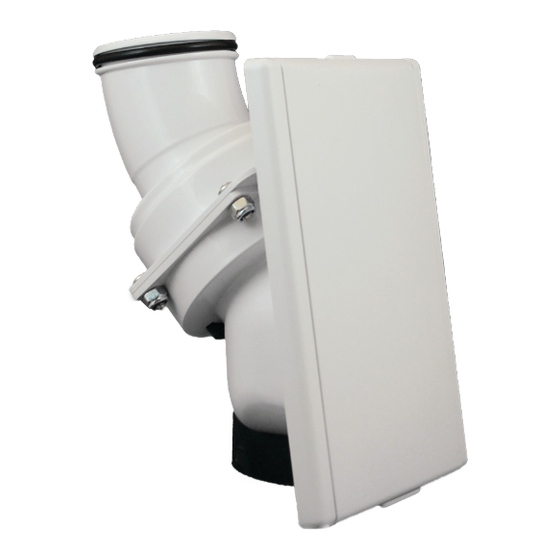
Page 11: Trim
Insert the valve assembly into the rough-in frame. Switch Align Align the four holes in the valve assembly with the holes frame in the frame. Secure with the holes four screws included in the trim kit. - 9 - HS5000 INSTALLATION GUIDE... -
Page 12: Retrofit An Existing Home
Installation of pipe runs and trim can follow same instructions as for new construction. - 10 - HS5000 INSTALLATION GUIDE... -
Page 13: Addendum (100716)
HS5000 valve in a Down Orientation Avoid Potential Issue One of the advantages of the HS5000 is that it can adjust for wall thicknesses from 1/2” to 1 1/2”. As shown in Figure 1, with 1/2” sheetrock, the pipe fitting is pushed all the way to the back of the wall. Problems can arise when the bottom hole is too far forward.
Need help?
Do you have a question about the HS5000 and is the answer not in the manual?
Questions and answers