Table of Contents
Advertisement
Quick Links
GATE LOCK
Installation Guide
Guide d'installation
Guía de instalación
Required tools
Outils nécessaires
Herramientas necesarias
Tape measure
Ruban à mesurer
Cinta métrica
Tournevis à tête Phillips no 2
Wood bits
Mèche à bois
Broca para madera
Recommendations
If you have an out-swinging gate, it is recommended that
you reverse your hinges to create an in-swinging gate for
added security.
The following instructions are for OUT-SWINGING gates.
Instructions for IN-SWINGING gates are available at
www.yardlock.com
Install latch assembly on gate interior.
1
Installez l'ensemble du loquet sur la face intérieure de la porte.
Monte el pestillo en el interior del portón.
1.1
Insert latch arm into latch and position on gate.
Insérez le bras du loquet
Inserte el brazo en el pestillo y posiciónelo en el portón.
Top of gate
Haut de la porte
Parte superior del
portón
INTERIOR
B
Latch
INTÉRIEUR
Loquet
INTERIOR
Pestillo
Gate Swinging Out
Porte à ouverture vers l'extérieur
Portón que abre así afuera
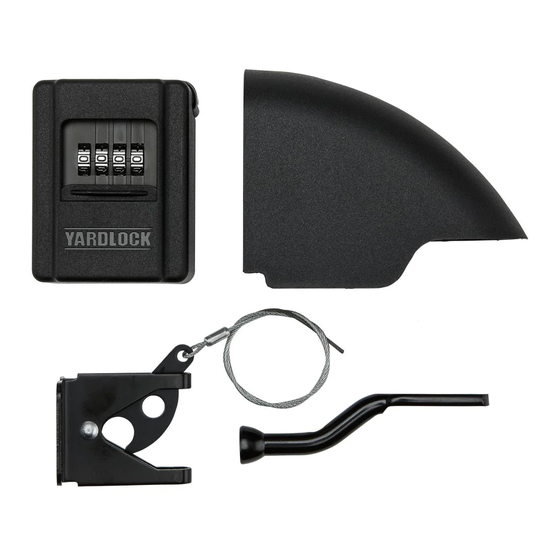
Parts in the box
Pièces dans la boîte
Piezas
Latch assembly
Ensemble du loquet
Ensamble de pestillo
#2 Phillips screwdriver
A
Destornillador Phillips No 2
9.5 mm
&
3.5 mm
Recommandation
Si vous avez une porte qui s'ouvre vers l'extérieur, il vous
est recommandé d'inverser vos charnières afin de créer
une porte qui s'ouvre vers l'intérieur pour plus de sécurité.
Les instructions suivantes concernent les portes qui
s'ouvrent VERS L'EXTÉRIEUR. Pour des instructions
concernant les portes qui s'ouvrent VERS L'INTÉRIEUR,
consultez le www.yardlock.com
89 mm minimum
89 mm minimum
al menos 89 mm
A
Latch arm
Bras du loquet
Brazo del pestillo
508 mm minimum
508 mm minimum
al menos 508 mm
G a t
e
P o s
P o r
t
P o t
t e
e a u
P o r
P o s
t ó n
t e
Video Instructions
Vidéo d'instructions
Video de instrucciones
Latch cover
Couvercle du pêne
Yardlock
Cabezal del pestillo
B
C
1.2
Secure latch assembly with supplied screws.
Fixez l'ensemble du loquet avec les vis fournies.
Fije el ensamble de pestillo usando los tornillos proporcionados.
E (6x)
1 / 4
Screws
Vis
Tornillos
D
F (1x)
Sugerencias
Si su portón abre así afuera, le aconsejamos invertir las
bisagras para crear un portón que abre así adentro, para
mayor seguridad.
Las directrices siguientes son para portones que ABREN
ASÍ AFUERA. Directrices para los portones que ABREN
ASÍ ADENTRO se encuentran en www.yardlock.com
Pilot holes (6x)
Trous de guidage (6x)
Agujeros guías (6x)
1-844-608-5553
sales@yardlock.com
www.yardlock.com
E (12x)
3 mm
Advertisement
Table of Contents

Related Manuals for YARDLOCK GATE LOCK

Summary of Contents for YARDLOCK GATE LOCK
- Page 1 VERS L’EXTÉRIEUR. Pour des instructions ASÍ AFUERA. Directrices para los portones que ABREN Instructions for IN-SWINGING gates are available at concernant les portes qui s’ouvrent VERS L’INTÉRIEUR, ASÍ ADENTRO se encuentran en www.yardlock.com www.yardlock.com consultez le www.yardlock.com Install latch assembly on gate interior.
- Page 2 Drill hole for cable. Percez un trou pour le câble. Taladre un agujero para el cable. Mark the point where the catch meets the gate. Drill hole through gate. Marquez le point où le loquet et la porte se rencontrent. Percez un trou dans la porte.
- Page 3 Unlock Gate Lock with default combination: 0-0-0-0 Faites passer le câble dans le boîtier Yardlock en le glissant Déverrouillez le boîtier Yardlock à l’aide de la combinaison par défaut : 0-0-0-0. par le trou préalablement percé. Abra el Yardlock con la combinación predeterminada: 0-0-0-0.
- Page 4 Palanca Posición Aprender Quite la tapa de caucho y mueva la palanca a la posición Aprender. Close Gate Lock and rotate Open Gate Lock, move dials to desired combination. lever to original position, and install rubber cover. Fermez le boîtier YARDLOCK...
Need help?
Do you have a question about the GATE LOCK and is the answer not in the manual?
Questions and answers