Table of Contents
Advertisement
Available languages
Available languages
Quick Links
Nożyce do cięcia żywopłotów z drążkiem teleskopowym
Nožnice na živý plot s teleskopickou rukoväťou
Telescopic Handled Hedge Trimmer
Heggenschaar met telescopische steel
Taille-haie à manche télescopique
Decespugliatore con manico telescopico
Tesoura de sebes com cabo telescópico
Podadora con mango telescópico
Nůžky na živý plot s teleskopickou rukojetí
Gyvatvorių žirklės su teleskopiniu kotu
Translation of the original instructions for use
Vertaling van de originele gebruiksaanwijzing
Traduction de la notice d'utilisation originale
Traduzione delle istruzioni per l'uso in originale
Tradução do manual de instruções original
Traducción del manual de instrucciones original
Tłumaczenie oryginalnej instrukcji obsługi
Vertimas iš originalių eksploatavimo instrukcijoje
Teleskopstiel-Heckenschere
Originalbetriebsanleitung
Překlad originálního návodu k obsluze
Preklad originálneho návodu na obsluhu
DE
GB
NL
FR
IT
PT
ES
PL
CZ
SK
LT
EHS 460-2 T
Advertisement
Chapters
Table of Contents

Subscribe to Our Youtube Channel
Related Manuals for Grizzly Tools EHS 460-2 T


Summary of Contents for Grizzly Tools EHS 460-2 T
- Page 1 Nożyce do cięcia żywopłotów z drążkiem teleskopowym Nůžky na živý plot s teleskopickou rukojetí Nožnice na živý plot s teleskopickou rukoväťou Gyvatvorių žirklės su teleskopiniu kotu EHS 460-2 T Originalbetriebsanleitung Translation of the original instructions for use Vertaling van de originele gebruiksaanwijzing Traduction de la notice d’utilisation originale...
- Page 3 ± max. 60...
- Page 4 Originalbetriebsanleitung ...........5 Translation of the original instructions for use ....18 Vertaling van de originele gebruiksaanwijzing ....29 Traduction de la notice d’utilisation originale ....41 Traduzione delle istruzioni per l’uso in originale ...54 Tradução do manual de instruções original ....66 Traducción del manual de instrucciones original ..79 Tłumaczenie oryginalnej instrukcji obsługi ....91 Překlad originálního návodu k obsluze ......103 Preklad originálneho návodu na obsluhu .....
-
Page 5: Table Of Contents
Verwendungszweck Bitte lesen Sie vor der ersten Inbe- triebnahme die Bedienungsanlei- tung aufmerksam durch, um eine Das Gerät ist nur für das Schneiden und falsche Handhabung zu vermei- Trimmen von Hecken, Büschen und Zier- den. Bewahren Sie die Anleitung sträuchern im häuslichen Bereich bestimmt. gut auf und geben Sie sie an jeden Der Teleskopstiel ermöglicht das Schnei- nachfolgenden Benutzer weiter,... -
Page 6: Sicherheitshinweise
Sicherheitshinweise Angabe des Schallleistungspegels in dB. Dieser Abschnitt behandelt die grundle- genden Sicherheitsvorschriften bei der Elektrogeräte gehören nicht in den Arbeit mit dem Gerät. Hausmüll. Bildzeichen auf dem Gerät Schutzklasse II 410 mm Schnittlänge 18 mm Zahnabstand Symbole in der Anleitung Gefahrenzeichen mit Angaben zur Verhütung von Personen- oder Sachschäden. -
Page 7: Allgemeine Sicherheitshinweise Für Elektrowerkzeuge
Bei Auftreten eines Unfalles oder Elektrowerkzeuges fern. Bei Ablen- einer Störung während des Be- kung können Sie die Kontrolle über das triebs ist das Gerät sofort auszu- Gerät verlieren. schalten und der Netzstecker zu ziehen. Versorgen Sie Verletzun- Elektrische Sicherheit: gen sachgemäß... - Page 8 verringert das Risiko eines elektrischen Stromversorgung anschließen, es Schlages. aufnehmen oder tragen. • Wenn der Betrieb des Elektrowerk- Wenn Sie beim Tragen des Elektro- zeuges in feuchter Umgebung nicht werkzeuges den Finger am Schalter vermeidbar ist, verwenden Sie einen haben oder das Gerät eingeschaltet an Fehlerstromschutzschalter.
-
Page 9: Sicherheitshinweise Für Heckenscheren
Diese Vorsichtsmaßnahme verhindert eigenen Netzkabel kommen kann. den unbeabsichtigten Start des Elektro- Der Kontakt des Schneidmessers mit werkzeuges. einer spannungsführenden Leitung • Bewahren Sie die unbenutzten Elek- kann metallene Geräteteile unter trowerkzeuge außerhalb der Reich- Spannung setzen und zu einem elekt- weite von Kindern auf. -
Page 10: Allgemeine Beschreibung
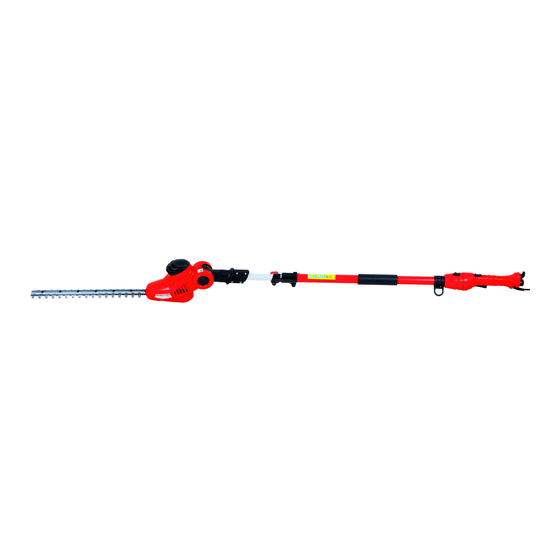
Übersicht und zu einem elektrischen Schlag füh- ren. • Halten Sie das Kabel vom Schneid- 1 Sicherheitsmesserbalken bereich fern. Während des Arbeits- 2 Schneidkopf vorgangs kann das Kabel im Gebüsch 3 Lüftungsöffnungen verdeckt sein und versehentlich 4 Arretierknopf für abwinkelbaren durchtrennt werden. -
Page 11: Montageanleitung
Montageanleitung schraube (5) übereinander liegen. Ziehen Sie vor allen Arbeiten an 3. Fixieren Sie die beiden Teile mit dem Gerät den Netzstecker. Hilfe der beiliegenden Inbus- schraube (5a) und Befestigungs- Wenn die Rohre des Gerätes mutter (5b). nicht ineinander gesteckt und korrekt verschraubt sind, lässt Schultergurt befestigen sich das Gerät nicht einschalten. -
Page 12: Teleskopstiel Verstellen
Ein- und Ausschalten Beachten Sie den Lärmschutz und örtliche Vorschriften. Achten Sie auf einen sicheren Stand Teleskopstiel verstellen und halten Sie das Gerät mit beiden Händen und mit Abstand vom eige- Der Teleskopstiel (6) kann stufenlos um ca. nen Körper gut fest. Achten Sie vor 40 cm verstellt werden. -
Page 13: Schnitttechniken
Halten Sie das Gerät immer mit • Bewegen Sie beim senkrechten beiden Händen gut fest, mit einer Schnitt die Heckenschere gleichmäßig Hand am Handgriff und mit der vorwärts oder bogenförmig auf und anderen Hand am Zusatzhandgriff. Daumen und Finger müssen die •... -
Page 14: Wartung Und Reinigung
Frei wachsende Hecken pflegen: 2) des Gerätes sauber. Verwen- den Sie dazu ein feuchtes Tuch oder Frei wachsende Hecken bekommen zwar eine Bürste. Das Gerät darf weder mit keinen Formschnitt, müssen aber regel- Wasser abgespritzt werden, noch in mäßig gepflegt werden, damit die Hecke Wasser gelegt werden. -
Page 15: Ersatzteile
Technische Daten maßnahmen zum Schutz des Bedieners festzulegen, die auf einer Abschätzung Teleskopstiel-Heckenschere der Aussetzung während der tatsächli- ..........EHS 460-2 T chen Benutzungsbedingungen beruhen Nenneingangsspannung .. 230-240 V~, 50Hz (hierbei sind alle Anteile des Betriebszyk- Leistungsaufnahme ......460 W lus zu berücksichtigen, beispielsweise Messerhubzahl ......1500 min... -
Page 16: Garantie
Garantie Reparatur-Service Für dieses Gerät gewähren wir 24 Monate Sie können Reparaturen, die nicht der Garantie. Garantie unterliegen, gegen Berechnung Schäden, die auf natürliche Abnutzung, von unserem Service-Center durchführen Überlastung oder unsachgemäße Bedie- lassen. Unser Service-Center erstellt Ih- nung zurückzuführen sind, bleiben von nen gerne einen Kostenvoranschlag. -
Page 17: Fehlersuche
Fehlersuche Problem Mögliche Ursache Fehlerbehebung Steckdose, Kabel, Leitung, Ste- Netzspannung fehlt cker und Sicherung prüfen, ggf. Reparatur durch Elektrofachmann Gerät startet nicht Ein-/Ausschalter defekt Kohlebürsten abgenutzt Reparatur durch Service-Center Motor defekt Kabel überprüfen, ggf. Wechsel Stromkabel beschädigt durch unser Service-Center Gerät arbeitet mit Interner Wackelkontakt Unterbrechungen... -
Page 18: Intended Use
Content Before first using the machine, please read this instruction manual Intended Use ........18 carefully, for your own safety and Notes on Safety ........19 for the safety of others. Keep the Symbols on the Equipment ....19 manual in a safe place and pass it Symbols in the manual ..... -
Page 19: Notes On Safety
Notes on Safety Information of the acoustic power level L in dB. This section deals with the basic safety regulations to be observed when working Machines are not to be place with with the electric hedge trimmer. domestic waste. Symbols on the Equipment Safety class II 410 mm Cutting length... -
Page 20: General Safety Instructions For Power Tools
consult a doctor. For the correction tools. Unmodified plugs and match- of faults, read the “Troubleshoot- ing outlets will reduce risk of electric ing” chapter or contact our service shock centre. • Avoid body contact with earthed or grounded surfaces, such as pipes, General safety instructions for radiators, ranges and refrigerators. - Page 21 operating a power tool. Do not use the correct power tool for your ap- a power tool while you are tired or plication. The correct power tool will under the influence of drugs, alco- do the job better and safer at the rate hol or medication.
-
Page 22: Hedge Trimmer Safety Warnings
and remove all wires or other foreign cut by the blade. bodies. • Before the work, search the hedge for concealed objects, e.g. cable etc. • Hold the power tool by insulated grip- ping surfaces only, because the cutter • Hold the hedge trimmer correctly, blade may contact hidden wiring or its e.g. -
Page 23: Overview
Assembling instructions Overview Safety blade Pull out the power plug before car- Cutting head rying out any work on the equip- Vents ment. Lock button for cutting head that If the equipment pipes are not can be angled plugged together and screwed Telescopic handle fixing screw + correctly then the equipment fixing nut... -
Page 24: Operation
Allen screw (5) are aligned. Loosen the height adjustment Use the enclosed Allen screw screw (7). (5a) and fixing nut (5b) to fix Pull or push to adjust the length both parts. of the telescopic handle (6). Retighten the height adjustment Attaching the Shoulder Strap: screw (7). -
Page 25: Working With The Equipment
through the eyelet on the handle ing area. Never lay the cable over the (14) and hang it in the cable hedge, where it could easily be caught strain relief (12). up in the trimmer blades. Connect the equipment to the •... -
Page 26: Maintenance/Cleaning
1. Cut the sides of a hedge first. To do Carry out the following maintenance and this, move the hedge trimmer in the cleaning work regularly. This will guarantee direction of growth from bottom to top. a long and reliable service life. If you cut down from the top, the thin- •... -
Page 27: Waste Disposal And Environmental Protection
Safety precautions aimed at Telescopic Handled Hedge Trimmer protecting the user should be based on ..........EHS 460-2 T estimated exposure under actual usage Input voltage rating ..230-240 V~, 50 Hz conditions (all parts of the operating cycle Input power ........460 W are to be considered, including, for ex- Blade speed...... -
Page 28: Trouble Shooting
indicated in the operating instructions which have been dispatched with cor- regarding cleaning and maintenance rect stamping. have been adhered to. • Note: In case of complaint or service, • Damage, which has been caused please deliver your device cleaned, from material or manufacturing faults, and with an indication of the defect, to will be made good free of charge, by... -
Page 29: Toepassingsgebied
Inhoud Lees, alvorens het apparaat te gebruiken, aandachtig deze ge- Toepassingsgebied ......29 bruiksaanwijzing door voor uw ei- Veiligheidsvoorschriften ....30 gen veiligheid en die van anderen. Symbolen op het apparaat ....30 Bewaar de handleiding goed en Symbolen in de gebruiksaanwijzing ...30 geef deze door aan de volgende Algemene veiligheidsvoorschriften .. -
Page 30: Veiligheidsvoorschriften
Veiligheidsvoorschriften 11 Omstaande personen mogen niet in de gevarenzone komen. Dit gedeelte beschrijft de wezenlijke veilig- heidsvoorschriften, die bij het werken met Aanduiding van het geluidsvolume de elektrische heggenschaar moeten wor- in dB. den nageleefd. Machines horen niet bij huishoude- Symbolen op het apparaat lijk afval thuis. -
Page 31: Algemene Veiligheidsinstructies Voor Elektrisch Gereedschap
bruik van het apparaat kan ernstige doen ontsteken. verwondingen veroorzaken. • Houd kinderen en andere personen tijdens het gebruik van het elektri- Indien er zich tijdens de werking sche gereedschap op een veilige een ongeval of een storing voor- afstand. Bij afleiding kunt u de controle doet, dient het apparaat onmid- over het apparaat verliezen. - Page 32 bruikt u enkel verlengsnoeren, die • Vermijd een onopzettelijke ingebruik- ook voor buiten geschikt zijn. Het name. Vergewis u dat het elektrische gebruik van een voor buiten geschikt gereedschap uitgeschakeld is voor- verlengsnoer verlaagt het risico op een dat u ze op de stroomvoorziening elektrische schok.
-
Page 33: Speciale Veiligheidsinstructies Voor Heggenscharen
voordat u apparaatinstellingen door- voorhanden zijn. Het verlies van de con- voert, toebehoren wisselt of het ap- trole over het apparaat kan tot verwon- paraat weglegt. Deze voorzorgsmaat- dingen leiden. regel voorkomt een onopzettelijke start van het elektrische gereedschap. Service: •... -
Page 34: Algemene Beschrijving
Overzicht • Houd het snoer op een veilige af- stand van het snoeibereik. Tijdens het arbeidsproces kan het snoer in het 1 Veiligheidsmesbalk struikgewas verborgen zijn en per ver- 2 Snoeikop gissing doorgesneden worden. 3 Ventilatieopeningen • Doorzoek de haag vóór het werk naar 4 Vergrendelknop voor buigbare verborgen objecten, bijvoorbeeld snoeikop... -
Page 35: Montagehandleiding
Montagehandleiding u een klikkend geluid van de veiligheidsschakelaar waarneemt Trek alvorens u aan het apparaat en de openingen voor de inbus- gaat werken de stekker uit het schroef (5) boven elkaar liggen. stopkontakt. 3. Bevestig de beide onderdelen met behulp van de bijgevoegde Wanneer de buizen van het ap- inbusschroef (5a) en bevesti- paraat niet in elkaar gestoken en... -
Page 36: Telescopische Steel Verstellen
Aan- en uitschakelen Let op geluidsoverlast en plaatselijke voorschriften. Zorg dat u stevig staat en houd het Telescopische steel verstellen apparaat met twee handen goed vast. Bewaar voldoende afstand tot De telescopische steel (6) kan traploos ca. uw eigen lichaam. 40 cm versteld worden. -
Page 37: Kniptechnieken
Houd het apparaat altijd met beide • Bij vertikaal knippen de heggenschaar handen goed vast en dit met één gelijkmatig voorwaarts bewegen of hand aan de achterste en met de boogvormig op en neer. andere hand aan de voorste hand- •... -
Page 38: Onderhoud En Reiniging
Onderhoud en reiniging - het mes reinigen (met olieachtige vod); Laat onderhoudswerkzaamheden - de mesbalk met die niet in deze handleiding wor- oliekannetje of den beschreven uitvoeren door spray oliën. ons servicecenter. Gebruik enkel originele onderdelen. • Lichte kerven aan de lemmeten kunt Gebruik geen reinigings- resp. -
Page 39: Vervangstukken
Technische gegevens Waarschuwing: Afhankelijk van de ma- Heggenschaar met telescopische steel nier, waarop het elektrische gereedschap ..........EHS 460-2 T gebruikt wordt, kan de trilingemissiewaar- Netspanning ....230-240 V~, 50 Hz de tijdens het effectieve gebruik van het Prestatievermogen ......460 W elektrische gereedschap van de aangege- Messlag ........1500 min... -
Page 40: Reparatieservice
derhoud in acht genomen werden. Wij kunnen apparaten slechts behan- • Beschadigingen, die door materiaal- of delen indien ze voldoende verpakt en fabricagefouten ontstaan zijn, worden gefrankeerd toegezonden werden. gratis door schadeloosstelling of door • Opgelet: In geval van klachten of ser- een herstelling verholpen. -
Page 41: Domaine D'utilisation
Sommaire Prière de lire attentivement le mode d’emploi avant la première Domaine d’utilisation ......41 mise en service afin d’éviter un Instructions de sécurité ..... 42 maniement incorrect. Conservez Symboles apposés sur l’appareil ..42 soigneusement ces instructions et Symboles utilisés dans le mode transmettez-les à... -
Page 42: Instructions De Sécurité
Instructions de sécurité 10 Portez des chaussures de sécurité antidérapantes. Ce chapitre traite des règles de base 11 Maintenir l’appareil à distance des concernant la sécurité pour travailler avec personnes le taille-haie à manche long . Indication du niveau garanti de puis- Symboles apposés sur l’appa- sance sonore maximale L en dB. -
Page 43: Consignes De Sécurité Générales Pour Outils Électriques
le fonctionnement, le mode d’action • Ne pas faire fonctionner les outils ainsi que les différentes techniques électriques en atmosphère explo- de travail que l’appareil vous offre. sive, par exemple en présence de Assurez-vous qu’en cas d’urgence, liquides inflammables, de gaz ou de vous pourrez immédiatement arrê- poussières. - Page 44 cordon adapté à l’utilisation extérieure S’assurer que l’interrupteur est en réduit le risque de choc électrique. position arrêt avant de brancher Si l’usage d’un outil dans un empla- l’outil au secteur et/ou au bloc de • cement humide est inévitable, utili- batteries, de le ramasser ou de le ser une alimentation protégée par un porter.
-
Page 45: Mises En Garde De Sécurité Des Taille-Haies
qui ne peut pas être commandé par • Arrêtez le taille-haie correctement, par l’interrupteur est dangereux et il faut le exemple avec les deux mains sur les réparer. poignées si l’appareil comporte deux • Débrancher la fiche de la source poignées. -
Page 46: Description Générale
Vue synoptique • Maintenir le câble éloigné de la zone de coupe. Au cours du fonctionnement, le câble peut être caché dans des 1 Porte-lames de sécurité arbustes et être accidentellement coupé 2 Tête de coupe par la lame. 3 Fentes d‘aération •... -
Page 47: Instructions De Montage
Instructions de montage rupteur de sécurité ; les ouver- tures pour la vis à pans creux Avant tout travail sur l’appareil, il (5) doivent se trouver l’un sur est indispensable de débrancher l’autre. la prise de courant (mise hors cir- 3. -
Page 48: Régler Le Manche Télescopique
Mise en marche et arrêt de Veuillez observer les normes de pro- l’appareil tection contre les nuisances acous- tiques ainsi que les prescriptions et directives locales en vigueur. Veillez à ce que l’appareil soit stable. Tenez l’appareil à deux Régler le manche mains tout en conservant une télescopique distance de sécurité... -
Page 49: Techniques De Taille
• Pour la coupe verticale, déplacez le En taillant, veillez à ne pas entrer taille haie régulièrement vers l’avant en contact avec des objets tels ou bien en forme d’arc vers le haut et que fils de grillage ou tuteurs de vers le bas. -
Page 50: Entretien Et Nettoyage
Soin des haies poussant librement: d’eau, ni le poser dans l’eau. • Maintenez l’appareil toujours propre. Les haies qui poussent librement ne sont Après chaque utilisation de l’appareil, pas taillées selon une forme spéciale, tou- vous devez : tefois il faut les entretenir régulièrement nettoyer la lame (avec un chiffon afin que la haie ne pousse pas trop haut. -
Page 51: Pièces De Rechange
Avertissement : L’émission de vibration au cours Taille-haie à manche télescopique de l’utilisation réelle de l’outil élec- ..........EHS 460-2 T trique peut différer de la valeur to- Tension d’entrée nominale..230-240 V~, tale déclarée, selon les méthodes 50 Hz d’utilisation de l’outil. -
Page 52: Garantie
Garantie Service de réparation • Nous accordons 24 mois de garantie • Vous pouvez faire effectuer les répara- pour cet appareil. tions non couvertes par la garantie par • Les dommages dûs à une usure natu- notre Centre de services avec une fac- relle, à... -
Page 53: Dépannage
Dépannage Problème Cause possible Suppression de la panne Vérifiez l‘alimentation en courant, la prise de courant, le câble, la Absence d‘alimentation rallonge, la prise de courant, le cas secteur échéant, réparation par un électro- technicien spécialisé L‘appareil ne dé- marre pas Interrupteur Marche/Arrêt défectueux Réparation par le Centre de ser-... -
Page 54: Scopo
Indice Per la sicurezza dell’operatore e delle altre persone, prima della Scopo ........... 54 prima mesa in funzione leggere Consigli di sicurezza ......55 attentamente le presenti istruzioni Raffigurazioni sull’apparecchio ..55 per l’uso con la massima attenzio- Simboli nelle istruzioni ..... 55 ne, in ogni caso prima di utilizzare Consigli di sicurezza generali .. -
Page 55: Consigli Di Sicurezza
Consigli di sicurezza Dati del livello di rumorosità L Questa sezione tratta le norme di sicu- rezza essenziali da rispettare quando si Le apparecchiature non si devono lavora con l’apparecchio. smaltire insieme ai rifiuti domestici. Raffigurazioni sull’apparecchio Classe di protezione II 410 mm Lunghezza di taglio 18 mm... -
Page 56: Indicazioni Di Sicurezza Generali Per Utensili Elettrici
In caso di incidente o guasto durante Sicurezza elettrica: il funzionamento si deve spegnere immediatamente l’apparecchio e Attenzione: in questo modo si evi- staccare la spina. Medicare le feri- tano infortuni e lesioni a causa di te secondo le disposizioni oppure scosse elettriche: recarsi da un medico. - Page 57 esclusivamente a una presa dotata di o chiave per dadi, prima di accende- dispositivo di protezione da corrente di re la sega elettrica. Un utensile o una guasto (interruttore FI) avente una cor- chiave che si trova all’interno di una par- rente misurata non inferiore a 30 mA.
-
Page 58: Indicazioni Di Sicurezza Per Decespugliatori
pericolosi se usati da persone inesperte. rimuovere il materiale tagliato o tene- • Trattare l’utensile elettrico con cura. re fermo il materiale da tagliare con Controllare che le parti in movimen- la lama in movimento. Rimuovere il to funzionino perfettamente e non materiale tagliato solo con l’apparec- si inceppino, che i componenti non chio spento. -
Page 59: Descrizione Generale
Descrizione generale vono in modo lineare avanti e indietro. Per motivi di protezione per l’utente, l’ap- Le figure per il commando dell’ap- parecchio può essere azionato soltanto parecchio si trovano nelle pagi- tenendo premuto l’interruttore di sicurezza. ne 2-3. Oltre a ciò, la protezione per le mani pro- tegge da rami e nodi. -
Page 60: Comando
Comando Montaggio vite di regolazione dell‘altezza (vedi figura piccola): 1. Premere il dado di fissaggio Non utilizzare l’apparecchio sen- (7b) nella sede sul manico tele- za protezione mani. Durante il scopico (6). lavoro con questo apparecchio, 2. Montare la vite di regolazione indossare abiti adeguati e guanti da lavoro. -
Page 61: Rotazione Dell'impugnatura
Premere la testa di bloccaggio (4) 5. Per spegnere, rilasciare l’inter- e inclinare contemporaneamente ruttore di accensione/spegni- la testa di taglio (2). Dopo il rilascio mento (11). della testa di bloccaggio, scatta Istruzioni di lavoro nella posizione desiderata. Rotazione dell’impugnatura Non usare il deramificatore su una scala o una posizione non sicura. -
Page 62: Tecniche Di Taglio
altrimenti vengono sovraccaricati il mo- il taglio dall’alto verso il basso, i rami tore e gli ingranaggi dell’apparecchio. più sottili si spostano all’esterno cau- • Evitare di sollecitare troppo l’apparec- sando punti radi o addirittura aperture. chio durante il lavoro. 2. -
Page 63: Conservazione
Decespugliatore con manico telescopico o danneggiate. Controllare che le viti ..........EHS 460-2 T siano saldamente fissate nel profilo Tensione nominale in con lama. ingresso......230-240 V~, 50 Hz •... -
Page 64: Smaltimento E Rispetto Per L'ambiente
I valori di rumorosità e vibrazione sono sono coperte da garanzia. Si tratta in stati determinati conformemente alle pre- particolare di: lama, gli eccentrici e i scrizioni e norme citate nella dichiarazio- carboncini. ne di conformità. • Requisito essenziale per le presta- Ci si riserva il diritto di apportare varia- zioni in garanzia è... -
Page 65: Ricerca Guasti
Ricerca guasti Problema Causa possibile Soluzione Controllare la presa, il cavo, il filo, la Manca tensione di spina, ed eventualmente far riparare a alimentazione un elettricista specializzato Interruttore di accensione L‘apparecchio / spegnimento difettoso non parte Riparazione presso il servizio di assistenza Carboncini usurati Motore difettoso... -
Page 66: Uso Previsto
Índice Leia, por favor, atentamente o manual de instruções antes de co- Uso previsto ........66 meçar a trabahar com o aparelho Medidas de segurança ....... 67 para evitar o manejo inadequado. Símbolos gráficos colocados no Guarde o manual em lugar bem aparelho ........... -
Page 67: Medidas De Segurança
Medidas de segurança 10 Use luvas protectoras sempre que es- tiver a fazer a manutenção e a limpeza Esta secção trata das instruções básicas do seu aparelho para se proteger con- de segurança a serem observadas duran- tra cortes e feridas. te o trabalho com o aparelho. -
Page 68: Indicações Gerais De Segurança Para Equipamentos Eléctricos
que, em caso de emergência, o apa- gases ou pós inflamáveis. Ferramen- relho possa ser imediatamente des- tas eléctricas originam centelhas que ligado. O uso indevido do aparelho podem inflamar o pó ou os vapores. poderá levar a ferimentos graves. •... - Page 69 dos para uso externo. A utilização capacete e protectores de ouvidos de um cabo de extensão apropriado diminui o risco de ferimentos. para uso externo diminui o risco de • Evitar um funcionamento acidental. choques eléctricos. Certificar-se de que o equipamento •...
-
Page 70: Tesouras Corta-Sebes
de ser reparada. Assistência técnica: • Retirar a ficha da tomada antes de executar ajustes no aparelho, substi- • Permitir a reparação das suas fer- tuir componentes ou se não for mais ramentas eléctricas somente a um utilizá-lo. Essa medida de precaução pessoal técnico qualificado e unica- evita a ligação acidental do equipamen- mente com peças sobressalentes... -
Page 71: Descrição Geral
Vista geral cado acidentalmente. • Antes de efectuar o trabalho, procu- re nos arbustos objectos escondi- Porta-lâminas de segurança dos, como por ex., arame, etc. 2 Cabeça de corte • Segure a tesoura de sebes correcta- 3 Ranhuras de ventilação mente, por ex., com ambas as mãos 4 Botão de retenção para cabeça nos cabos, se estiverem disponíveis... -
Page 72: Instruções De Montagem
Instruções de montagem nio sextavado (6) até ouvir um som de clique do interruptor de Antes de começar a efectuar traba- segurança e as aberturas des- lhos no aparelho, retire primeiro a tinadas ao parafuso sextavado ficha da tomada. (5) estarem sobrepostas. 3. -
Page 73: Ajustar O Cabo Telescópico
Preste atenção às medidas contra a mãos, mantendo uma distância em poluição sonora e às regras locais. relação ao corpo. Preste atenção para que o aparelho Ajustar o cabo telescópico não esteja em contacto com nenhum objecto antes de o ligar. O cabo telescópico (6) pode ser livremente ajustado até... -
Page 74: Técnicas De Corte
mão na parte traseira e com a outra uniformemente para a frente ou com na parte dianteira do punho. Os pu- um movimento em forma de arco, nhos precisam ser segurados de tal para cima e para baixo. forma que os polegares e os outros •... -
Page 75: Manutenção E Limpeza
Como tratar das sebes de crescimento • Mantenha as ranhuras de ventilação livre: e a caixa do motor (cabeça de As sebes de crescimento livre não são mo- corte) sempre limpas. Para tal, deladas mas, mesmo assim, elas têm de utilize um pano húmido ou uma esco- ser cuidadas regularmente para se evitar va. -
Page 76: Peças Sobressalentes
Dados técnicos Aviso: Tesoura de sebes com cabo Durante a utilização real da ferramenta telescópico ......EHS 460-2 T eléctrica, o valor de emissão de vibrações Tensão nominal de pode divergir do valor indicado, dependen- entrada ......230-240 V~, 50 Hz do da forma como a ferramenta eléctrica... -
Page 77: Garantia
Garantia Serviço de reparação • Concedemos 24 meses de garantia a • Poderá encarregar os nossos Servi- este aparelho. ços de Assistência Técnica de efec- • Esta garantia não contempla danos tuar reparações que não são cobertas provocados por desgaste natural, so- pela garantia, remunerando os res- brecarga ou uso indevido do aparelho. -
Page 78: Resolução De Problemas
Resolução de problemas Problema Causa possível Resolução do problema Inspeccionar a tomada, o cabo, a linha, a ficha e o fusível e, caso seja necessário, Não há tensão de rede levar para reparação a um técnico especia- lizado O aparelho Interruptor de ligar/desli- não arranca gar avariado... -
Page 79: Uso Previsto
Contenido Para su seguridad y la de los de- más, le rogamos leer estas instruc- Uso previsto ........79 ciones de uso atentamente antes Instrucciones de seguridad ....80 de la primera puesta en marcha. Símbolos gráficos en el aparato ..80 Conserve las instrucciones apropia- Símbolos en las instrucciones .. -
Page 80: Instrucciones De Seguridad
Instrucciones de ditiva y casco. seguridad 10 Porte botas con protección contra cor- tes con suela antideslizante. Este párrafo trata las prescripciones bási- 11 Mantener a las personas alejadas del cas de seguridad durante el trabajo con la aparato. cizalla eléctrica para setos. Indicación del nivel de la Símbolos gráficos en el apa- intensidad acústica Lwa en dB. -
Page 81: Instrucciones Generales De Seguridad Para Herramientas Eléctricas
trabajo. Asegúrese que pueda • No trabajar con la herramienta eléc- desactivar el aparato en caso de trica en zonas bajo peligro de explo- emergencia en forma inmediata. El sión, donde se encuentren líquidos, uso no apropiado del aparato pue- gases o polvos inflamables. - Page 82 aumentan el riesgo de descarga eléctri- como zapatos de seguridad antides- lizantes, casco protector o protección • Si trabaja con la sierra eléctrica de contra el ruido disminuye el riesgo de cadena en el exterior, utilice sola- sufrir daños. mente cables de alargo que estén •...
-
Page 83: Instrucciones De Seguridad Para Cizallas Cortasetos
• No utilice herramientas eléctricas peligrosas. que tengan el interruptor defectuoso. • Inspeccione cuidadosamente la Las herramientas eléctricas que ya no superficie a podar y retire todos los se pueden conectar o desconectar son alambres y demás cuerpos extraños. peligrosas y deben ser reparadas. •... -
Page 84: Descripción General
Vista general • Antes de empezar a trabajar, explore el seto por si hubiese objetos ocul- tos, como alambres, etc. 1 Barra de corte de seguridad • Aguante el cortasetos correctamente, 2 Cabeza de corte p.ej. con ambas manos por los aside- 3 Ranuras de ventilación ros (en caso de haber dos asideros). -
Page 85: Instrucciones De Montaje
Instrucciones de montaje agujeros para el tornillo de hexá- gono interior (5) coincidan. Retire siempre el enchufe de red 3. Fije ambas partes con la ayuda antes de realizar trabajos en el apa- del tornillo de hexágono hembra rato. (5a) adjunto y la tuerca de suje- ción (5b). -
Page 86: Ajustar El Mango Telescópico
Activación y desactivación Observe la regulación para la pro- tección acústica, así como las pres- cripciones regionales. Ponga atención en una posición segura y mantenga el equipo bien Ajustar el mango telescópico sujetado con ambas manos, con cierta distancia a su propio cuer- El mango telescópico (6) puede ser ajus- po. -
Page 87: Técnicas De Poda
Sujete el aparato siempre bien con la cizalla eléctrica para setos en forma ambas manos (con una por el asa de hoz hacia el borde del seto, de modo trasera, y con la otra, por el asa de- que las ramas cortadas puedan caerse lantera), debiendo los pulgares y los al suelo. -
Page 88: Mantenimiento Y Limpieza
Mantenimiento y limpieza vez, tiene que - limpiar la cuchilla (con un trapo acei- Los trabajos de reparación y man- toso); tenimiento no descritos en estas - aceitar la barra instrucciones, deben ejecutarse portacuchilla con por nuestro Centro de Servicio. una aceitera o un Utilice exclusivamente piezas origi- spray. -
Page 89: Piezas De Repuesto
Datos técnicos Aviso: Podadora con mango telescópico El índice de emisión de vibraciones in- ..........EHS 460-2 T dicado puede diferir del valor reseñado Tensión de entrada cuando se usa efectivamente esa herra- nominal ....... 230-240 V~, 50 Hz mienta eléctrica y según cómo se utilice. -
Page 90: Servicio De Reparación
alguno mediante sustitución o repara- tos, que estén adecuadamente emba- ción del producto. lados y franqueados. Condición para ello es que el aparato • Un requisito esencial para la presta- sea devuelto al comerciante en estado ción de la garantía es que el aparato montado junto con el comprobante de no haya sido desmontado, y que se compra y de garantía. -
Page 91: Cel Zastosowania
Spis tresci Przed pierwszym uruchomieniem urządzenia uważnie przeczytaj Cel zastosowania........ 91 tę instrukcję obsługi. Przechowuj Zasady bezpieczeństwa ..... 92 tę instrukcję w dobrze zabezpie- Symbole graficzne na urządzeniu ..92 czonym miejscu i przekazuj ją Symbole w instrukcji obsługi .... 92 każdemu kolejnemu właścicielowi Ogólne zasady bezpieczeństwa .. -
Page 92: Zasady Bezpieczeństwa
Zasady bezpieczeństwa Podanie poziomu hałasu L w dB. Ten rozdział zawiera podstawowe przepisy Urządzeń elektrycznych nie należy bezpieczeństwa dotyczące pracy z okrze- wyrzucać razem z odpadami domo- sywarką. wymi. Symbole graficzne na urządzeniu Klasa ochrony II 410 mm Długość cięcia 18 mm Grubość... -
Page 93: Ogólne Zasady Bezpieczeństwa Dotyczące Narzędzi Elektrycznych
Ogólne zasady bezpieczeń- • Wtyczka narzędzia elektrycznego stwa dotyczące narzędzi elek- musi pasować do gniazdka. Wtyczki nie można w żaden sposób modyfi- trycznych kować. Nie używaj adapterów wty- OSTRZEŻENIE! Przeczytaj czek razem z narzędziami elektrycz- wszystkie zasady i instrukcje nymi posiadającymi zestyk ochronny bezpieczeństwa. - Page 94 • Jeżeli kabel zasilający tego urządzenia wanie lepszej kontroli nad narzędziem jest uszkodzony, musi on zostać wymie- elektrycznym w nieoczekiwanych sytu- niony na specjalny kabel zasilający, do- acjach. stępny u producenta lub w jego serwisie. • Noś odpowiednie ubranie. Nie zakła- daj obszernych, luźnych ubrań...
-
Page 95: Specjalne Zasady Bezpieczeństwa Dotyczące Przycinarek Do Żywopłotów
Przed użyciem urządzenia zleć na- tylko za uchwyt i przy nieruchomym prawę uszkodzonych części. Przyczy- nożu. Przy transportowaniu i prze- ną wielu wypadków są źle konserwowa- chowywaniu przycinarki do żywopło- ne narzędzia elektryczne. tów zawsze zakładaj pokrowiec. • Narzędzia tnące muszą być zawsze Staranne obchodzenie się... -
Page 96: Przegląd Elementów
Zawartość opakowania ga uziemienia. Jako mechanizm tnący przycinarka do żywopłotów posiada obustronną, zabez- Rozpakuj urządzenie i sprawdź, czy jest pieczoną belkę nożową. Podczas cięcia ono kompletne. Prawidłowo posegreguj i zęby tnące przesuwają się liniowo w tę i usuń materiały opakowania. z powrotem. -
Page 97: Obsługa
Montaż drążka teleskopowego Gdyby któryś z przełączników był 1. Wyciągnąć sześciokątną rurę uszkodzony, wówczas nie wolno wykonywać żadnych prac przy aluminiową (6) pokonując wy- czuwalny opór. (opór ten stawia pomocy tego urządzenia. Zwróć niewidoczny kabel w rurze). uwagę, czy napięcie sieciowe jest zgodne z danymi na tabliczce zna- 2. -
Page 98: Obracanie Rękojeści
Obracanie rękojeści Podczas ciecia uwazaj, aby nie do- tykac zadnych przedmiotów, takich Dzięki możliwości obracania rękojeści o jak plot z drutu czy slupki podpiera- 180° można zawsze uzyskać pozycję ide- jace rosline. Moze to spowodowac alną do strzyżenia. uszkodzenie listwy nozowej. Przesunąć... -
Page 99: Konserwacja I Naprawy
nożyce równomiernie w przód lub po wprawdzie modelowane, jednak muszą łuku w górę lub w dół. być regularnie pielęgnowane, aby żywo- • Podczas cięcia w poziomie przesuwaj płot nie osiągnął nadmiernej wysokości. nożyce do cięcia żywopłotów sierpo- Konserwacja i naprawy watym ruchem w kierunku krawędzi żywopłotu, aby obcięte gałązki spadły na ziemię. -
Page 100: Przechowywanie
Lekkie szczerby na ostrzach możesz wyrównywać sam. W tym celu prze- Nożyce do cięcia żywopłotów z drąż- ciągnij ostrza osełką do ostrzenia na kiem teleskopowym....EHS 460-2 T mokro. Tylko ostre noże zapewniają Znamionowe napięcie skuteczne i dokładne przycinanie. wejściowe ....230-240 V~, 50 Hz •... -
Page 101: Gwarancja
służyć do szacunkowej oceny stopnia • Warunkiem skorzystania z uprawnień ekspozycji użytkownika na drgania. gwarancyjnych jest ponadto przestrze- ganie wskazówek dotyczących oczysz- Ostrzeżenie: Wartość emisji drgań czania i konserwacji urządzenia. może się różnić w czasie korzysta- • Szkody wywołane wadami materia- nia z urządzenia od podanej war- łowymi lub produkcyjnymi zostaną... -
Page 102: Usuwanie Ustek
Usuwanie ustek Problem Możliwa przyczyna Środek zaradczy Sprawdzić gniazdko, przewód, Brak napięcia sieciowego sieć i bezpieczniki, w razie potrze- by zlecić naprawę elektrykowi Urządzenie nie Uszkodzony włącznik/wyłącz- chce się załączyć Naprawa w Centrum serwisowym Zużyte szczotki węglowe Uszkodzony silnik Sprawdzić kabel, w razie potrzeby Uszkodzony przewód siecio- wymiana w naszym Centrum Ser- wisowym... -
Page 103: Účel Použití
Obsah Před prvním uvedením do provozu si prosím pozorně přečtěte tento Účel použití ........103 návod k obsluze. Tento návod Bezpečnostní pokyny....... 104 dobře uschovejte a předejte jej Obrazové symboly na přístroji..104 každému dalšími uživateli, aby byly Symboly v návodu ......104 tyto informace kdykoliv k dispozici. -
Page 104: Bezpečnostní Pokyny
Bezpečnostní pokyny Údaj o hladině hluku L v dB V tomto odstavci jsou uvedeny základní Elektrické přístroje nepatří do do- bezpečnostní předpisy při práci s vyvětvo- mácího odpadu. vací pilou. Ochranná třída II Obrazové symboly na přístroji 410 mm Délka řezu 18 mm Průměr řezaných větví... - Page 105 Všechny bezpečnostní pokyny a instruk- úder, když je Vaše tělo zemněné. ce uchovejte pro budoucí použití. • Nevystavujte elektrický nástroj dešti anebo mokru. Vniknutí vody do elek- Pojem „elektrické nářadí“ používaný v trického nástroje zvyšuje riziko elektric- bezpečnostních pokynech se vztahuje na kého úderu.
- Page 106 elektrický nástroj, když jste unaveni trickým nástrojem pracujete v udaném anebo pod vlivem drog, alkoholu výkonovém rozsahu lépe a bezpečněji. anebo léků. Jediný okamžik nepozor- • Nepoužívejte žádné elektrické nářa- nosti při používání elektrického nástro- dí, jehož spínač je defektní. Elektric- je může vést k vážným poraněním.
-
Page 107: Bezpečnostní Pokyny Pro Nůžky Na Živé Ploty
vypínačem proti chybovému proudu živý plot, zda se v něm nenacházejí (proudový chránič FI) s reziduálním skryté objekty, např. drát atd. Držte nůžky na živý plot správně, proudem ne větším, než 30 mA. • • Prohlídněte pečlivě plochu, která se např. -
Page 108: Popis Funkcí
Popis funkcí Používejte pouze originální díly. Pohonem ele ktrických nůžek na živé ploty Klíš s vnitřním šestihranem ( 8) se s teleskopickou rukojetí je elektromotor. nachází ve svém držáku na telesko- Přístroj má bezpečnostní ochrannou izo- pické rukojeti ( laci a nevyžaduje si uzemnění. Stříhacím Montáž... -
Page 109: Obsluha
Otočení držadla teleskopické rukojeti můžete dodatečně nastavit po uvolnění inbusového šroubu (16). Díky držadlu otočnému o 180° vždy docílí- te ideální polohy ke stříhání. Obsluha Pojistnou západku (9) posuňte Při práci s přístrojem noste vhod- dopředu a současně otáčejte dr- né... -
Page 110: Techniky Střihání
Při práci dbejte na to, aby nedošlo rovnoměrně a kývavým pohybem na- k dotyku se žádnými předměty, horu a dolů. jako např. s drátěnými ploty anebo • Při vodorovných řezech pohybujte podporami rostlin. To by mohlo vést nůžkami srpovitě směrem k okraji k poškození... -
Page 111: Údržba A Čištění
Údržba a čištění • Lehké zuby u ostří můžete vyhladit sami. Ostří obtáhněte olejovým brous- Opravářské a údržbářské práce, kem. Pouze ostré nože zaručují dobrý které v tomto návodu nejsou po- výkon při stříhání. psány, přenechejte některému námi • Tupé, ohnuté nebo poškozené nože se autorizovanému servisnímu středis- musí... -
Page 112: Technická Data
Hodnoty hluku a vibrací byly stanoveny na základě norem a nařízení, jmenovaných v Nůžky na živý plot prohlášení o konformitě. s teleskopickou rukojetí..EHS 460-2 T Technické a optické změny mohou být pro- Jmenovité vstupní vedeny v rámci dalšího vývoje bez před- napětí...... -
Page 113: Detekce Poruch
Opravy Služby • Opravy, které nepodléhají záruce, • Pozor: V případě reklamace anebo můžete nechat provést za úhradu v servisu zašlete prosím přístroj na naši našem zákaznickému servisu. Náš servisní adresu vyčištěný a s upozor- zákaznický servis vám ochotně vypra- něním na poruchu. -
Page 114: Účel Použitia
Obsah Pre Vašu bezpečnosť ako i pre bezpečnosť iných osôb si pred Účel použitia ........114 prvým uvedením do prevádzky, Bezpečnostné pokyny....... 115 skôr než prístroj použijete, pozorne Obrázkové znaky na prístroji ..115 prečítajte tento návod na obsluhu. Symboly v návode ......115 Tento návod dobre uschovajte, aby Všeobecné... -
Page 115: Bezpečnostné Pokyny
Bezpečnostné pokyny Údaj o hladine akustického výkonu v dB. Tento odsek sa týka základných bezpeč- nostných predpisov pri práci s odvetvova- Elektrické prístroje nepatria do do- čom. mového odpadu. Obrázkové znaky na prístroji Ochranná trieda II 410 mm Dĺžka rezu 18 mm Hrúbka rezu Symboly v návode... -
Page 116: Všeobecné Bezpečnostné Pokyny Pre Elektrické Nástroje
Všeobecné bezpečnostné po- adaptérové zástrčky v spojení s elek- kyny pre elektrické nástroje trickými nástrojmi s ochranným uzem- nením. Nezmenené zástrčky a zásuvky VAROVANIE! Prečítajte si všetky zmenšujú riziko elektrického úderu. bezpečnostné pokyny a nariade- • Vyvarujte sa telesnému kontaktu s nia. - Page 117 Bezpečnosť osôb: chytené pohybujúcimi sa časťami. Používanie a ošetrovanie elektrického Pozor: Takto sa vyvarujete nehodám a poraneniam: nástroja: Buďte pozorní, dbajte na to, čo robíte Nepreťažujte tento nástroj. Použite • • a pustite sa s elektrickým nástrojom pre svoju prácu elektrické náradie, rozumne do práce.
-
Page 118: Bezpečnostné Pokyny Pre Nožnice Na Živé Ploty
jeho príslušenstvo, vložné nástroje pod napätím a týmto privodiť elektrický atď. v súlade s týmito inštrukciami. úder. Zohľadnite pritom pracovné podmienky • Udržujte kábel vzdialene od oblasti a činnosť, ktorá sa má vykonávať. Po- rezania. V priebehu pracovného po- užívanie elektrického nástroja pre iné stupu môže byť... -
Page 119: Prehľad
Montáž Prehľad 1 Bezpečnostná nožová lišta Pred všetkými prácami na stroji 2 Rezná hlava vytiahnite sieťovú zástrčku. 3 Vetracie otvory 4 Aretačné tlačidlo pre ohybnú Ak rúry prístroja nie sú do seba zasunuté a správne zoskrutkova- reznú hlavu né, prístroj nie je možné zapnúť. 5 Upevňovacia skrutka telesko- Bezpečnostný... -
Page 120: Obsluha
Upevnenie ramenného popruhu: 3. Skrutku na nastavenie výšky (7) znovu pevne zaskrutkujte. 1. Hák karabínky ramenného po- Otočenie reznej hlavy pruhu (18) upevnite na záves- nom oku (15) na teleskopickej rukoväti prístroja. Pre strihanie aj šikmých okrajov alebo 2. Dĺžku popruhu nastavte tak, aby hornej časti živého plota môžete reznú... -
Page 121: Práca S Elektrickými Nožnicami
rýchlosťou. V prípade poškodenia, zamotania 5. Pre vypnutie znovu uvoľnite za- alebo prerezania kábla okamžite vytiahnite zástrčku zo zásuvky. pínač / vypínač (11). Práca s elektrickými nožnicami Techniky strihania Odvetvovač nepoužívajte stojac • Hrubé konáre naskôr vyrežte nožnicami na rebríku alebo na labilnom sta- na konáre. -
Page 122: Údržba A Čistenie
tvaru. Hlavný výhonok by mal zostať ich vymeňte. nepoškodený, až kým živý plot nedo- • Udržujte vetracie otvory ( 3) a skri- siahne plánovanú výšku. Všetky ostat- ňu motora prístroja (rezná hlava) né výhonky sa skrátia o polovicu. 2) čisté. Za týmto účelom použite vlhkú... -
Page 123: Technické Údaje
Nožnice na živý plot s teles- kopickou rukoväťou ..EHS 460-2 T Hodnoty hluku a vibrácií boli zistené v sú- Menovité vstupné napätie .. 230-240V~, 50Hz lade s normami a predpismi uvedenými vo Príkon ..........460 W... -
Page 124: Zisťovanie Závad
center a uhlíkové kefky, pokiaľ príčinou servisné stredisko vám s radosťou reklamácie nie sú vady materiálu. vyhotoví cenovú ponuku. Môžeme • Predpokladom pre záručné plnenie je spracovať len zariadenia, ktoré boli dodržanie pokynov na čistenie a údržbu dostatočne zabalené a vyplatené. uvedených v návode na obsluhu. -
Page 125: Paskirtis
Paskirtis Prieš pradėdami eksploatuoti pir- mą kartą atidžiai perskaitykite šią eksploatavimo instrukciją. Sau- Prietaisas yra skirtas pjauti gyvatvores, gokite šią instrukciją ir prireikus krūmus ir dekoratyvinius krūmokšnius perduokite kitam naudotojui, kad namų valdose. būtų galima bet kada pasinaudoti Įstačius teleskopinį kotą galima pjauti instrukcijoje esančia informacija. -
Page 126: Saugos Nurodymai
Saugos nurodymai Garso galios lygio L nurodymas Šiame skyriuje pateikiami pagrindiniai saugos potvarkiai, kurių reikia laikytis dir- Elektros prietaisų negalima išmesti bant su benzininėmis gyvatvorių žirklėmis. kartu su buitinėmis atliekomis. Paveikslėliai ant prietaiso Apsaugos klasė II 410 mm Pjovimo ilgis 18 mm Atstumas tarp dantų... -
Page 127: Bendrieji Saugos Nurodymai Nau
Įvykus nelaimingam atsitikimui Elektros sauga arba eksploatuojant atsiradus trik- • Elektrinio įrankio prijungimo kiš- čiai, nedelsdami išjunkite prietaisą ir ištraukite tinklo kištuką. Imkitės tukas turi tikti kištukiniam lizdui. priemonių sužalojimams sutvarkyti Draudžiama keisti kištuko kons- trukciją. Įžemintiems elektriniams arba kreipkitės į gydytoją. Apie trik- čių... - Page 128 vartojate narkotikus, alkoholį ar dojami. Naudojant dulkių siurbimo medikamentus. Dėl vieno neatsar- prietaisą sumažinama dulkių keliama gaus poelgio naudojant elektrinį įrankį grėsmė. galima sunkiai susižaloti. • Naudokite asmenines apsaugos Saugus elgesys su elektriniais įran- priemones ir visada užsidėkite ap- kiais ir jų naudojimas sauginius akinius.
-
Page 129: Specialūs Saugos Nurodymai
mo įrankiai su pagaląstomis pjovimo perduota įtampa, todėl kyla elektros briaunomis rečiau užstringa ir juos šoko pavojus. daug lengviau valdyti. • Laidą laikykite atokiai nuo pjovimo • Elektrinį įrankį, priedus, naudoja- srities. Dirbant laidą gali uždengti muosius įrankius ir kt. naudokite nupjauti krūmai, todėl galite netyčia pagal šią... -
Page 130: Apžvalga
Montavimas Apžvalga 1 Apsauginė peilių juosta Prieš pradėdami visus darbus iš 2 Pjovimo galvutė prietaiso ištraukite tinklo kištuką. 3 Ventiliacijos angos 4 Fiksavimo mygtukas pasukamai Prietaiso nepavyks įjungti, jei prietaiso vamzdžiai neįstatyti vie- pjovimo galvutei nas į kitą ir netinkamai prisukti. 5 Teleskopinio koto tvirtinimo Apsauginis jungiklis neleidžia varžtas + tvirtinimo veržlė... -
Page 131: Valdymas
Teleskopinio koto reguliavimas Pečių srities diržo pritvirtinimas: 1. Pečių srities diržo (18) karabini- Teleskopinį kotą (6) galima nuosekliai re- nį kablį prikabinkite prie prietai- guliuoti 40 cm. so teleskopinio koto nešiojimo kilpų (15). 1. Atlaisvinkite aukščio reguliavimo 2. Nustatykite tokį diržo ilgį, kad varžtą... -
Page 132: Darbas Su Prietaisu
1. Užsidėkite pečių srities diržą (18) kryptimi pjausite. Atkreipkite dėmesį, (žr. „Pečių srities diržo pritvirtini- kad ilginamasis kabelis būtų toli nuo mas“). darbo srities. Niekada nedėkite kabelio 2. Prijungimo prie tinklo kabelio (13) ant gyvatvorės, kur jį lengvai galėtų gale padarykite kilpą, įverkite ją sugriebti peiliai. -
Page 133: Techninė Priežiūra Ir Valymas
šakelės, kurios užtikrina patikimą Reguliariai atlikite toliau nurodytus apsaugą nuo pašalinių žvilgsnių. techninės priežiūros ir valymo darbus. At- liekant šiuos darbus užtikrinamas ilgas ir 1. Iš pradžių nupjaukite vieną gyvatvo- patikimas naudojimas. rės pusę. Gyvatvorių žirkles traukite • Prieš kiekvieną naudojimą patikrinkite, augimo kryptimi iš... -
Page 134: Utilizavimas / Aplinkos Apsauga
įrankį tikroji vibracijos emisijos vertė gali skirtis nuo nurodytosios, Gyvatvorių žirklės su teleskopiniu kotu nes ji priklauso nuo elektrinio įrankio nau- ..........EHS 460-2 T dojimo būdo. Vardinė įėjimo įtampa ..230-240 V~, 50 Hz Būtina nustatyti saugos priemones naudo- Imamoji galia ........ -
Page 135: Atsarginės Dalys
Atsarginės dalys priežiūros centrui, būtinai nurodykite defektą. Atsargines dalis galite įsigyti mūsų tech- Mes nepriimame prietaisų, už kurių ninės priežiūros centre. Užsakydami siuntimą nebuvo sumokėta (nega- nurodykite savo įrenginio tipą ir pozicijos baritinis krovinys, skubiosios siun- numerį detalių brėžinyje. tos arba kitas specialus gabenimo būdas). -
Page 136: Gedimų Paieška
Gedimų paieška Problema Galima priežastis Gedimo šalinimas Patikrinkite kištukinį lizdą, kabelį, linijas, kištukus ir apsaugą, prirei- Nėra tinklo įtampos. kus perduokite suremontuoti kvali- fikuotam elektrikui. Neužsiveda prietai- Sugedo įjungimo ir išjungi- mo mygtukas. Suremontuokite techninės priežiū- Nusidėvėjo anglinis šepe- ros centre. tėlis. -
Page 138: Translation Of The Original Ec Declaration Of Conformity
Die alleinige Verantwortung für die Aus- This declaration of conformity is issued stellung dieser Konformitätserklärung trägt under the sole responsibility of the manu- der Hersteller: facturer: Grizzly Tools GmbH & Co. KG Stockstädter Straße 20 63762 Großostheim, Germany Volker Lappas, 01.04.2016 (Dokumentationsbevollmächtigter,... -
Page 139: Traduction De La Déclaration De Conformité Ce Originale
Nous certifions par la présente que le Con la presente dichiariamo che modèle Decespugliatore con manico telescopico Taille-haie à manche télescopique Série serie di costruzione EHS 460-2 T EHS 460-2 T Numero di serie Numéro de série 201602000001 - 201602003000... -
Page 140: Vertaling Van De Originele Ce- Conformiteitsverklaring
CE Hiermede bevestigen wij dat de Vimos, por este meio, declarar que o Heggenschaar met telescopische steel Tesoura de sebes com cabo telescópico da série EHS 460-2 T bouwserie EHS 460-2 T Número de serie Serienummer 201602000001 - 201602003000 201602000001 - 201602003000 corresponde às respectivas normas da UE... -
Page 141: Traducción De La Declaración De Conformidad Ce Original
Mediante la presente declaramos que el że konstrukcja modo constructivo de Nożyce do cięcia żywopłotów z drąż- Podadora con mango telescópico kiem teleskopowym serie de construcción EHS 460-2 T seriia produkcyjna EHS 460-2 T Número de serie Numer seryjny 201602000001 - 201602003000... -
Page 142: Překlad Originálního Prohlášení O Shodě Ce
Tímto potvrzujeme, že Týmto potvrdzujeme, že Nůžky na živý plot s teleskopickou ru- Nožnice na živý plot s teleskopickou rukoväťou kojetí konstrukční řady EHS 460-2 T konštrukčnej rady EHS 460-2 T Pořadové číslo Poradové číslo 201602000001 - 201602003000 201602000001 - 201602003000 odpovídá... -
Page 143: Vertimas Iš Originalių Eb Atitikties Deklaracija
Garso galingumo lygis: Numatyta: 98 dB(A) Išmatuota: 96,33 dB(A) Taikytas atitinkamas 2000/14/EB V priede nurodytas atitikties įvertinimo metodas. Tiktai gamintojas yra atsakingas už šio atitikties pareiškimo parengimą: Grizzly Tools GmbH & Co. KG Stockstädter Straße 20 63762 Großostheim, Germany 01.04.2016 Volker Lappas įgaliotas sudaryti dokumentaciją... -
Page 145: Explosionszeichnung
Explosionszeichnung • Exploded Drawing Explosietekening • Vue éclatée • Vista esplosa Vista en corte • Plano de explosión Rysunek samorozwijający • Výkres sestavení Výkres náhradných dielov • Trimatis vaizdas EHS 460-2 T... -
Page 146: Grizzly Service-Center
Grizzly Service-Center 92, S.A. Grizzly Tools GmbH & Co. KG c/ Bristol, 32-34 Kundenservice Parque Empresarial Europolis Stockstädter Straße 20 28232 Las Rozas (Madrid) 63762 Großostheim Tel.: 91 6409 950 Tel.: 06026 9914 441 Fax: 91 6407 135 Fax: 06026 9914 499 e-mail: comercial@92sa.com... -
Page 147: Grizzly Service-Center
B39534_20160302_tr...
Need help?
Do you have a question about the EHS 460-2 T and is the answer not in the manual?
Questions and answers