Table of Contents
Advertisement
Quick Links
Advertisement
Table of Contents

Related Manuals for andover SPINDECK


Summary of Contents for andover SPINDECK
- Page 1 Product Manual www.andoveraudio.com Page 1...
- Page 2 Page 2...
-
Page 3: Table Of Contents
Table of Contents Introduction / Safety notes............4 Product Diagram............5 To Set-up your Spindeck............6-7 Useful Tips............8 Specifications y............9 In Case of Difficulty............10 Customizing Your Experience............11 Installing a New Cartridge............12 Repacking Diagram............13 30-Day Guarantee / Warranty / Service............14 Page 3... -
Page 4: Introduction / Safety Notes
Getting Started Spindeck comes with a cartridge pre-mounted and all critical adjustments factory set. To setup Spindeck, you only have to remove the packing materials and install the belt. Then plug it into your system and you’re ready to play. -
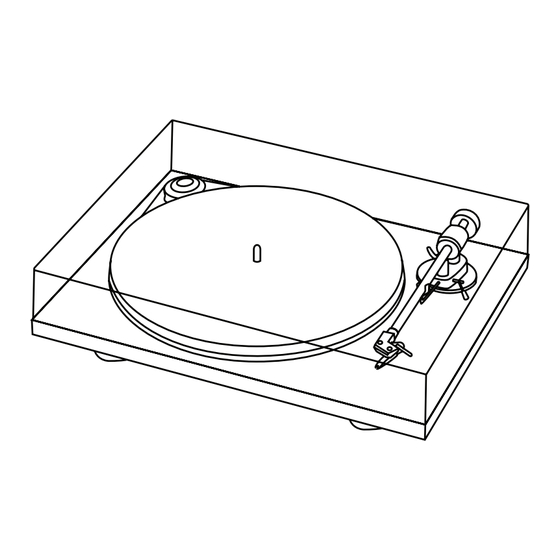
Page 5: Product Diagram
Controls, features and connections: Power switch Stepped drive pulley and drive belt Platter with felt mat Tonearm counterweight Tonearm lift lever Tonearm rest and removable transport lock Tonearm tube Headshell with finger lift and pre-mounted Ortofon OM5e cartridge Dustcover Lid (10) Lid hinge (11) -
Page 6: To Set-Up Your Spindeck
Belt set for 33 RPM as shown Connect Spindeck to your Amplifier Spindeck has a captive tonearm signal lead (pg.5, #12) for connection to the amplifier. Use the Phono input on your amplifier or Spinbase. The plug with the red band should be attached to the RIGHT channel input jack, and the plug with the white band is the LEFT channel. - Page 7 Carefully remove the clear plastic stylus protection cover by gently pulling it straight off the front of the stylus. Save it for later use if Spindeck must be moved or shipped. Take care to not pull the stylus out in the process.
-
Page 8: Useful Tips
Useful Tips Spindeck should be positioned on a low-resonance surface such as wood or multiple layer ply board to avoid structural vibrations disturbing replay. The Andover Spinbase has been specially designed designed to provide a stable, solid support that perfectly compliments Spindeck. -
Page 9: Specifications Y
Technical Specifications Spindeck Nominal speeds 33/45 r.p.m. Wow and flutter 33: <0.29% 45: <0.27% Signal to noise -65dB Effective tonearm mass Effective tonearm length 8.6” (218,5mm) Overhang 22mm Power consumption 4.5W Power cord Suitable for USA/Canada Dimensions (W x H x D) -
Page 10: In Case Of Difficulty
The unit is not connected to a phono input designed for a magnetic cartridge. Line or Aux inputs are not suitable for Spindeck. If you do not have a magnetic phono input on your amplifier a separate phono preamp is required. -
Page 11: Customizing Your Experience
If you would like to add the convenience of automatic arm lift at the end of a side, the Q-Up accessory is available from Andover for use with your Spinbase. It is simple to use and has no negative effect on playback performance. The tonearm does not contact the Q-Up until the arm is in the lead-out groove area. -
Page 12: Installing A New Cartridge
The full performance of any turntable can only be achieved if the cartridge is adjusted correctly. Precision tools and patience are required to accomplish this job properly. If you are not comfortable performing this task, your Andover dealer or support@andoveraudio. com are available to help. -
Page 13: Repacking Diagram
Repacking diagram Be sure to repack your Spindeck correctly if returning the unit for any reason. Shipping damage due to incorrect packing is not covered by the warranty. Page 13... -
Page 14: 30-Day Guarantee / Warranty / Service
Spindeck. If you must return your Spindeck for any reason, it must be safely packed and shipped in its original carton and packing material according to the diagrams on the last page of this user guide. - Page 15 Page 15...
- Page 16 15 High Street North Andover, Massachusetts 01845 978.775.3670 www.andoveraudio.com | support@andoveraudio.com | Andover is a registered trademark of Andover Audio L.L.C. PRO-JECT is a registered trademark of AUDIO TUNING Vertriebs GmbH. ORTOFON is a registered trademark of ORTOFON S/A. Page 3...
Need help?
Do you have a question about the SPINDECK and is the answer not in the manual?
Questions and answers