Table of Contents
Advertisement
Quick Links
Advertisement
Table of Contents

Subscribe to Our Youtube Channel
Related Manuals for Transpak TP-6000

Summary of Contents for Transpak TP-6000
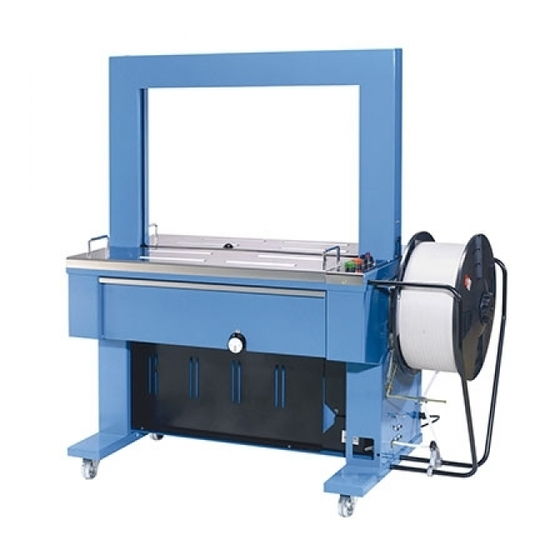
- Page 1 AUTOMATIC TP-6000 TP-6000 TP-6000CE (CE version) Original Instruction 01/2017...
- Page 2 Explanations for Each Model NO. : TP-6000-1 Single Phase Model TP-6000-3 Three Phase Model TP-6000CE1 Single Phase With CE Version TP-6000CE3 Three Phase With CE Version...
-
Page 3: Table Of Contents
PART CONTENTS 1. Safety Instructions .................. 1 (1) Before Operating ................1 (2) During operating ................1 (3) After operating ................1 (4) Signs ....................1 (5) Maintenance ................... 2 (6) Storage ................... 2 (7) Other Reminders ................2 2. Construction and Function of Units ............3 3. - Page 4 (2) Technical Data ................8 (3) Control Panel ................. 9 (4) Electric Control Unit ..............11 5. Operating the Machine ................. 13 (1) Operation Space ................13 (2) Installation of Arch Unit .............. 14 (3) How to Load P.P. Strap ..............16 (4) How to Operate ................
- Page 5 (2) Machine works................24 10. Wiring Diagram ..................26...
-
Page 6: Safety Instructions
1. Safety Instructions (1) Before Operating a. Read the instruction manual. b. Wear eye protection and safety gloves before operating this machine. Eye protection must be worn Safety gloves must be worn Ear-protector must be worn c. Verify that the power line voltage is correct. d. -
Page 7: Maintenance
Warning for danger! Do not put your hands or body into arch working area when machine is operating. (5) Maintenance a. Turn off the power before removing either of the top covers. b. The heater tongue is very hot; do not touch it. (6) Storage a. -
Page 8: Construction And Function Of Units
2. Construction and Function of Units 1 Strapping head unit This unit is the most important part of the machine for cutting and sealing of P.P. strap. 2 Bandway unit This is the arch track through which P.P. strap forwards or reverses. 5 Body frame unit Feeding and reversing of strap. -
Page 9: General Safety Remarks
3. General Safety Remarks (1) Basic Operation The machine is only to be operated when in good running condition and in accordance with the instructions provided in the operation manual. Operators must be trained in proper operation and safety of the equipment. The machine may only be operated in accordance with its designated use. -
Page 10: Warning Of Electrical Dangers
Before starting the strapping machine, make sure that the area is clear and safe. Operating personnel need to be briefed before executing special operations and maintenance work; this work needs to be done with the proper supervision. Always check and tighten connections after maintenance or repair. After completing maintenance or repair, all safety devices must be replaced and checked for functionality before operating the equipment. -
Page 11: Grounding Instructions Shall Include The Followin
(5) Grounding Instructions Shall Include the Followin This product must be grounded. In the event of an electrical short circuit, grounding reduces the risk of electric shock. This product is equipped with a cord that has a grounding wire and an appropriate grounding plug. The plug must be plugged into an outlet that is properly installed and grounded in accordance with all local codes and ordinances. -
Page 12: Machine Information
4. Machine Information (1) Areas of Application and Machine Description This plastic strapping machine can be used for all types of strapping applications with package sizes of 100 mm(width 20 mm(height) and up. This machine is particularly suitable for heavy packaged goods as well as printed products, boxes, etc. -
Page 13: Technical Data
(2) Technical Data Sealing method Heat Strap width 8 mm to 15.5 mm (3/8" - 5/8") Strap thickness : 0.55 mm up to 0.75 mm (0.022" - 0.03") Strap reel diameter : 200 mm (8" nominal) Width : 1430 mm (56.3") Depth : 620 mm (24.4") Table height :... -
Page 14: Control Panel
(3) Control Panel a. (For Standard Version) 1 Start Switch 5 Auto/Hand selector switch This is the switch to start a strapping While selector switch is placed to the operation. A strapping cycle is completed position "AUTO", the machine will only after actuation of this switch. - Page 15 b. (For CE Version) 1 Start switch This is the switch to start a strapping operation. A strapping cycle is completed only after actuation of this switch. 3 F/R switch (Feed and Reverse) After P.P. strap is fed and the main power switch is on, turn this switch counterclockwise to feed P.P.
-
Page 16: Electric Control Unit
If the time selected for Timer T2 is too short, strap may not reach the sealing position. Normally, Timer T2 is set to about 0.8 second for standard arch (850x600), but may have to be adjusted depending on arch size. TP-6000-3 TP-6000CE3 -11-... - Page 17 T2 is too short, strap may not reach the sealing position. Normally, Timer T2 is set to about 0.7 second for standard arch (850x600), but may have to be adjusted depending on arch size. TP-6000-1 TP-6000CE1 c. Adjustments of T1 & T2 for Different Arch Size...
-
Page 18: Operating The Machine
5. Operating the Machine (1) Operation Space Keep the area (A) and (B) free for the operator. The area (A) is necessary for operation strapping machine and the area (B) is necessary for changing the strap or adjusting strap amount in the accumulator. -13-... -
Page 19: Installation Of Arch Unit
(2) Installation of Arch Unit -14-... - Page 20 a.Take the upper table off. b. Take the LH bandway off. TMS, M5×8 TMS, M6×8 HBS, M8×15 SW, M8 PW, M8 (A) Slide the arch unit into the fixing brackets and fix both sides of the arch frame with * Please note that is imperative to open the flaps of RH bandway to protect them when installing the arch unit in.
-
Page 21: How To Load P
(3) How to Load P.P. Strap Ensure that the power supply switch is turned off before loading P.P. strap. Step 1 Place a strap coil on the reel drum according to the arrow direction as indicated on the Outer Flange . -
Page 22: How To Operate
(4) How to Operate a. For standard version Turn the power supply switch on. The pilot lamp lights up and the strap is automatically fed into the Accumulator Box. (See part I page 9 For CE version Turn on the Main power switch (make a 90-degree clockwise turn). The front door will be locked at the same time. -
Page 23: Adjustments
6. Adjustments (1) Tension strength The tension knob is used to adjust the tension strength for strapping. The range of strapping tension is 0-10, so that an operator can choose the adequate strapping tension for a package. Normally, the knob position 4 or 5 is suitable for a carton box. (2) Heater temperature Set the knob to position 3 or 4. -
Page 24: Feed And Take-Up Mechanism
(3) Feed and take-up mechanism If this unit is not correctly adjusted, strap feed and take-up will become irregular. Normally, this unit is set to accept P.P. strap with the thicknesses of 0.55mm-0.6mm. If a different strap thickness is used, adjust the section marked by a circle in the drawing so that the clearance between the Upper Roller Spring... -
Page 25: How To Adjust Ls3, Ls2, Ls1 (Movements Of Control Unit)
(4) How to adjust LS3, LS2, LS1 (Movements of control unit) LS3, controls the machine to stop at home position and is adjusted by Limit Switch Contactor, When LS1 is activated, the control unit stops and the strap starts reversing. In the control unit, the right Press Unit rises up to the top and grips the strap under Slide Table,... -
Page 26: Amount Of Strap In Accumulator Box
(5) Amount of strap in Accumulator Box The machine has already been set in its Accumulator Box. However, some adjustment may be required, depending on the actual quality or thickness of the strap used. If adjustment is necessary, proceed as shown in the following drawing. a. -
Page 27: Maintenance
7. Maintenance Warning: Before any maintenance or repairs on the machine, set the Main Power Switch to "O" (OFF). Wait about 3 minutes for cooling down the heater to avoid burns with this area. (1) Cleaning and Lubrication The high reliability and long service life of the strapping machine will depend on regular cleaning and maintenance. -
Page 28: How To Safely Move The Machine
Monthly :( or 50,000 strapping cycles) Clean both sides of heater plate and polish with fine sandpaper if necessary ATTENTION: Make sure the welding plate is cool first!! Check supporting and cam rollers of strapping head for easy movement. The slide table must be moved back to home position automatically by the spring tension. -
Page 29: Troubleshooting
9. Troubleshooting (1) Machine does not work a. Pilot Lamp does "NOT LIGHT UP" Probable Causes Remedy a1. No electrical supply a1. Check electrical power source a2. Fuse is blown or dislodged a2. Check electrical unit a3. Wire broken or disconnected a3. - Page 30 b. Incorrect strap feed and take-up Probable Causes Remedy b1. Incorrect strap threading direction on b1. Reload strap correctly (see P16) reel holder b2. Incorrect loading of strap b2. Check if strap is twisted in loading section (see P16) b3. Strap gets in between strap coil and b3.
- Page 31 10.Wiring Diagram a. TP-6000-1/TP-6000-CE1 -26-...
- Page 32 -27-...
- Page 33 -28-...
- Page 34 -29-...
- Page 35 -30-...
- Page 36 TP-6000-3/TP-6000-CE3 -31-...
- Page 37 -32-...
- Page 38 -33-...
- Page 39 -34-...
- Page 40 -35-...
- Page 42 PART II CONTENTS 1. Strapping Head Unit ………………………………………… 1 2. Bandway Unit ………………………………………………34 3. Accumulator Unit ………………………………………… 49 4. Reel Unit …………………………………………………… 59 5. Body Frame Group ………………………………………… 68 6. Electric Control Unit……………………………………… 90...
- Page 43 STRAPPING HEAD UNIT T6-1-90000 T6-1-90012 REF. PART NO. DESCRIPTION Q'TY REMARKS T6-1-90000 Strapping Head Unit (For 12mm) T6-1-90000S Strapping Head Unit (For 12mm) (Stainless Steel Model) T6-1-90012 Strapping Head Unit (For 9mm) T6-1-90012S Strapping Head Unit (For 9mm) (Stainless Steel Model) T6-1-90013 Strapping Head Unit (For 15.5mm) T6-1-90013S...
- Page 44 STRAPPING HEAD UNIT T6-1-90000 T6-1-90012 REF. PART NO. DESCRIPTION Q'TY REMARKS T6-1-20005 Slide Table Group (For 12mm) SEE PAGE 6 T6-1-20005S Slide Table Group (For 12mm) SEE PAGE 6 (Stainless Steel Model) T6-1-20006 Slide Table Group (For 9mm) SEE PAGE 6 T6-1-20006S Slide Table Group (For 9mm) SEE PAGE 6...
- Page 45 CAM GROUP T6-1-10006 T6-1-10007...
- Page 46 CAM GROUP T6-1-10006 T6-1-10007 REF. PART NO. DESCRIPTION Q'TY REMARKS T6-1-10006 Cam Group (For 1Phase) T6-1-10007 Cam Group (For 3Phase) T6-1-10110 Tension Cam T6-1-10111 Tension Cam (For Max Tension45kg)(CE) T6-1-10120 Cam Shaft End Plate T6-1-10130 Limit Cam (LS1) T6-1-10140 Limit Switch Contactor A (LS3) T6-1-10150 Limit Switch Contactor B (LS2) KYA070720...
- Page 47 CAM ASS'Y 1-1-1 T6-1-12000 REF. PART NO. DESCRIPTION Q'TY REMARKS T6-1-12110 Slide Table Cam T6-1-12120 RH Press Cam T6-1-12130 Center Press Cam T6-1-12140 Heater Cam T6-1-12150 LH Press Cam T6-1-12160 Cam Shaft T6-1-12170 Cam Shaft Coupling T6-1-12180 Collar (27.8L) T6-1-12190 Collar (20L) T6-1-12210 Collar(8L)
- Page 49 SLIDE TABLE GROUP T6-1-20005 T6-1-20006 REF. PART NO. DESCRIPTION Q'TY REMARKS T6-1-20005 Slide Table Group (For 12mm) T6-1-20005S Slide Table Group (For 12mm) (Stainless Steel Model) T6-1-20006 Slide Table Group (For 9mm) T6-1-20006S Slide Table Group (For 9mm) (Stainless Steel Model) T6-1-20007 Slide Table Group (For 15.5mm) T6-1-20007S...
- Page 50 T6-1-20005 SLIDE TABLE GROUP T6-1-20006 REF. PART NO. DESCRIPTION Q'TY REMARKS T6-1-20194 S.F.S Ass'y (For S.F.S, 12mm)(Option) T6-1-20194S S.F.S Ass'y (For S.F.S, 12mm)(Stainless Steel Model)(Option) T6-1-20191 S.F.S Ass'y (For S.F.S, 9mm)(Option) T6-1-20191S S.F.S Ass'y (For S.F.S, 9mm)(Stainless Steel Model)(Option) T6-1-20192 S.F.S Ass'y (For S.F.S, 15.5mm)(Option) T6-1-20192S...
- Page 51 T6-1-20005 SLIDE TABLE GROUP T6-1-20006 REF. PART NO. DESCRIPTION Q'TY REMARKS PW08A PW, M8 (A) PW06A PW, M6 (A) PW, M6 (A)(For S.F.S)(Option) SW06 SW, M6 SW, M6 (For S.F.S)(Option) HBS0620 HBS, M6x20 (For S.F.S)(Option) HBS0408 HBS, M4x8 (For S.F.S)(Option) TMS0412 TMS, M4x12 (For S.F.S)(Option) PMS0212...
- Page 52 1-2-1 STRAP GUIDE ARM ASS'Y T6-1-21000 REF. PART NO. DESCRIPTION Q'TY REMARKS T6-1-21110 Strap Guide Arm MB2025 Metal Bushing, 2025 -10-...
- Page 53 1-2-2 STRAP GUIDE SPRING ASS'Y T6-1-22000 REF. PART NO. DESCRIPTION Q'TY REMARKS T6-1-22110 Strap Guide Spring T6-1-22120 Strap Guide Spring Bracket HBS0616 HBS, M6x16 HN06 HN, M6 -11-...
- Page 54 PRESS GROUP T6-1-30000...
- Page 55 PRESS GROUP T6-1-30000 REF. PART NO. DESCRIPTION Q'TY REMARKS T6-1-30000 Press Group T6-1-30000S Press Group (Stainless Steel Model) T6-1-30110 Press Arm Shaft T6-1-30120 Cutter Tension Spring Hook T6-1-30130 Upper Roller Spring T6-1-30140 Upper Shaft Spring Adjuster T6-1-30150 Press Tension Spring T6-1-30160 Cutter Tension Spring T6-1-30170...
- Page 56 RH, BLOCK ARM ASS'Y 1-3-1 T6-1-31000 REF. Q'TY PART NO. DESCRIPTION REMARKS T6-1-31000 RH, Block Arm Ass'y T6-1-31000S RH, Block Arm Ass'y (Stainless Steel Model) T6-1-31110 RH, Block Arm T6-1-31120 Upper Cutter T6-1-31120S Upper Cutter (Stainless Steel Model) T6-1-31130 Upper Cutter Pin T6-1-31140 RH, Block Spring BR628ZZ...
- Page 57 CENTER BLOCK ARM ASS'Y 1-3-2 T6-1-32000 REF. PART NO. DESCRIPTION Q'TY REMARKS T6-1-32000 Center Block Arm Ass'y T6-1-32000S Center Block Arm Ass'y (Stainless Steel Model) T6-1-32110 Center Block Arm T6-1-32120 Universal Press T6-1-32120S Universal Press (Stainless Steel Model) T6-1-32130 Lower Cutter T6-1-32130S2 Lower Cutter (Stainless Steel Model) T6-1-32140...
- Page 58 LH, BLOCK ARM ASS'Y 1-3-3 T6-1-33000 REF. PART NO. DESCRIPTION Q'TY REMARKS T6-1-33110 LH, Block Arm T6-1-33120 Jaw Left T6-1-32150 LH & Center Block Spring BR628ZZ Bearing, 628ZZ SP0820 Spring Pin, 8x20 SP0622 Spring Pin, 6x22 MB2020 Metal Bushing, 2020 -16-...
- Page 59 HEATER GROUP T6-1-40000...
- Page 60 T6-1-40000 HEATER GROUP REF. PART NO. DESCRIPTION Q'TY REMARKS T6-1-40110 Heater Cover T6-1-40120 Heater Crank Spring T6-1-40130 Heater Slider Guide (L) T6-1-40140 Heater Slider Guide (R) T6-1-40150 Heater Crank Shaft ER15 Snap Ring, E-15 T6-1-40170 Heater Stopper LA-40002 Label T6-1-41000 Heater Ass'y T6-1-42000 Heater Crank Ass'y...
- Page 61 1-4-1 HEATER CRANK ASS'Y T6-1-42000 REF. PART NO. DESCRIPTION Q'TY REMARKS T6-1-42110 Heater Crank T6-1-42120 Heater Bearing Shaft T6-1-42130 Heater Crank Collar BR6304ZZ Bearing, 6304ZZ MB2015 Metal Bushing, 2015 ER15 Snap Ring, E-15 HN08 HN, M8 -19-...
- Page 62 STRAPPING HEAD GROUP T6-1-50000...
- Page 63 STRAPPING HEAD GROUP T6-1-50000 REF. PART NO. DESCRIPTION Q'TY REMARKS T6-1-50100 Strapping Head Frame T6-1-50111 Band Width Block HBS0820 HBS, M8x20 HBS0620 HBS, M6x20 PW06B PW, M6 (B) SW08 SW, M8 PW08C PW, M8 (C) -21-...
- Page 64 TENSION GROUP T6-1-60000...
- Page 65 T6-1-60000 TENSION GROUP REF. PART NO. DESCRIPTION Q'TY REMARKS T6-1-60000 Tension Group T6-1-60000S Tension Group (Stainless Steel Model) T6-1-60110 Tension Arm Shaft T6-1-60120 Tension Arm Spring T6-1-60130 Tension Adjusting Arm Spring T6-1-60140 Tension Arm Spacer T6-1-60150 Strap Cover T6-1-60160 Tension Arm Spring Hook L-Type BRHK2516 Bearing, HK2516 ER15...
- Page 66 TENSION ARM ASS'Y 1-6-1 T6-1-61000 REF. Q'TY PART NO. DESCRIPTION REMARKS T6-1-61110 Tension Arm T6-1-61120 Tension Jaw Shaft T6-1-61130 Tension Arm Spring Hook I-Type T6-1-61140 Tension Jaw Spring T6-1-20250 Cam Follower, KR22xLL ER06 Snap Ring, E-6 HSS0810G HSS, M8x10 (G) HN08 HN, M8 -24-...
- Page 67 1-6-3 T6-1-63001 TENSION ADJUSTING CAM ASS'Y REF. Q'TY PART NO. DESCRIPTION REMARKS T6-1-63001 Tension Adjusting Cam Ass'y T6-1-63001S Tension Adjusting Cam Ass'y (Stainless Steel Model) T6-1-63011 Tension Adjusting Handle T6-1-63012 Tension Adjusting Shaft T6-1-63130 Plate (Tension Selector Knob) T6-1-63014 Tension Adjusting Cam T6-1-63015 Bushing T6-1-63016...
- Page 68 TENSION ADJUSTING CAM ASS'Y T6-1-63001 1-6-3 REF. PART NO. DESCRIPTION Q'TY REMARKS HBS0625 HBS, M6x25 HBS0620 HBS, M6x20 HBS0516 HBS, M5x16 PMS0412 PMS, M4x12 HSS0608G HSS, M6x8 (G) PW05 PW, M5 PW04 PW, M4 SW05 SW, M5 NTE06 NTE, M6 HN05 HN, M5 SR12...
- Page 69 1-6-4 TENSION ADJUSTING ASS'Y T6-1-64000 REF. Q'TY PART NO. DESCRIPTION REMARKS T6-1-64110 Tension Adjusting MB2015 Metal Bushing, 2015 SP0645 Spring Pin, 6x45 -27-...
- Page 70 1-6-5 T6-1-65000 TENSION ADJUSTING ARM ASS'Y REF. Q'TY PART NO. DESCRIPTION REMARKS T6-1-65110 Tension Adjusting Arm T6-1-65120 Tension Adjusting Arm Spring Hook MB2015 Metal Bushing, 2015 SP0645 Spring Pin, 6x45 -28-...
- Page 71 FEED GROUP T6-1-70010 T6-1-70011 REF. PART NO. DESCRIPTION Q'TY REMARKS T6-1-70010 Feed Group (For 12mm) T6-1-70010S Feed Group (For 12mm) (Stainless Steel Model) T6-1-70011 Feed Group (For 9mm) T6-1-70011S Feed Group (For 9mm) (Stainless Steel Model) T6-1-70012 Feed Group (For 15.5mm) T6-1-70012S Feed Group (For 15.5mm) (Stainless Steel Model)
- Page 72 FEED ASS'Y 1-7-1 T6-1-71000 T6-1-71004...
- Page 73 FEED ASS'Y 1-7-1 T6-1-71000 T6-1-71004 REF. PART NO. DESCRIPTION Q'TY REMARKS T6-1-71000 Feed Ass'y (For 12mm) T6-1-71000S Feed Ass'y (For 12mm)(Stainless Steel Model) T6-1-71004 Feed Ass'y (For 9mm) T6-1-71004S Feed Ass'y (For 9mm)(Stainless Steel Model) T6-1-71005 Feed Ass'y (For 15.5mm) T6-1-71005S Feed Ass'y (For 15.5mm)(Stainless Steel Model)
- Page 74 1-7-1 FEED ASS'Y T6-1-71000 T6-1-71004 REF. PART NO. DESCRIPTION Q'TY REMARKS T6-1-71190 Upper Feed Roller Set (For 12mm) T6-1-71190S Upper Feed Roller Set (For 12mm) (Stainless Steel Model) T6-1-71191 Upper Feed Roller Set (For 9mm) T6-1-71191S Upper Feed Roller Set (For 9mm) (Stainless Steel Model) T6-1-71192 Upper Feed Roller Set (For 15.5mm)
- Page 75 UPPER ADJUSTING WEIGHT ASS'Y 1-7-2 T6-1-72000 REF. Q'TY PART NO. DESCRIPTION REMARKS T6-1-72110 Upper Adjusting Base T6-1-72120 Upper Adjusting Spring Hook T6-1-72130 Upper Adjusting Spring Rod T6-1-72140 Spring HBS0512 HBS, M5x12 HN06 HN, M6 SW05 SW, M5 -33-...
- Page 76 BANDWAY UNIT T6-2-90000 T6-2-90007 REF. PART NO. DESCRIPTION Q'TY REMARKS T6-2-90000 Bandway Unit (For 12mm) T6-2-90000S Bandway Unit (For 12mm) (Stainless Steel Model) T6-2-90007 Bandway Unit (For 9mm) T6-2-90007S Bandway Unit (For 9mm) (Stainless Steel Model) T6-2-90018 Bandway Unit (For 15.5mm) T6-2-90018S Bandway Unit (For 15.5mm) (Stainless Steel Model)
- Page 77 BANDWAY GROUP T6-2-90000 T6-2-90007 REF. PART NO. DESCRIPTION Q'TY REMARKS T6-2-10140 Bandway Group (For 1050W, 12mm) T6-2-10141 Bandway Group (For 1050W, 9mm) T6-2-10142 Bandway Group (For 1050W, 15.5mm) T6-2-10150 Bandway Group (For 1250W, 12mm) T6-2-10151 Bandway Group (For 1250W, 9mm) T6-2-10152 Bandway Group (For 1250W, 15.5mm) T6-2-10160...
- Page 78 BANDWAY GROUP T6-2-10110 T6-2-10111...
- Page 79 BANDWAY GROUP T6-2-10110 T6-2-10111 REF. PART NO. DESCRIPTION Q'TY REMARKS T6-2-10110 Bandway Group (For 850W, 12mm) T6-2-10111 Bandway Group (For 850W, 9mm) T6-2-10112 Bandway Group (For 850W, 15.5mm) T6-2-10120 Bandway Group (For 650W, 12mm) T6-2-10121 Bandway Group (For 650W, 9mm) T6-2-10122 Bandway Group (For 650W, 15.5mm) T6-2-10140...
- Page 80 BANDWAY GROUP T6-2-10110 T6-2-10111 REF. PART NO. DESCRIPTION Q'TY REMARKS T6-2-12020 SEE PAGE 40 LH Bandway Ass'y (For 1050W, 12mm /15.5mm) T6-2-12021 SEE PAGE 40 LH Bandway Ass'y (For 1050W, 9mm) T6-2-12030 LH Bandway Ass'y (For 1250W, 12mm SEE PAGE 40 /15.5mm) T6-2-12031 LH Bandway Ass'y (For 1250W, 9mm)
- Page 81 RH RANDWAY ASS'Y 2-1-1 T6-2-11000 T6-2-11001 REF. PART NO. DESCRIPTION Q'TY REMARKS T6-2-11000 RH Bandway Ass'y (For 12mm) T6-2-11001 RH Bandway Ass'y (For 9mm) T6-2-11002 RH Bandway Ass'y (For 15.5mm) T6-2-11010 RH Bandway Ass'y (Only 650W, 12mm) T6-2-11011 RH Bandway Ass'y (Only 650W, 9mm) T6-2-11012 RH Bandway Ass'y (Only 650W, 15.5mm) T6-2-11140...
- Page 82 LH BANDWAY ASS'Y 2-1-2 T6-2-12000 T6-2-12001...
- Page 83 2-1-2 LH BANDWAY ASS'Y T6-2-12000 T6-2-12001 REF. PART NO. DESCRIPTION Q'TY REMARKS T6-2-12000 LH Bandway Ass'y (For 850W, 12mm/15.5mm) T6-2-12001 LH Bandway Ass'y (For 850W, 9mm) T6-2-12010 LH Bandway Ass'y (For 650W, 12mm/15.5mm) T6-2-12011 LH Bandway Ass'y (For 650W, 9mm) T6-2-12020 LH Bandway Ass'y (For 1050W, 12mm/15.5mm)
- Page 84 CHUTE ARCH GROUP T6-2-20003 REF. PART NO. DESCRIPTION Q'TY REMARKS T6-2-20003 Chute Arch Group T6-2-20003S Chute Arch Group (Stainless Steel Model) T6-2-21003 Arch Ass'y SEE PAGE 43 T6-2-21003S Arch Ass'y (Stainless Steel Model) SEE PAGE 43 HBS0816 HBS, M8 x16 HBS0816S HBS, M8 x16 (Stainless Steel Model) PW08A...
- Page 85 ARCH ASS'Y 2-2-1 T6-2-21003...
- Page 86 2-2-1 T6-2-21003 ARCH ASS'Y REF. PART NO. DESCRIPTION Q'TY REMARKS T6-2-21003 Arch Ass'y T6-2-21003S Arch Ass'y (Stainless Steel Model) T6-2-20500 Arch Frame (For 850Wx600H) T6-2-20500S Arch Frame (For 850Wx600H)(Stainless Steel Model)(Option) T6-2-20120 Arch Bandway (For 850Wx600H) T6-2-20146 Arch Cover, Front (For 850Wx600H) T6-2-20146S Arch Cover, Front (For 850Wx600H)(Stainless Steel Model)
- Page 87 2-2-1 T6-2-21003 ARCH ASS'Y REF. PART NO. DESCRIPTION Q'TY REMARKS T6-2-20159S Upper Guide Rail (For 650W)(Stainless Steel Model)(Option) T6-2-20160 RH Side Guide Rail (For 600H) T6-2-20160S RH Side Guide Rail (For 600H)(Stainless Steel Model)(Option) T6-2-20161 RH Side Guide Rail (For 800H) T6-2-20161S RH Side Guide Rail (For 800H)(Stainless Steel Model)(Option)
- Page 88 2-2-1 T6-2-21003 ARCH ASS'Y REF. PART NO. DESCRIPTION Q'TY REMARKS T6-2-20190S Corner Guide Rail, Lower (LH)(Stainless Steel Model)(Option) T6-2-20200 Corner Guide Rail, Lower (RH) T6-2-20200S Corner Guide Rail, Lower (RH)(Stainless Steel Model)(Option) T6-2-20210 Guide Rail Hinge (1)(For 850Wx600H) 11 T6-2-20220 K-Type Guide Rail Hinge Shaft (For 850Wx600H) T6-2-20230...
- Page 89 2-2-1 T6-2-21003 ARCH ASS'Y REF. PART NO. DESCRIPTION Q'TY REMARKS T6-2-20343S Back Guide Plate, Upper (For 1450W)(Stainless Steel Model)(Option) T6-2-20344 Back Guide Plate, Upper (For 1650W) T6-2-20344S Back Guide Plate, Upper (For 1650W)(Stainless Steel Model)(Option) T6-2-20345 Back Guide Plate, Upper (For 1850W) T6-2-20345S Back Guide Plate, Upper (For 1850W)(Stainless Steel...
- Page 90 2-2-1 T6-2-21003 ARCH ASS'Y REF. PART NO. DESCRIPTION Q'TY REMARKS T6-2-21380S Back Guide Plate, RH Lower (Stainless Steel Model)(Option) PN04 4 (For 850Wx600H) PN04S 4 (For 850Wx600H)(Stainless Steel Model)(Option) TMS0508S TMS, M5x8 TMS0408 TMS, M4x8 (For 850Wx600H) TMS0408S TMS, M4x8 (For 850Wx600H)(Stainless Steel Model)(Option) HBS0440H...
- Page 91 ACCUMULATOR UNIT T6-3-90004 T6-3-90005 REF. Q'TY PART NO. DESCRIPTION REMARKS T6-3-90004 Accumulator Unit (For 12mm) T6-3-90004S Accumulator Unit (For 12mm) (Stainless Steel Model) T6-3-90005 Accumulator Unit (For 15.5mm) T6-3-90005S Accumulator Unit (For 15.5mm) (Stainless Steel Model) T6-3-90008 Accumulator Unit (For 9mm) T6-3-90008S Accumulator Unit (For 9mm) (Stainless Steel Model)
- Page 92 ACCUMULATOR UNIT T6-3-90004 T6-3-90005 REF. PART NO. DESCRIPTION Q'TY REMARKS T6-3-20000 Accumulator Box Group (For 12mm) SEE PAGE 56 T6-3-20000S Accumulator Box Group (For 12mm) SEE PAGE 56 (Stainless Steel Model) T6-3-20003 Accumulator Box Group (For 9mm) SEE PAGE 56 T6-3-20003S Accumulator Box Group (For 9mm) SEE PAGE 56...
- Page 93 ACCUMULATOR GROUP T6-3-10000 T6-3-10003...
- Page 94 ACCUMULATOR GROUP T6-3-10000 T6-3-10003 REF. PART NO. DESCRIPTION Q'TY REMARKS T6-3-10000 Accumulator Group (For 12mm) T6-3-10000S Accumulator Group (For 12mm) (Stainless Steel Model) T6-3-10003 Accumulator Group (For 9mm) T6-3-10003S Accumulator Group (For 9mm) (Stainless Steel Model) T6-3-10004 Accumulator Group (For 15.5mm) T6-3-10004S Accumulator Group (For 15.5mm) (Stainless Steel Model)
- Page 95 ACCUMULATOR GROUP T6-3-10000 T6-3-10003 REF. PART NO. DESCRIPTION Q'TY REMARKS HBS0620 HBS, M6x20 HBS0620S HBS, M6x20 (Stainless Steel Model) HBS0616 HBS, M6x16 (For 9mm/12mm) HBS0620 HBS, M6x20 (For 15.5mm) PMS0315 PMS, M3x15 HN08 HN, M8 HN08S HN, M8 (Stainless Steel Model) HN03 HN, M3 PW06A...
- Page 96 ACCUMULATOR ASS'Y 3-1-1 T6-3-11000 T6-3-11001...
- Page 97 3-1-1 T6-3-11000 ACCUMULATOR ASS'Y T6-3-11001 REF. PART NO. DESCRIPTION Q'TY REMARKS T6-3-11000 Accumulator Ass'y (For 12mm) T6-3-11001 Accumulator Ass'y (For 9mm) T6-3-11002 Accumulator Ass'y (For 15.5mm) T6-3-11110 Accumulator Bearing Case T6-3-11120 Accumulator Lower Shaft T6-3-11130 Accumulator Lower Roller T6-3-11140 Accumulator Main Roller & Shaft T6-3-11150 Accumulator Balance Bar Holder T6-3-11160...
- Page 98 ACCUMULATOR BOX GROUP T6-3-20000 T6-3-20003...
- Page 99 ACCUMULATOR BOX GROUP T6-3-20000 T6-3-20003 REF. PART NO. DESCRIPTION Q'TY REMARKS T6-3-20000 Accumulator Box Group (For 12mm) T6-3-20000S Accumulator Box Group (For 12mm) (Stainless Steel Model) T6-3-20003 Accumulator Box Group (For 9mm) T6-3-20003S Accumulator Box Group (For 9mm) (Stainless Steel Model) T6-3-20004 Accumulator Box Group (For 15.5mm) T6-3-20004S...
- Page 100 ACCUMULATOR BOX GROUP T6-3-20000 T6-3-20003 REF. PART NO. DESCRIPTION Q'TY REMARKS TMS0308 TMS, M3x8 PW05 PW, M5 PW05S PW, M5 (Stainless Steel Model) PW04 PW, M4 PW04S PW, M4 (Stainless Steel Model) HBS0430H HBS, M4x30 (H) HBS0430HS HBS, M4x30 (H)(Stainless Steel Model) SW04 SW, M4...
- Page 101 REEL UNIT T6-4-90020 REF. PART NO. DESCRIPTION Q'TY REMARKS T6-4-90020 Reel Unit T6-4-90020S Reel Unit (Stainless Steel Model) T6-4-10000 Reel Guard Group SEE PAGE 60 T6-4-10000S Reel Guard Group (Stainless Steel SEE PAGE 60 Model) T6-4-20040 Reel Control Group (For 200mm) SEE PAGE 62 T6-4-20040S Reel Control Group (For 200mm)
- Page 102 REEL GUARD GROUP T6-4-10000 REF. PART NO. DESCRIPTION Q'TY REMARKS T6-4-10000 Reel Guard Group T6-4-10000S Reel Guard Group (Stainless Steel Model) T6-4-11000 Free Angle Bracket Holder Ass'y SEE PAGE 61 T6-4-11000S Free Angle Bracket Holder Ass'y SEE PAGE 61 (Stainless Steel Model) T6-4-10530 Reel Guard (Front) T6-4-10530S...
- Page 103 FREE ANGLE BRACKET 4-1-1 T6-4-11000 HOLDER ASS'Y REF. Q'TY PART NO. DESCRIPTION REMARKS T6-4-11000 Free Angle Bracket Holder Ass'y T6-4-11000S Free Angle Bracket Holder Ass'y (Stainless Steel Model) T6-4-11110 Free Angle Bracket Holder Free Angle Roller Bracket T6-4-11120 T6-4-11130 Strap Guide Roller T6-4-11130S Strap Guide Roller (Stainless Steel Model)
- Page 104 REEL CONTROL GROUP T6-4-20040 T6-4-20041...
- Page 105 REEL CONTROL GROUP T6-4-20040 T6-4-20041 REF. PART NO. DESCRIPTION Q'TY REMARKS T6-4-20040 Reel Control Group (For 200mm) T6-4-20040S Reel Control Group (For 200mm)(Stainless Steel Model) T6-4-20041 Reel Control Group (For 280mm)(Option) T6-4-20041S Reel Control Group (For 280mm)(Stainless Steel T6-4-20110 Reel Unit Base T6-4-20130 Brake Tension Holder T6-4-20140...
- Page 106 REEL CONTROL GROUP T6-4-20040 T6-4-20041 REF. PART NO. DESCRIPTION Q'TY REMARKS T6-4-20280 Washer T6-4-20280S Washer (Stainless Steel Model) T6-4-20290 Collar TC-076 Washer T6-4-10570 Inner Flange TC-014 Outer Flange TC-015 Protector TC-016 Reel Nut Handle TC-020 TC-021 Split Pin TC-075 Center Drum (For 280mm)(Option) T6-4-21000 Brake Belt Ass'y SEE PAGE 66...
- Page 107 REEL CONTROL GROUP T6-4-20040 T6-4-20041 REF. PART NO. DESCRIPTION Q'TY REMARKS SW06 SW, M6 SW06S SW, M6 (Stainless Steel Model) HSS0606G HSS, M6x6 (G) HSS0606S HSS, M6x6 (Stainless Steel Model) HB0816 HB, M8x16 HB0816S HB, M8x16 (Stainless Steel Model) LA-31010 Label PW06A PW, M6 (A)
- Page 108 BRAKE BELT ASS'Y 4-2-1 T6-4-21000 REF. PART NO. DESCRIPTION Q'TY REMARKS T6-4-21000 Brake Belt Ass'y T6-4-21000S Brake Belt Ass'y (Stainless Steel Model) T6-4-21110 Brake Belt Holder T6-4-21110S Brake Belt Holder (Stainless Steel Model) T6-4-21120 Brake Holder Plate T6-4-21120S Brake Holder Plate (Stainless Steel Model) T6-4-21130 Brake V-Belt MB1520...
- Page 109 FREE SLIDE ROLLER ASS'Y 4-2-2 T6-4-22000 REF. PART NO. DESCRIPTION Q'TY REMARKS T6-4-22000 Free Slide Roller Ass'y T6-4-22000S Free Slide Roller Ass'y (Stainless Steel Model) T6-4-22110 Free Slide Roller Bracket T6-4-22110S Free Slide Roller Bracket (Stainless Steel Model) TE-028 Roller T6-4-11140 Rivet, Ø6x30 T6-4-11140S...
- Page 110 BODY FRAME GROUP T6-5-10054 T6-5-10055 REF. PART NO. DESCRIPTION Q'TY REMARKS T6-5-10054 Body Frame Group (For 850W)(For CE) SEE PAGE 70 T6-5-10054S Body Frame Group (For 850W) SEE PAGE 70 (For CE)(Stainless Steel Model) T6-5-10101 Body Frame Group (For 850W) SEE PAGE 70 (For Non CE) T6-5-10101S...
- Page 111 BODY FRAME GROUP T6-5-10054 T6-5-10055 REF. PART NO. DESCRIPTION Q'TY REMARKS T6-5-10057 Body Frame Group (For 1450W) SEE PAGE 70 (For CE) T6-5-10057S Body Frame Group (For 1450W) SEE PAGE 70 (For CE)(Stainless Steel Model) T6-5-10104 Body Frame Group (For 1450W) SEE PAGE 70 (For Non CE) T6-5-10104S...
- Page 113 BODY FRAME GROUP T6-5-10054 T6-5-10055 REF. PART NO. DESCRIPTION Q'TY REMARKS T6-5-10054 Body Frame Group (For 850W) (For CE) T6-5-10054S Body Frame Group (For 850W) (For CE)(Stainless Steel Model) T6-5-10101 Body Frame Group (For 850W) (For Non CE) T6-5-10101S Body Frame Group (For 850W)(For Non CE)(Stainless Steel Model) T6-5-10055 Body Frame Group (For 1050W)
- Page 114 T6-5-10054 BODY FRAME GROUP T6-5-10055 REF. PART NO. DESCRIPTION Q'TY REMARKS T6-5-10105 Body Frame Group (For 1650W)(For Non CE) T6-5-10105S Body Frame Group (For 1650W)(For Non CE)(Stainless Steel Model) T6-5-10059 Body Frame Group (For 1850W)(For T6-5-10059S Body Frame Group (For 1850W)(For CE)(Stainless Steel Model) T6-5-10106 Body Frame Group (For 1850W)(For...
- Page 115 BODY FRAME GROUP T6-5-10054 T6-5-10055 REF. PART NO. DESCRIPTION Q'TY REMARKS T6-5-10190 Rear Plate T6-5-10190S Rear Plate (Stainless Steel Model) LA-10020 Control Label (For Non CE) LA-10021 Control Label (For CE) T6-5-10220 Rear Cover T6-5-10220S Rear Cover (Stainless Steel Model) T6-5-10230 Caster (Free)(For 650W~1650W) Caster (Free)(For 1850W)
- Page 116 BODY FRAME GROUP T6-5-10054 T6-5-10055 REF. PART NO. DESCRIPTION Q'TY REMARKS T6-5-13015 Body Frame (For 1050W) T6-5-13015S Body Frame (For 1050W)(Stainless Steel Model) T6-5-11000 Upper Table, Front Ass'y (For 850W) SEE PAGE 78 T6-5-11000S Upper Table, Front Ass'y (For 850W) SEE PAGE 78 (Stainless Steel Model) T6-5-11009...
- Page 117 T6-5-10054 BODY FRAME GROUP T6-5-10055 REF. PART NO. DESCRIPTION Q'TY REMARKS T6-5-12008 Upper Table, Rear Ass'y (For 1450W) T6-5-12008S Upper Table, Rear Ass'y (For 1450W)(Stainless Steel Model) T6-5-12012 Upper Table, Rear Ass'y (For 1650W) T6-5-12012S Upper Table, Rear Ass'y (For 1650W)(Stainless Steel Model) T6-5-12013 Upper Table, Rear Ass'y (For 1850W)
- Page 118 T6-5-10054 BODY FRAME GROUP T6-5-10055 REF. PART NO. DESCRIPTION Q'TY REMARKS T6-5-10590 Upper Left Table, Rear Set (For 1050W) SEE PAGE 87 T6-5-10590S Upper Left Table, Rear Set (For SEE PAGE 87 1050W)(Stainless Steel Model) T6-5-10600 SEE PAGE 87 Upper Left Table, Rear Set (For 1250W) T6-5-10600S Upper Left Table, Rear Set (For SEE PAGE 87...
- Page 119 T6-5-10054 BODY FRAME GROUP T6-5-10055 REF. PART NO. DESCRIPTION Q'TY REMARKS SW, M6 (For Non CE) SW06S SW, M6 (For CE)(Stainless Steel Model) SW, M6 (For Non CE)(Stainless Steel Model) TMS0408 TMS, M4x8 (For Non CE) TMS, M4x8 (For CE) TMS0408S TMS, M4x8 (For Non CE)(Stainless Steel Model)
- Page 121 UPPER TABLE, FRONT ASS'Y T6-5-11000 T6-5-11009 REF. PART NO. DESCRIPTION Q'TY REMARKS ER07 Snap Ring, E-7 ER07S Snap Ring, E-7 (Stainless Steel Model) T6-5-11150 Table Handle T6-5-11150S Table Handle (Stainless Steel Model) TMS0612 TMS, M6x12 TMS0612S TMS, M6x12 (Stainless Steel Model) SW06 SW, M6 SW06S...
- Page 123 UPPER TABLE, REAR ASS'Y T6-5-12000 T6-5-12009 REF. PART NO. DESCRIPTION Q'TY REMARKS T6-5-11150 Table Handle T6-5-11150S Table Handle (Stainless Steel Model) TMS0612 TMS, M6x12 TMS0612S TMS, M6x12 (Stainless Steel Model) SW06 SW, M6 SW06S SW, M6 (Stainless Steel Model) -81-...
- Page 126 UPPER LEFT TABLE, FRONT SET T6-5-10550 T6-5-10560 REF. PART NO. DESCRIPTION Q'TY REMARKS T6-5-10550 Upper Left Table, Front Set (For 1050W) T6-5-10550S Upper Left Table, Front Set (For 1050W) (Stainless Steel Model) Upper Left Table, Front Set (For 1250W) T6-5-10560 Upper Left Table, Front Set (For 1250W) T6-5-10560S (Stainless Steel Model)
- Page 127 UPPER LEFT TABLE, FRONT SET T6-5-10550 T6-5-10560 REF. PART NO. DESCRIPTION Q'TY REMARKS T6-5-11030 Upper Left Table Front (For 1050W) T6-5-11030S Upper Left Table Front (For 1050W)(Stainless Steel Model) T6-5-11040 Upper Left Table Front (For 1250W) T6-5-11040S Upper Left Table Front (For 1250W)(Stainless Steel Model) T6-5-11050 Upper Left Table Front (For 1450W)
- Page 128 UPPER LEFT TABLE, FRONT SET T6-5-10550 T6-5-10560 REF. PART NO. DESCRIPTION Q'TY REMARKS TMS0612 TMS, M6x12 TMS0612S TMS, M6x12 (Stainless Steel Model) SW06 SW, M6 SW06S SW, M6 (Stainless Steel Model) -86-...
- Page 129 UPPER LEFT TABLE, REAR SET T6-5-10590 T6-5-10600 REF. PART NO. DESCRIPTION Q'TY REMARKS T6-5-10590 Upper Left Table, Rear Set (For 1050W) T6-5-10590S Upper Left Table, Rear Set (For 1050W) (Stainless Steel Model) T6-5-10600 Upper Left Table, Rear Set (For 1250W) T6-5-10600S Upper Left Table, Rear Set (For 1250W) (Stainless Steel Model)
- Page 130 UPPER LEFT TABLE, REAR SET T6-5-10590 T6-5-10600 REF. PART NO. DESCRIPTION Q'TY REMARKS T6-5-12030 Upper Left Table Rear (For 1050W) T6-5-12030S Upper Left Table Rear (For 1050W)(Stainless Steel Model) T6-5-12040 Upper Left Table Rear (For 1250W) T6-5-12040S Upper Left Table Rear (For 1250W)(Stainless Steel Model) T6-5-12050 Upper Left Table Rear (For 1450W)
- Page 131 UPPER LEFT TABLE, REAR SET T6-5-10590 T6-5-10600 REF. PART NO. DESCRIPTION Q'TY REMARKS TMS0612 TMS, M6x12 TMS0612S TMS, M6x12 (Stainless Steel Model) SW06 SW, M6 SW06S SW, M6 (Stainless Steel Model) -89-...
- Page 132 ELECTRIC CONTROL UNIT T6-6-90010 T6-6-90011...
- Page 133 T6-6-90010 ELECTRIC CONTROL T6-6-90011 REF. PART NO. DESCRIPTION Q'TY REMARKS T6-6-90010 Electric Control Unit (For TP-6000-1, 220V, 1Phase) T6-6-90011 Electric Control Unit (For TP-6000CE1, 220V, 1Phase) T6-6-90012 Electric Control Unit (For TP-6000-1, 110V, 1Phase) T6-6-90013 Electric Control Unit (For TP-6000CE1,...
- Page 134 DESCRIPTION Q'TY REMARKS T6-6-10040 Electric Control Group (For TP-6000CE1, SEE PAGE 93 240V, 1Phase) T6-6-10041 Electric Control Group (For TP-6000-3, SEE PAGE 93 220V, 3Phase) T6-6-10042 Electric Control Group (For TP-6000CE3, SEE PAGE 93 220V, 3Phase) T6-6-10043 Electric Control Group (For TP-6000-3,...
- Page 135 ELECTRIC CONTROL GROUP T6-6-10035 T6-6-10036...
- Page 136 T6-6-10035 ELECTRIC CONTROL T6-6-10036 REF. PART NO. DESCRIPTION Q'TY REMARKS T6-6-10035 Electric Control Group (For TP-6000- 1, 220V, 1Phase) T6-6-10036 Electric Control Group (For TP- 6000CE1, 220V, 1Phase) T6-6-10037 Electric Control Group (For TP-6000- 1, 110V, 1Phase) T6-6-10038 Electric Control Group (For TP-...
- Page 137 T6-6-10035 ELECTRIC CONTROL T6-6-10036 REF. PART NO. DESCRIPTION Q'TY REMARKS T6-6-10190 Limit Switch Ball T6-6-10200 Limit Switch Base T6-6-10210 Limit Switch Fixing Plate T6-6-10220 Limit Switch Cover T6-6-10230 ML, Limit Switch T6-1-71160 Feed Roller Pulley T6-6-40036 Transformer Box Cover T6-6-10260 Smoke Fan Bracket T6-6-30011 Power Selector Switch (For Non CE)
- Page 138 T6-6-10035 ELECTRIC CONTROL T6-6-10036 REF. PART NO. DESCRIPTION Q'TY REMARKS T6-6-30060 Motor (M1)(For 220V, 1Phase) T6-6-30051 Motor (M1)(For 110V, 1Phase) T6-6-30052 Motor (M1)(For 240V, 1Phase) T6-6-10442 Motor (M1)(For 220V, 3Phase) T6-6-10444 Motor (M1)(For 380V, 3Phase) T6-6-10441 Motor (M1)(For 415V, 3Phase) T6-6-30070 Motor (M2)(For 220V, 1Phase) T6-6-30054...
- Page 139 T6-6-10035 ELECTRIC CONTROL T6-6-10036 REF. PART NO. DESCRIPTION Q'TY REMARKS T6-6-11000 Pedal Control Set HBS0625 HBS, M6x25 HBS0510 HBS, M5x10 HBS0512 HBS, M5x12 (Only CE) PMS0410 PMS, M4x10 HSS0610G HSS, M6x10 (G) FMS0435S FMS, M4x35 HBS0620 HBS, M6x20 TMS0308 TMS, M3x8 TMS0508 TMS, M5x8 TMS0408...
- Page 140 T6-6-10035 ELECTRIC CONTROL T6-6-10036 REF. PART NO. DESCRIPTION Q'TY REMARKS T6-6-10915 Motor starting capacitor (For M3, 220V, 1Phase) T6-6-10912 Motor starting capacitor (For M3, 110V, 1Phase) T6-6-10914 Motor starting capacitor (For M3, 240V, 1Phase) T6-6-10950 Reset Switch (For S.F.S.)(Option) T6-6-10960 Relay (For S.F.S.)(Option) T6-6-10980 Cable Gland (PG11)
- Page 141 ELECTRIC CONTROL GROUP T6-6-30025 T6-6-30026 TP 6000 1/TP 6000CE1...
- Page 142 ELECTRIC CONTROL GROUP T6-6-30025 T6-6-30026 REF. PART NO. DESCRIPTION Q'TY REMARKS T6-6-30025 Electric Control Group (For TP-6000- 1, 220V/230V/240V) T6-6-30026 Electric Control Group (For TP-6000- 1, 110V) T6-6-40034 Electric Control Group (For TP- 6000CE1, 220V/230V/240V) T6-6-40035 Electric Control Group (For TP-...
- Page 143 ELECTRIC CONTROL GROUP T6-6-30025 T6-6-30026 REF. PART NO. DESCRIPTION Q'TY REMARKS T6-6-30031 Fuse (2A) 30L (For 220V/230V/240V) T6-6-30032 Fuse (3A) 30L (For 110V) T6-6-30033 Fuse (5A) 30L (For 220V/230V/240V) T6-6-30133 Fuse (10A) 30L (For 110V) T6-6-30034 Fuse (7A) 30L (For 220V/230V/240V) T6-6-30133 Fuse (10A) 30L (For 110V) T6-6-30036...
- Page 144 ELECTRIC CONTROL GROUP T6-6-50001 T6-6-50002 (1 OF 2) TP 6000 3/TP 6000CE3...
- Page 145 ELECTRIC CONTROL GROUP T6-6-50001 T6-6-50002 (1 OF 2) REF. PART NO. DESCRIPTION Q'TY REMARKS Electric Control Group T6-6-50001 (For TP-6000-3) T6-6-50002 Electric Control Group (For TP-6000CE3) T6-6-50110 Electric Box T6-6-50130 Panel T6-6-50140 Terminal (Ground) T6-6-50150 Terminal (Control)(Single in, single out)
- Page 146 ELECTRIC CONTROL GROUP T6-6-50001 T6-6-50002 (1 OF 2) REF. PART NO. DESCRIPTION Q'TY REMARKS SW05 SW, M5 HBS0510 HBS, M5x10 PW05 PW, M5 TMS0508 TMS, M5x8 T5-2-10500 Cable Gland (PG9) T6-6-10980 Cable Gland (PG11) T6-6-10340 Cable Gland (PG13.5) SW06 SW, M6 HN06 HN, M6 T6-6-50410...
- Page 147 ELECTRIC CONTROL GROUP T6-6-50001 T6-6-50002 (2 OF 2)
- Page 148 ELECTRIC CONTROL GROUP T6-6-50001 T6-6-50002 (2 OF 2) REF. PART NO. DESCRIPTION Q'TY REMARKS T6-6-50470 Wire Ass'y (Control Panel)(For CE) T6-6-50480 Wire Ass'y (Control Panel)(For Non CE ) T6-6-50490 Wire Ass'y (Control Panel)(Only Non CE ) T6-6-50500 Motor Cable (M1) T6-6-50510 Motor Cable (M2) T6-6-50520...
Need help?
Do you have a question about the TP-6000 and is the answer not in the manual?
Questions and answers