Table of Contents
Advertisement
Alarm Clock Radio
with USB Charging and Time Projection
CR20
User Manual v1.1
Thank you for your purchase of this Magnasonic product.
Please read this user manual carefully before using product
to ensure proper use. Keep this manual in a safe place
for future reference.
magnasonic.com/support
We reserve the right to change models, con gurations, or speci cation without notice or liability. Product may not
be exactly as shown. © MAGNASONIC®, MAGNASONIC®, the MAGNASONIC® marks may be registered. All other
trademarks are property of their respective owners
Advertisement
Table of Contents

Related Manuals for Magnasonic CR20


Summary of Contents for Magnasonic CR20
- Page 1 We reserve the right to change models, con gurations, or speci cation without notice or liability. Product may not be exactly as shown. © MAGNASONIC®, MAGNASONIC®, the MAGNASONIC® marks may be registered. All other trademarks are property of their respective owners...
- Page 2 At Magnasonic, our mission is a simple one – create people-driven products that make life’s daily adventures easier and more fun. We believe everyday experiences should be extraordinary.
- Page 3 IMPORTANT SAFETY INFORMATION 1. Read these instructions. 2. Keep these instructions. 3. Heed all warnings. 4. Follow all instructions. 5. Do not use this apparatus near water. 6. Clean only with a dry cloth. 7. Do not block any ventilation openings. Install in accordance with the manufacturer’s instructions.
- Page 4 14. Refer all servicing to quali ed service personnel. Servicing is required when the apparatus has been damaged in any way, such as power-supply cord or plug is damaged, liquid has been spilled or objects have fallen into the apparatus, the apparatus has been exposed to rain or moisture, does not operate normally, or has been dropped.
- Page 5 21. Servicing: Do not attempt to service this product yourself as opening or removing covers may expose you to dangerous voltages or other hazards. Refer all servicing to a quali ed service professional. 22. Replacement Parts: When replacement parts are required, be sure the service technician has used replacement parts speci ed by the manufacturer, or have the same characteristics as the original parts.
- Page 6 WARNING INFORMATION WARNING To reduce the risk of re or electric shock, do not expose this appliance to rain or moisture. CAUTION Use of controls or adjustments or performance of procedures other than those speci ed may result in hazardous radiation exposure. ATTENTION RISK OF ELECTRIC SHOCK DO NOT OPEN...
- Page 7 WARNING: DO NOT INGEST BATTERY, CHEMICAL BURN HAZARD • This product contains a coin/button cell battery. If the coin/button cell battery is swallowed, it can cause severe internal burns in just 2 hours and can lead to death. • Keep new and used batteries away from children. If the battery compartment does not close securely, stop using the product and keep it away from children.
- Page 8 7. The unit should not be exposed to direct sunlight, very high or low temperature, moisture, vibrations or placed in dusty environment. 8. Do not use abrasive, benzene, thinner or other solvents to clean the surface of the unit. To clean, wipe it with mild non-abrasive detergent solution and clean soft cloth.
-
Page 9: Table Of Contents
TABLE OF CONTENTS WHAT’S INCLUDED ..........10 PRODUCT INFORMATION . -
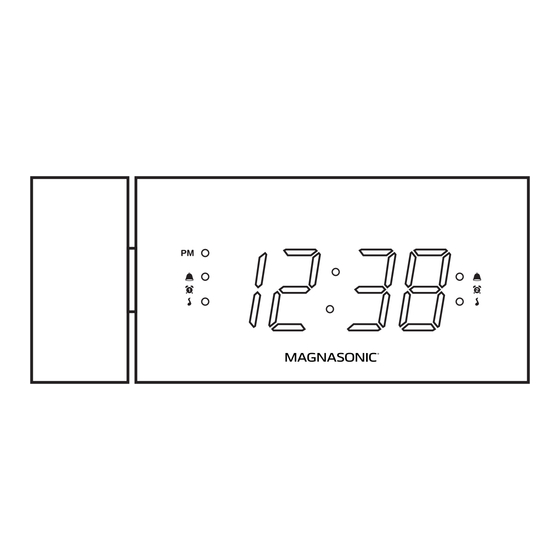
Page 10: What's Included
WHAT’S INCLUDED • Clock Radio • User Manual • Power Adapter • Flat Lithium Battery (installed) PRODUCT INFORMATION LED DISPLAY 1. PM Indicator 6. Minute 2. Alarm 1 Buzzer Indicator 7. Alarm 2 Music Indicator 3. Alarm 1 Indicator 8. Alarm 2 Indicator 4. -
Page 11: Buttons And Functions
BUTTONS AND FUNCTIONS TOP VIEW PROJECTION DIMMER BACK VIEW ALARM OFF PRESETS SLEEP ON/OFF FM ON/OFF TIME SET FLIP º Y-M-D DC 5V 1.0A USB CHARGING DC 5V 1.5A 1. Projection Lens 7. Tap – Alarm 1 Display – On/O Hold –... -
Page 12: Quick Start Guide
QUICK START GUIDE CONNECTING POWER Connect the power adapter to the DC input on the back of the clock. Then connect the adapter plug to a standard AC wall outlet. ALARM OFF PRESETS SLEEP ON/OFF FM ON/OFF TIME SET º FLIP Y-M-D DC 5V 1.0A... -
Page 13: Setting An Alarm
SETTING AN ALARM 1. To set Alarm 1, press and hold the button and alarm time will ash. 2. Use the button to adjust the Hour and use the button to adjust the Minute. Press the button to proceed to setting the Alarm Type. -
Page 14: Snooze Function
SNOOZE FUNCTION Note: The Snooze button is a touch sensitive button. To ensure proper operation, press directly on the button. When the alarm is sounding, press to silence the alarm for 9 minutes. After 9 minutes the alarm will resume. The snooze function can be used seven times after which the alarm is cancelled. -
Page 15: Radio Preset Function
RADIO PRESET FUNCTION SETTING A RADIO PRESET / FM ON/OFF button to turn the radio on. 1. Press the 2. Press the buttons to select your desired radio station. 3. Press and hold the PRESETS button to begin the radio preset setting process. -
Page 16: Usb Charging Function
USB CHARGING FUNCTION Connect your electronic device to the USB port on the back of the clock to charge it. The USB port cannot be used for music playback. Note: Charging time will vary depending on the charging current that your device requires. -
Page 17: Battery Backup
BATTERY BACKUP This alarm clock is equipped with a battery backup feature. This feature will restore your alarm clock settings as well as ensure your alarm sounds in the event of a power outage. The 3V, CR2032 Flat Lithium battery is pre-installed. Should you need to replace the battery, please read the following instructions. -
Page 18: Replacing The Battery
REPLACING THE BATTERY If your clock does not save settings after a power outage the backup battery may need to be replaced. Remove power by unplugging the clock and follow the below steps to replace the 3V, CR2032 Flat Lithium battery. 1. -
Page 19: Troubleshooting
TROUBLESHOOTING Please consult the Troubleshooting chart below before communicating with Magnasonic Customer Support. SYMPTOM POSSIBLE CAUSE POSSIBLE SOLUTION GENERAL Power Cord not plugged in Ensure power cord is rmly to wall outlet or to clock connected Tap DIMMER button to... -
Page 20: Care And Maintenance
CARE AND MAINTENANCE 1. Disconnect the unit from any power sources before cleaning. 2. Keep the unit away from magnetic objects, water, or heat sources. 3. Clean only with a dry cloth. SPECIFICATIONS Display Size 1.2" LED Adjustable Brightness HI, LO1, LO2, LO3, OFF Volume Indicator LED Automatic Time Set Daylight Savings... -
Page 21: Ic And Fcc Statement
IC AND FCC STATEMENTT FCC statement on regulation This device complies with Part 15 of the FCC Rules. Operation is subject to the following two conditions: 1. This device may not cause harmful interference, and 2. This device must accept any interference received, including interference that may cause undesired operation. -
Page 22: Warranty
All items are guaranteed against defects in materials and craftsmanship. Magnasonic products come with a complete one year parts and labour warranty. Proof of purchase from an authorized Magnasonic dealer is required when seeking warranty assistance. - Page 23 G. Any installation, setup and/or programming charges. If in any situation your purchase displays a manufacturer’s defect during the warranty period and does not function correctly, Magnasonic will repair your product and cover all parts, labour, and return costs upon delivery of the Magnasonic product together with proof of purchase.
- Page 24 Thank you for your purchase of your Magnasonic product. We hope you enjoy your experience. Help others make the right choice, leave a product review and share your experience. Questions? Give us a chance to help, we’re just a click away.
Need help?
Do you have a question about the CR20 and is the answer not in the manual?
Questions and answers