Table of Contents
Advertisement
Quick Links
Advertisement
Table of Contents

Related Manuals for HumanTechnik Scalla3 Combo

Summary of Contents for HumanTechnik Scalla3 Combo
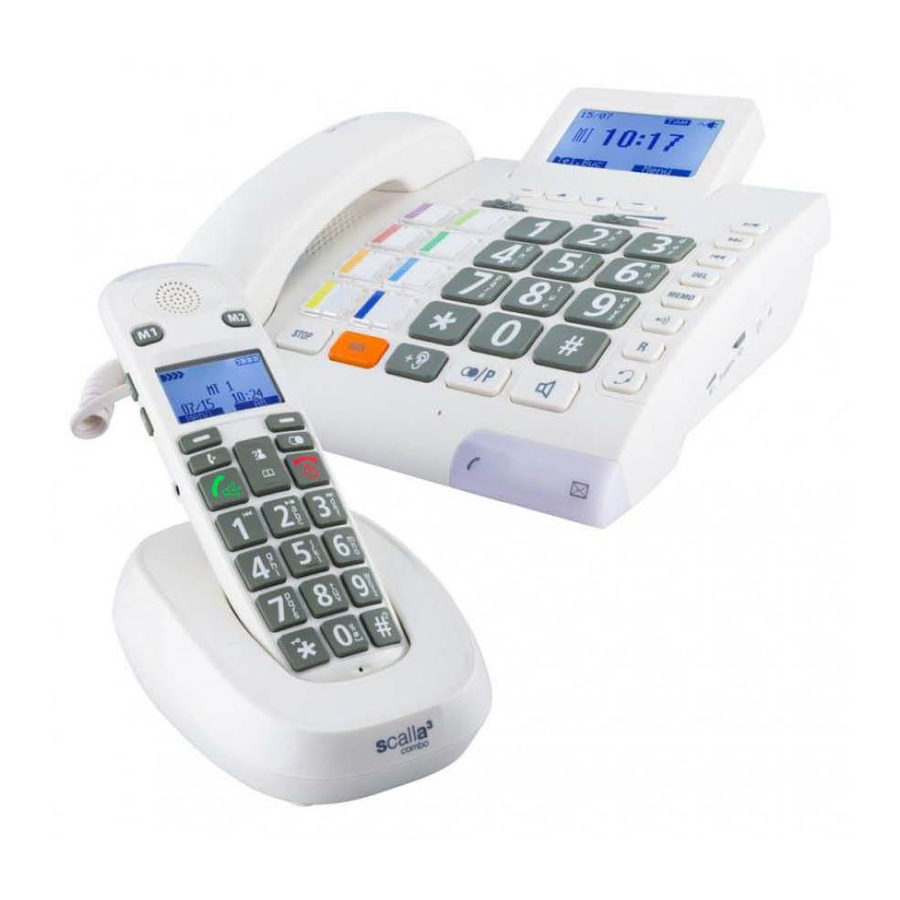
- Page 1 Instruction manual Large button comfort phone combined with a wireless station...
-
Page 2: Safety Instructions
Congratulations for purchasing your scalla combo phone. We hope that you will enjoy it for a long time. Please review these operating instructions carefully to ensure that you set up the phone correctly and that you are familiar with all the functions of the system. Safety instructions Please read the safety information in the section "Setup"... -
Page 3: Table Of Contents
Table of contents Page Safety instructions Setup Packaging content Inserting the batteries into the basic unit Inserting the accumulator into the mobile unit Connecting the phone Connecting the mobile charging station Keys and their meaning Base Keys and their meaning mobile unit Control elements Base station (BS) Control elements mobile unit (MT) Phone calls with Base (BS) - Page 4 Table of contents Page Caller ID with Base (BS) Save phone numbers from the caller ID list in the phone book Erase a call from the caller ID list Erase all calls from the caller ID list Display calls received during absence Setup screen display (BS) Set display language Adjust screen contrast...
- Page 5 Table of contents Page SOS functions (BS) Program SOS number Program SOS text Replay SOS text Erase SOS text Switch SOS on automatically Define security ID for SOS Additional connections (BS) Connecting socket for vibration pad and/or module Headset connection Headphone connection Wall mounting Switch mobile unit On/Off Phoning with the mobile unit (MT) Calling...
- Page 6 Table of contents Page Caller ID mobile unit (MT) Review callers in CID Book Save phone numbers from the caller ID list in the phone book Delete a call from the caller ID list Erase all calls from the caller ID list Basic settings with the mobile unit (MT) Change PIN code De-register mobile unit (MT) from Base...
- Page 7 General information The phone does not work. Warning tone during a call Phone number will not be displayed Important note Appendix Maintenance and care Warranty Environmental information/disposal Batteries Technical Data Base Technical data - mobile unit Humantechnik Service-Partner English 7...
-
Page 8: Setup
Setup Inserting the accumulator into the mobile unit The wireless phone needs three 1.2 V accu- Packaging content mulator (type "AAA") for the operation. Please check whether all of the parts listed Please proceed as follows when inserting in the following are included: the accumulator: • Basic phone unit 1. -
Page 9: Keys And Their Meaning Base
Keys and their meaning Base Call back key, e.g. to distribute Menu key calls when connecting a phone to - Menu selection right a phone system - Menu selection left Arrow keys up/down Loudspeaker button: Browsing in menu – "Hands-free call": Assign line, disconnect line Answering machine –... -
Page 10: Control Elements Base Station (Bs)
Control elements Base station (BS) Sliding switch sound Display Function keys for control/volume adjust- menu control ment Plate for photo target dial key (in the phone receiver) Dial keys Answering machine Mobile unit search/coupling MEMO R-button Headset button STOP Display "New call"... - Page 11 Permanent display Audio output Headset connec- Connection socket for backlight on / off (3.5 mm) tion phone receiver cable switch (2.5 mm) OFF ON DC 7.5V Connection socket for Signal selector Connection socket Connection socket special accessories switch for plug charger for phone cable such as vibration pad Switch to adjust the volume...
-
Page 12: Control Elements Mobile Unit (Mt)
Control elements mobile unit (MT) Flashlight Visual ringer Amplification Earphone Speed dial key Display Upwards/down- wards key Menu key Redial key INT key Lift the receiver. Hang up receiver Switch MT on/off Dial keys Star key Pound key Keyboard block Flashlight Microphone 12 English... - Page 13 SOS button Speakers Battery compartment cover Charging contacts Charging contacts Set volume Audio adjuster Set amplifica- tion Headset connection (2.5 mm) English 13...
-
Page 14: Phone Calls With Base (Bs)
Phone calls with Base (BS) 2. Hang the receiver up to switch the equip- ment loudspeaker on. 3. You can now continue the phone call Calling through the equipment loudspeaker and 1. Lift the telephone receiver or press the the installed microphone. 4. -
Page 15: Switch To Adjust The Volume Reset
You can also increase high or low frequen- Use of the phone with a hearing aid cies by using the sound control (slide switch You can use your phone with hearing aids, on the front, see figure 1). assumed they are equipped with a T-coil. For this purpose. -
Page 16: Photo Target Dial Key Base
Photo target dial key Base 3. Select the desired ring tone for the phone number and press "Select". This means that the number is saved. Assign phone numbers to photo target dial keys Photo target dial key The 8 photo target dial keys can be assigned You can insert a small photo of the desired to any phone number (max. -
Page 17: Adjust The Ringer Volume Of The Ring Tone
Adjust the ringer volume of the ring tone 3. The contacts are listed in alphabetical The ringer volume of the ring tone can be order. To move faster through the phone, adjusted with the two switches on the right you can use the dial keys to jump to the side of the phone. -
Page 18: Modify Voice Recording In Phone Book
Caller ID with Base (BS) Modify voice recording in phone book Please follow the instruction when editing the voice recording: Calls that were not answered will be shown 1. Press the key "PhoneBk" to get to the on the display. phone book. -
Page 19: Erase A Call From The Caller Id List
Setup screen display (BS) Erase a call from the caller ID list 1. The keys are used to transfer to the caller ID list. Set display language 2. The keys are used to find the num- 1. Press the "Menu" key to get to the setup bers to be erased in the list. -
Page 20: Set Hour Format
Phone settings (BS) Set hour format This setup is used to decide whether the time on the display is shown in a 24 hour or Change ring tone volume 12 hour mode. 1. Press the "Menu" key to get to the setup 1. -
Page 21: Set The Call Back Time
Set Talk (BS) 3. Select "Call waiting" and confirm with "Select". 4. Use to switch the function on/off and This phone is equipped with voice output. confirm with "Select". Numbers and functions will be read by an external loudspeaker. Set the call back time 1. -
Page 22: Set The Language For Set Talk
Answering machine AB (BS) Set the language for set talk. You can set the language that will be read to you. A maximum of three languages are The phone includes an integrated answer- available. ing machine. 1. Press the "Menu" key to get to the setup It can be controlled by the Base or the mo- menu. -
Page 23: Edit Outgoing Message
4. Select "Record OGM" and confirm with Save toll during remote inquiry with the "Select". The display shows "will be re- TAM. corded". Speak your message loudly In toll saver mode, incoming calls will be an- and clearly into the answering machine swered after 5 rings until the first new mes- and complete the recording with "End". -
Page 24: Listen To Messages (Bs)
Listen to messages (BS) 3. The TAM will replay a sequence of com- The phone shows on the display if you have mands if the remote query security ID a new message. is accepted. Follow the requests for the handling. 07/12 4. -
Page 25: Sos Functions (Bs)
SOS functions (BS) Replay SOS text 1. Press the "Menu" key to get to the setup menu. This part of the instructions covers the SOS 2. Select "SET SOS" and confirm with "Se- functions of the base station. lect" by using the keys. This phone is equipped with an SOS func- 3. -
Page 26: Define Security Id For Sos
Additional connections (BS) 3. Select "SOS autom on" and confirm with "Select". Connecting socket for vibration pad and/ to switch the function on/off and or module confirm with "Select". Your phone includes a connection socket for vibration pads or supplementary signal gen- Define security ID for SOS erator modules. This means that a received 1. -
Page 27: Wall Mounting
Wall mounting 1. Slide the bracket for the phone receiver from its position and rotate it by 180 de- grees. Afterwards, slide the bracket back into the original position in such a way the the bracket nose points upward (see figure 2). This prevents a falling of the receiver from the receiver cradle if the phone is wall mounted. -
Page 28: Switch Mobile Unit On/Off
Switch mobile unit On/Off Use of the equipment loudspeaker dur- ing a call 1. Press key to switch the equipment loud- If the mobile unit is switched off, then it will speaker on . The loudspeaker of the be switched on automatically by putting it receiver continues to be switched on. -
Page 29: Erase The Last Dialed Numbers
Erase the last dialed numbers Muting 1. By pressing the key , the last dialed You can switch the microphone of your number will be displayed. phone temporarily off during a call, which 2. Using , you can dial the last dialed num- means that your conversational partner can bers. -
Page 30: Speed Dial Keys M1/M2 (Mt)
Speed dial keys M1/M2 (MT) Phone book the mobile unit (MT) Assign phone numbers to speed dial Key assignment keys M1/M2 Letter/character The 2 speed dial keys M1/M2 can be as- 1 _ + - “ ( ) % signed to any phone number (max. 32 num- A B C a b c 2 bers for each key). -
Page 31: Modify Contact In Phone Book
Caller ID mobile unit (MT) 4. The contact will be called up by pressing key. Calls that were not answered will be shown on the display, e.g. "2 New calls". Modify contact in phone book Please follow the instructions when modify- Review callers in CID Book ing the contacts: Please follow the instructions to get the list... -
Page 32: Delete A Call From The Caller Id List
Delete a call from the caller ID list De-register mobile unit (MT) from Base 1. Press the "Menu" key and select the "CID You can de-register a mobile unit from a Book" entry with Base registration. 2. The keys are used to browse in the 1. -
Page 33: Phone Settings (Mt)
Phone settings (MT) 5. Select the desired option with "Select". 6. Chose the desired ringer tone and com- plete the process with "Select". Set alarm You can set an alarm with the snooze func- Set ringer tone volume tion on the mobile unit. 1. -
Page 34: Range Alarm
Range alarm Display contrast A signal tone can be heard each time if the 1. Press the "Menu" key and select the "HS mobile unit is outside the range of the Base Settings" entry with station. This signal tone can be switched on/ 2. -
Page 35: Voice Output Mobile Unit
Set date/time (MT) Voice output mobile unit This mobile unit is equipped with a simple Set time voice output. Numbers will be read during 1. Press the "Menu" key and select the "HS entry. Settings" entry with 1. Press the "Menu" key and select the "HS 2. -
Page 36: Additional Functions (Mt)
Additional functions (MT) Internal calls You can conduct internal calls or transfer ex- ternal calls between mobile units if several Register new mobile unit mobile units are registered to one base. The delivered mobile unit is already regis- Please follow the instructions to conduct an tered with the Base. -
Page 37: Three Way Conference Call
Three way conference call Switch answering machine (TAM) on You can establish a three way conference 1. Press the "Menu" key and select the call if both of you conduct an external call "ANS. Machine" entry with and if an intercom situation is present. 2. -
Page 38: Playback Outgoing Message 1
Playback outgoing message 1 Set answer mode 1. Press the "Menu" key and select the 1. Press the "Menu" key and select the "ANS. Machine" entry with "ANS. Machine" entry with 2. Press "Select". 2. Press "Select". 3. Select "Announce" and confirm with "Se- 3. Select "TAM Setting" and confirm with lect". -
Page 39: Secret Security Id For Tam Setup
4. Select "Set Ring" and confirm with "Se- Listen to messages (MT) lect". The phone shows a tape symbol on the dis- 5. You select "toll saver" with and confirm play if you have received a new message. it with "Select" 1. -
Page 40: Sos Functions (Mt)
SOS functions (MT) If the phone does not work General information This part of the instructions covers the SOS Please ensure that the phone cable is un- functions of the mobile unit. damaged and correctly plugged in. Remove The mobile unit is equipped with a simple possible existing accessories, extension ca- SOS function. -
Page 41: Important Note
Important note Environmental information/disposal Disposal of used electrical and electronic devices (to be applied in The device is not protected against splash- countries of the European Union and ing water. Do not put objects that are filled other European countries with a with fluids on the device, e.g. vases. Naked separate collection system for these flames sources such as burning candles, devices). -
Page 42: Technical Data Base
Technical Data Base Electrical supply: Power supply: Primary 100-240V 50/60 Hz AC Secondary 7.5V DC / 1000 mA Dimensions (L×W×H): 243 mm × 240 mm × 94 mm Weight: app. 965 g Technical data - mobile unit Standard: DECT = Digital Enhanced Cordless Telecommunication Expanded digital standard for wireless phones Transmission protocol for wireless phones Number of channels:... - Page 43 This device adheres to the requirements of the following EU directives: - 2002/95/EG RoHS directive - 2004/108/EG EMV directive - 2002/96/EG WEEE directive - 2006/95/EG low voltage directive - 1999/5/EG R&TTE directive The conformity of the a.m. directives is confirmed by the CE mark on the device. EU confor- mity declarations are available on the Internet under www.humantechnik.com. Subject to technical changes. English 43...
-
Page 44: Humantechnik Service-Partner
Im Wörth 25 Fax: +49 (0) 76 21/ 9 56 89-70 D-79576 Weil am Rhein Email: info@humantechnik.com Germany Humantechnik GHL AG Phone: +41 (0) 61/ 6 93 22 60 Rastatterstrasse 9 Fax: +41 (0) 61/ 6 93 22 61 CH-4057 Basel Email: info@humantechnik.com...
Need help?
Do you have a question about the Scalla3 Combo and is the answer not in the manual?
Questions and answers
How to block unwanted number