Table of Contents
Advertisement
Advertisement
Table of Contents

Related Manuals for BANGGOOD Bugs 7

Summary of Contents for BANGGOOD Bugs 7
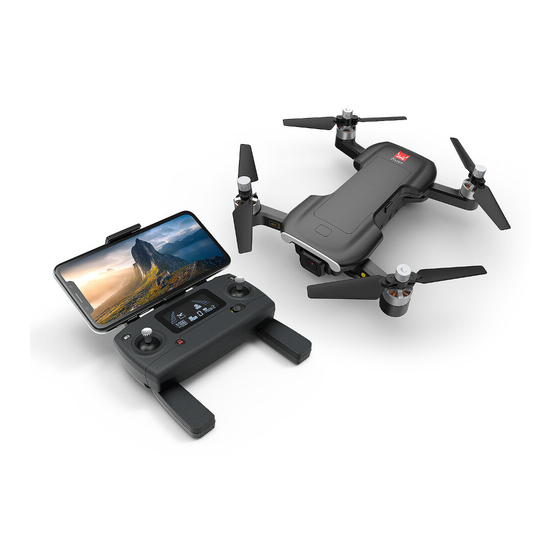
- Page 1 Bugs 7 User Manual Farther.Faster.Clearer...
-
Page 2: Table Of Contents
Contents Product Profile Introduction Prepare Your B7 Prepare the Remote Controller Major Parts & Functional Switch Aircraft Flight Modes Aircraft Status Indicator Lights Return to Home (RTH) Vision System Aircraft Power Switch Aircraft Battery Attach and Detach the Propellers Remote Controller Remote Controller Functions and Status Throttle Control Stick Mode Install the Mobile Phone Holder... -
Page 3: Product Profile
Introduction ● The Bugs 7 aircraft is equipped with optical flow and GPS system. It can hover and fly stably indoor and outdoor. It has automatic return home function and other easy-to-use intelligent flight functions, such as orbit flight, follow-me and waypoint flight. -
Page 4: Prepare The Remote Controller
Bugs 7 User Manual Battery installation Insert the fully charged battery into the aircraft battery box (see as the picture), ensure the battery install correctly. Attention: The battery should be installed firmly, failure to do so may affect the flight safety of your aircraft. -
Page 5: Major Parts & Functional Switch
Bugs 7 User Manual Major Parts & Functional Switch [1] Power switch [2] Drone’s status indicator light [3] Propeller [4] Battery [5] Camera [6] Bottom lights [7] Optical flow camera [1] Photo/Video [2] Left stick [3] Unlock/Lock [4] One-key RTH... - Page 6 Bugs 7 User Manual [8] One-key takeoff/ One-key landing [9] Short- press for the optical flow switch Long- press for the fast-slow speed switch. [10] GPS Switch [10]...
-
Page 7: Aircraft
This section introduces functions and features of the B7. Flight Modes The following flight modes are available in Bugs 7. GPS mode: ● When the drone is in GPS mode, it can receive the GPS signal to realize accurate hovering. -
Page 8: Aircraft Status Indicator Lights
Bugs 7 User Manual Aircraft Status Indicator Lights Drone’s status indicator light Aircraft status indicator Indicator status Meanings Indicator yellow light flash fast. Aircraft 2.4GHz disconnected. Indicator yellow green red light flash by turn. Aircraft is in initialization detection status. -
Page 9: Return To Home (Rth)
Bugs 7 User Manual Return to Home (RTH) The Return-to-Home (RTH) function brings the aircraft back to the last recorded Home Point. There are 3 types of RTH: smart RTH, low battery RTH and failsafe RTH. This section describes these 3 scenarios in detail. -
Page 10: Vision System
Bugs 7 User Manual Attention: When the aircraft is automatically return home with Low Battery RTH function activated, you can not cancel the RTH procedure by pressing the RTH button to regain control of the aircraft. Out of connection return home function The GPS signal is good (the No. -
Page 11: Aircraft Power Switch
Bugs 7 User Manual The measuring precision of optical flow system will be affected easily by the light strength and the features of object surface texture. Once the optical flow is unavailable, the drone will enter to altitude-holding mode automatically. Please be cautious in as following situations: 1. -
Page 12: Aircraft Battery
Bugs 7 User Manual Aircraft Battery ● Made by high-energy battery cells; ● Standard battery capacity is 7.6V 1500mAh. Battery Charger Charge the aircraft battery ● Please charge the battery fully before using it. ● Be sure you use the officially supplied USB charging cable to charge. -
Page 13: Attach And Detach The Propellers
Bugs 7 User Manual Attach and Detach the Propellers Blade assemble and disassemble ●Attach propeller A: Put the propeller with marking ‘A’ into the clockwise rotating motor shaft (the side marked A should be upwards). Then, put the silicone rubber ring into the center bore of the propeller. Last, choose the propeller screw with dot and put it onto the motor shaft;... - Page 14 Bugs 7 User Manual ● Please make sure that the clockwise and the counter-clockwise propellers are installed on the correct motors, because the aircraft will not fly normally for wrong propellers installation. ● Be aware of the sharp edges of the propellers. Handle with care.
-
Page 15: Remote Controller
Remote Controller This section describes the features of the remote controller, including the instruction on controlling the B7. Remote Controller Functions and Status Flight mode switch Choose the flight mode by switching the GPS button to ON/OFF position. The on-working flight mode “ ”... - Page 16 Bugs 7 User Manual LCD Screen display Return to Home (RTH) icon Headless mode Signal strength Aircraft battery level Remote controller battery level Photo/Video Distance against Home Point High/Low speed mode Satellite amount Altitude against Remote controller Home Point mode...
- Page 17 Bugs 7 User Manual Attention: When the aircraft is not inserted with TF card or the TF card is malfunction, photos and videos taking can not be done by pressing the button of the remote controller, but by the icon on the APP interface.
- Page 18 Bugs 7 User Manual Remote control low voltage warning When the “ ” icon appears on the LCD screen and the remote control emits “beep beep” sound, it means that the remote control battery is nearly out of power. Please change new battery for the remote control.
-
Page 19: Throttle Control Stick Mode
Bugs 7 User Manual Throttle Control Stick Mode Throttle mode switch Forward/ Forward/ Backward Throttle Throttle Backward control control control control Leftward/ Leftward/ Turn Left/ Rightward Turn Left/ Rightward Right control flight control Right contro flight control Mode 1 Mode 2 (Default) Mode 1: The right stick serves as the throttle. -
Page 20: Install The Mobile Phone Holder
Bugs 7 User Manual Install the Mobile Phone Holder 1. Pull out the mobile phone holder upwards completely (Pic. 1); 2. Tilt the holder 30 degrees towards you and then you will hear a click sound (Pic. 2); 3. Rotate and fix the support board in place (Pic. 3);... -
Page 21: App Download & Installation
APP Download & Installation This section introduces how to download the “M RC PRO” APP and connect with mobile device. FPV Real-time Image Transmission Software “M RC PRO” Where to download “M RC PRO” APP ● For Apple IOS system, please turn to Apple store, search “M RC PRO” or scan the QR code at right side to download the software. - Page 22 Bugs 7 User Manual How to link the “M RC PRO” to the camera Power on the aircraft, then enter phone setting option. Turn on WiFi, find “drone4****** ” on the list and connect it. When “ ” legend is shown, it means WiFi connection is successful. Exit settings and tap “M RC PRO” APP at your mobile device.
-
Page 23: Flight
Flight This section introduces safe flight requirements and basic aircraft operations. Flight Environment Requirements 1. Please don’t fly in such bad weather conditions as high temperature, snow, strong wind (≥level 5), rain or fog. 2. Always choose a wide open area for every flight. Tall structures and large metal structures may affect the accuracy of the onboard compass and GPS system. -
Page 24: Aircraft Operations
Bugs 7 User Manual Aircraft Operations Signal connection between the aircraft and remote controller ● Keep pressing the red button “ ” and turn on the remote controller (Pic. 1). The remote controller makes 2 beep sounds, and the indicator light “... - Page 25 Bugs 7 User Manual Aircraft compass calibration 1. Compass calibration should be performed after successful aircraft initialization detection. 2. Aircraft compass calibration should be done for every flight. That is to say, if changing new battery or the battery is reinstalled, compass calibration should be done again.
- Page 26 Bugs 7 User Manual Manual gyro calibration After the aircraft and the remote controller are banded, set the aircraft on flat ground and follow the indication photo as below to calibrate the gyro. Once the aircraft lights turn from flashing to solid on, it means that the gyro calibration is succeeded.
-
Page 27: Test Flight
2. Turn on the aircraft and remote controller. 3. Connect the remote controller with the aircraft and then proceed aircraft initialization detection. 4. Operate the “M RC PRO” APP, connect your device with Bugs 7, enter into the Camera interface. 5. Unlock the aircraft. -
Page 28: Appendix
Appendix Product Parameters Aircraft Gross Weight B7: about 245g (Battery and propellers included) Dimensions Folded: 140x75x55mm(length*width*height) Unfolded: 240x235x55mm(length*width*height) Diagonal 175mm Max Ascent Speed 3m/s Max Descent Speed 2m/s Max Speed 32km/h Flight Height Limitation 120m Max Tilt Angle 35° Max Angular Velocity 200°/s Operating Temperature Range 0℃-40℃... - Page 29 Bugs 7 User Manual Camera Image Sensor 1/2.7 inch CMOS Lens FOV: approx.120° Aperture: f/2.5 Focal length: 3.6mm ISO Range 100-1600 (Auto) Electronic Shutter Speed Electronic Shutter: 1/30s-1/10000s Still Image Size 3840x2160 Still Photography Modes Single Shot Video Resolution 3840x2160...
- Page 30 Bugs 7 User Manual Energy 11.4Wh Net Weight about 74g Charging Temperature Range 5℃-40℃ Charging Current 2A (Max) 2A Adaptor Charging Time 150 minutes APP Name M RC PRO Image Transmission System WIFI 5GHz Real-time Image Transmission 720p@20fps Latency 200-300ms Required Operating System iOS 9.0 or later...
-
Page 31: Packing Detail
Bugs 7 User Manual Packing Detail Full package includes the following parts. Aircraft *1 Remote Controller *1 Propellers *4 Aircraft Battery *1 Charger *1 USB Cable *1 Bugs 7 Bugs 7 User Manual Quick Start Farther.Faster.Clearer Farther.Faster.Clearer Screwdriver *1 User Manual *1... -
Page 32: Important Statement
Bugs 7 User Manual Important Statement ● This aircraft is not a toy, but hobby grade model. It should be assembled and operated properly. Pilot must operate this aircraft in safe way. Improper operation may cause injury or property damage. - Page 33 Note: a) Changes or modifications not expressly approved by the party responsible for compliance could void the user’s authority to operate the equipment. b) This equipment has been tested and found to comply with the limits for a Class B digital device, pursuant to part 15 of the FCC Rules.
Need help?
Do you have a question about the Bugs 7 and is the answer not in the manual?
Questions and answers