Table of Contents
Advertisement
Quick Links
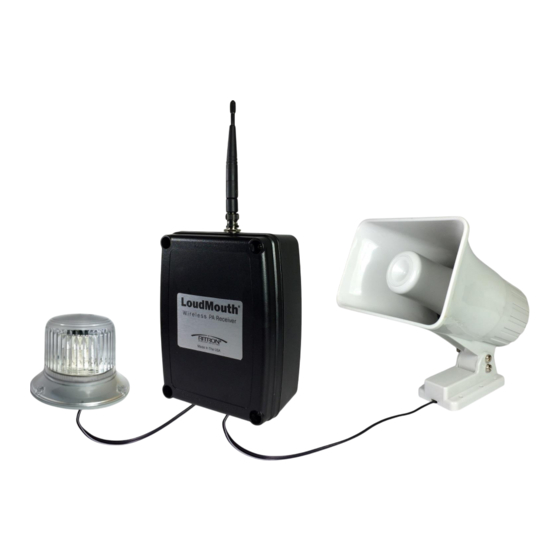
Strobe light and relay cable
assembly (pn 60201127)
are optional accessories,
not included as standard.
Ritron Pub. 14500060
© 2017 Ritron, Inc. All rights reserved. Loudmouth, Ritron, Patriot, Jobcom, OutPost, GateGuard, Quiet Call and
Quick Assist are registered trademarks of Ritron, Inc. Quick Talk, Liberty and RadioNexus are trademarks of Ritron,
Inc.
P.O. Box 1998 · Carmel, Indiana 46082-1998 · 317-846-1201 · Fax: 317-846-4978 · Email: ritron@ritron.com · www.ritron.com
Owner's Manual
GEN 3
Wireless PA Receiver System
Rev. G
Call 800-USA-1-USA
For the right Wireless for your communication needs.
Updated for compatibility with
2013 FCC Narrowband Radios
New features available in models with
SN# A100119000 or higher:
-
Relay Trigger Feature for Optional Strobe Light
-
Record and Play Message DELAY Feature
-
Record and Play Message REPEAT Feature
09/17
plus
Advertisement
Table of Contents

Related Manuals for Ritron LoudMouth


Summary of Contents for Ritron LoudMouth
- Page 1 Rev. G Ritron Pub. 14500060 09/17 © 2017 Ritron, Inc. All rights reserved. Loudmouth, Ritron, Patriot, Jobcom, OutPost, GateGuard, Quiet Call and Quick Assist are registered trademarks of Ritron, Inc. Quick Talk, Liberty and RadioNexus are trademarks of Ritron, Inc.
-
Page 2: Table Of Contents
Selecting the PA speaker location ..........................6 PA speaker installation ............................... 8 ® Loudmouth radio receiver installation ........................9 ® Installing two PA speakers with a single Loudmouth receiver................. 10 ® Installing multiple Loudmouth receivers and PA speakers ..................11 Vehicular installation ..............................12 Temporary outdoor installation .......................... -
Page 3: Getting Started
® specific Power Cube and Backup Battery necessary for your Loudmouth receiver. * Ritron portable JMX-446D is also included when ordering the LM-U450SYSTEM, and the JMX-144D portable is included when ordering the LM-V150SYSTEM. Section 1 Getting Started... -
Page 4: Loudmouth ® Receiver Assembly
Separate the case front from the case back. ® Connect an optional BP-LM-Li22 backup battery to the Loudmouth receiver using the blue mating connectors shown above. The BP-LM-Li22 is secured to the case front with interlocking mushroom-head fastener strips. Press firmly on the battery to interlock the strips, snapping it into position as shown. -
Page 5: Paging The Loudmouth
PA speaker can be paged with 2-way radios programmed for Quiet Call (CTCSS), Digital Quiet ® Call (DCS), 2-Tone Paging, or Selcall paging formats. Each format offers a unique method of paging the Loudmouth receiver and PA speaker. -
Page 6: Compatibility With Other Ritron Model Radios
® Without 2-tone or Selcall paging the loudspeaker can be addressed by simply selecting the Loudmouth channel on your 2-way radio and pressing the PTT button to talk. ... -
Page 7: Determine The Volume Setting
When coverage of a large area is required, additional Loudmouth speakers may be necessary for satisfactory ® performance. See the Installation section of this manual for details on how to install 2 speakers using a single Loudmouth receiver, or multiple receivers and speakers. EXAMPLE:... -
Page 8: Installation
® If there is an area with a significantly higher ambient noise level, the Loudmouth speaker should be located as close as possible to this area. The speaker volume must be 6 db higher than the ambient noise level in order to be heard. - Page 9 ® The Loudmouth speaker should be mounted as high as practical and pointed toward the farthest location you need to cover. Large obstructions will significantly reduce the coverage area. Do not place the speaker behind large, tall objects. Section 2...
-
Page 10: Pa Speaker Installation
Be sure the speaker wire exits cleanly from under the speaker mounting bracket through the wire exit tunnel provided. ® Pinching the speaker wires could cause a short that will destroy the Loudmouth receiver audio amplifier. Route the speaker wire closely against a wall or support beam. Speaker wire hanging in free space is easily snagged ®... -
Page 11: Loudmouth Radio Receiver Installation
® Installation of the Loudmouth receiver is critical to the effective radio coverage of the radio loudspeaker system. Without ® proper installation the maximum possible distance between the calling radio and the Loudmouth receiver will be significantly reduced. ® Guidelines for installing the Loudmouth receiver: ... -
Page 12: Installing Two Pa Speakers With A Single Loudmouth
® Installing two PA speakers with a single Loudmouth receiver ® Many locations may require the installation of two speakers with a single Loudmouth receiver. Two speakers are used when: Coverage is required over a large area. You can connect 2 speakers Optional 2nd PA speaker with 20 ft. -
Page 13: Installing Multiple Loudmouth
Zone paging is required. Paging is required in more than one location. ® Zone paging, or paging in more than one location requires a separate Loudmouth receiver for each area. ® With zone paging all radios can operate on the same Loudmouth radio frequency. -
Page 14: Vehicular Installation
Dimensions: 13”H x 10.5”W x 5.5”D Weight: 8 lbs. ® Ritron model RSS-100 10W solar panel kit can be used to power the Loudmouth receiver without the need for the RPS-1B power supply in locations where AC power is not available. -
Page 15: Programming
For most installations the Loudmouth can be programmed in the field without the need for Ritron PC Programmer 12.0.8. Field programming is accomplished in 3 easy steps. First, the radio frequency and tone codes are entered. Second, the selective signaling code is entered ®... -
Page 16: Readout Current Frequency, Tone And Selective Signaling Codes
PC Programmer. These radios will be clearly marked as “FCC Narrowband Compatible”. For a complete list of all Ritron radios capable of narrowband operation; a Ritron FAQ on the subject, and various links on the FCC website dealing with Narrowbanding go to: www.ritron.com/narrowband... -
Page 17: Program Frequency & Tone Codes
Once you have made your final program entry, press the ENTER button a final time to exit programming mode. The Program display will be blank and the radio will be ready for use. The ® Loudmouth will exit program mode automatically after 30 seconds if no program entries are attempted. - Page 18 Table 1: Programmable Frequency Codes VHF Business Band UHF Business Band UHF Business Band UHF Business Band Code Frequency Color Dot Code Frequency Color Dot Code Frequency Color Dot Code Frequency Color Dot 03 151.625 12.5 01 467.7625 32 461.0875 12.5 63 466.2375 12.5...
-
Page 19: Program Paging Codes
4, or for a 3-7 digit Selcall code. 2-Tone codes correspond to field programmable 2-Tone encode (transmit) codes available in other RITRON portable and base radios. In our example we will program an LM-U450 to operate with 2-Tone Paging Code 94 frequencies of 389.0 and 669.9 Hz. -
Page 20: Program Loudmouth Features
The wireless speaker can be field programmed for a variety of features. Refer to Table 5 for the two digit codes available for ® field programming. In our example we will program an LM-U450 for Record and Play operation. The Loudmouth is set from the factory with these options enabled. Refer to Table 5 to determine the two-digit feature code and write it down. - Page 21 6 digits to identify operating code revision. This is helpful when troubleshooting the radio. Pre-Announce Tone – On ® Enable this feature to play a short tone over the Loudmouth speaker whenever it receives a signal. Pre-Announce Tone – Off Disable Pre-Announce Tone Record and Play –...
-
Page 22: Program Loudmouth Volume
® In our example we will program an LM-U450 for 25% Speaker Volume Level. The Loudmouth is set from the factory with a 50% volume setting. -
Page 23: Program The Noaa Weather Frequency
The LM-V150 can be programmed to play severe weather warnings originating from the National Weather service that are ® broadcast on one of seven NOAA weather frequencies. The Loudmouth is shipped from the factory without a NOAA weather frequency selected. Before the Weather Alert feature can be used you must first select the local NOAA frequency. -
Page 24: Field Programming Flow Chart
Field Programming Flow Chart Feature Decision Programming Frequency Code from Table? Custom frequency requires PC programming Interference Eliminator Tone Code? Enter Frequency & QC Tone codes [F] Enter Frequency & DQC Tone codes [F] Selective Paging? None Enter No Paging Code [C] Selcall Enter 3-7 digit Selcall Code [C] 2-Tone... -
Page 25: Operation
Set the portable, base station, or mobile radio to the Loudmouth channel. ® Monitor the channel before transmitting to be sure there are no other radio users on the Loudmouth frequency. Press and hold the PTT button and pause for about 1 second, allowing the pre-announce tone to be heard. -
Page 26: 2-Tone Paging
Factory default Two-Tone Reset Time is 5 seconds. ® Can be used in conjunction with QC or DQC for added security. The 2-way radio and the Loudmouth receiver must be programmed for the same QC or DQC code. Record and Play (30 seconds of record time MAXIMUM) ®... -
Page 27: Weather Alert
NOAA weather frequencies. The Loudmouth will listen for emergency weather broadcasts any ® time it is not being used. To use this feature the Loudmouth must first be programmed for your local NOAA weather frequency. -
Page 28: Loudmouth Options
® In general, the calling radio should be at least 50 feet away from the speaker when the Loudmouth is set for 50% volume. The necessary distance increases if the volume is turned up and decreases if the volume is turned down. -
Page 29: Relay Operation (Serial Number A100119000 Or Higher)
® 4-conductor cable with a mating connector to the Loudmouth for easy installation. ® Heyco strain relief used to retain the 4-conductor cable to the Loudmouth case and provide a weather seal. Refer to Relay cable assembly 60201127 Installation for instructions on installing the ®... - Page 30 Connect to Green wire 4.10 Radio Operation Timeline (serial number A100119000 or higher) ® The following timeline explains operation for radios with serial number A100119000 or higher. In this example the Loudmouth is programmed for: Record and Play ...
-
Page 31: Specifications
Specifications Audio Output Output power 60mW - 5.35W RMS adjustable Sound pressure level (see chart below) Nominal coverage when wall-mounted Vertical .....+/- 50° (reference at 0° -5 dB) Horizontal ..+/- 45° Audio input level to power amplifier 180 mVPP 1.9 – 18.5 VPP Audio output level 10 –... -
Page 32: Power Requirements
WARNING! Audio output to speaker is bridge tied load (BTL). Grounding either connection ® to the speaker will result in failure of the Loudmouth audio amplifier. RPS-1B Power Cube 2.93” L (74.5 mm) x 1.97” W (50 mm) x 1.14” H (29 mm) -
Page 33: Loudmouth Receiver
® Loudmouth Receiver 7.125”H x 5.5”W x 3.0”D Receiver physical dimensions Receiver enclosure material Hi- Impact Polycarbonate Thermoplastic Receiver color Black Receiver weight 1.65 lb. (with AFB-1545 antenna and BP-LM-Li22 battery) Receiver mounting 2 aluminum brackets to side of radio... -
Page 34: Loudmouth ® Power Supply Requirements
PA module that is installed. LM receivers with the 9/LM-PA module require: Ritron model RPS-2B power supply and BP-LM9 Emergency Backup Battery LM receivers with the 9/LM-PA-2 module require: Ritron model RPS-1B power supply and BP-LM8-MH Emergency Backup Battery ... -
Page 35: Warranty
• Installation, maintenance or service of the product, unless this is covered by a separate written agreement with RITRON; • Any products not furnished by RITRON which are attached or used with the covered product, or defects or damage from the use of the covered product with equipment that is not covered (such as defects or damage from the charging or use of batteries other than with covered product);...
Need help?
Do you have a question about the LoudMouth and is the answer not in the manual?
Questions and answers