Advertisement
Quick Links
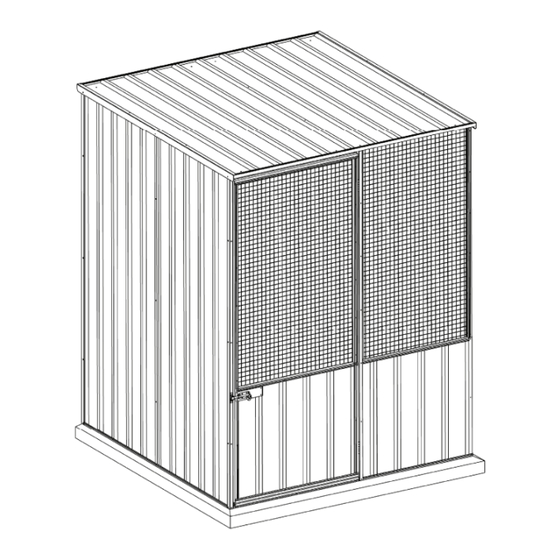
FOWLHOUSE
1.51W x 1.51D x 1.82Hm
Fowl House Series
Congratulations on purchasing your new Pinnacle fowl house. Before assembling, we recommend
you read the instructions thoroughly. Your new fowl house comes with pre-drilled holes to make
assembly quicker. We recommend you assemble it using a trestle table or sawhorses and planks.
This will ensure that you are working off the ground and make it easier for you.
Assembly of this fowl house is a two-person job and should not be attempted in windy conditions.
Tools required: Drill, measuring tape, Phillips-head screw driver, rivet gun, rubber mallet, sturdy ladder, shifting spanner, 2 saw horses, 3mm
steel drill bit, 4mm steel drill bit and a 10mm masonry drill bit.
Assembly instructions
www.pinnacle.net.au
Check out our
shed building
tips on Youtube!
AU: 1800 349 776
NZ: 09 276 4071
Advertisement

Related Manuals for Pinnacle Fowl House Series

Summary of Contents for Pinnacle Fowl House Series
- Page 1 AU: 1800 349 776 NZ: 09 276 4071 Congratulations on purchasing your new Pinnacle fowl house. Before assembling, we recommend you read the instructions thoroughly. Your new fowl house comes with pre-drilled holes to make assembly quicker. We recommend you assemble it using a trestle table or sawhorses and planks.
- Page 2 FOWLHOUSE 1.51W x 1.51D x 1.82Hm Dimension overview: Outer base dimensions 1515 x 1515 mm Inner base dimensions 1470 x 1470 mm Wall height 1800 mm Peak height 1825 mm Roof width 1601 mm Door opening dimensions 1740 x 746 mm...
- Page 3 Build your fowl house in 7 easy steps! Step 1: Check all parts against the component list Step 2: Assemble the rear wall panels Step 3: Assemble the side wall panels Step 4: Assemble the roof panels Step 5: Assemble the front wall panel Step 6: Assemble the front door Step 7: Fit the panels together Warning: Do not assemble this fowl house on a windy day.
- Page 4 FOWLHOUSE 1.51W x 1.51D x 1.82Hm Step 1: Check all parts against the component list Lay out all parts with number facing outwards and check off against parts list. Part Picture Description Component Location QTY Check Sheet Sheet 1800x770mm Rear wall Sheet Sheet 1800x770mm Side wall...
- Page 5 Part Picture Description Component Location QTY Check Channel Channel 655mm Front Channel Channel 775mm Front Jamb Jamb 1798mm Front Jamb Jamb 775mm Front Corner Brace Brace 1798mm Corners Corner Brace Brace 1898mm Corners Lip 1601mm Roof...
- Page 6 Signature: _________________________________________ In the unlikely event that you find you are missing a part, Australian customers please contact Pinnacle on 1800 349 776. New Zealand customers please contact Harco (Harkness & Young Ltd) on: 09 276 4071. A copy of proof of purchase may be requested.
- Page 7 Fowl house overview:...
- Page 8 FOWLHOUSE 1.51W x 1.51D x 1.82Hm Step 2: Assemble the rear wall panels For easier assembly of your fowl house use sawhorses with timber studs as per diagram below (timber needs to be the same length as the fowl house (1.5 M)) or alternatively, a trestle table. Place 2 x part S75 (sheets) on your worktable and join together with the self-tapping screws as per the diagram below.
- Page 9 ROOF TOP EDGE Assemble the rear wall panels (continued) Step 2: Please note the groove should face downwards. Position the top and bottom channels with self-tapping screws as well. NOTE: All screws marked with a cross should not be fixed at this stage. ROOF TOP EDGE RIDGES FACING DOWN Tip: If panel and screw holes do not line up, try pulling panel to match up holes.
- Page 10 FOWLHOUSE 1.51W x 1.51D x 1.82Hm Assemble the side wall panels Step 3: Place 2 x part S76 (sheets) on your worktable and tap or slide on part 20H (top channel) and part 20A (bottom channel). Fix part 20A (bottom channel) with self-tapping screws but not part 20H (top channel) at this stage. Make sure the small lip of the channels is always facing out.
- Page 11 Assemble the roof panel Step 4: Place 2 x part 8A (sheets) on your worktable and join together with the self-tapping screws as per the diagram below. Now tap or slide 2 x part 20A (channels) onto the sheeting and fix them to the top and bottom with self-tapping screws. Make sure the small lip on both channels are facing out.
- Page 12 FOWLHOUSE 1.51W x 1.51D x 1.82Hm Assemble the roof panel (continued) Step 4:...
- Page 13 Step 5: Assemble the front wall panels Place part 17A (front wall) on the worktable then fit parts 20F (top channel) and 20E (bottom channel) to the front wall sheeting and fix with self-tapping screws. NOTE: Fix parts 20F (top channel) from the centre hole first. Secure the iron mesh by riveting part 86 (channel) onto part 20F (top channel).
- Page 14 FOWLHOUSE 1.51W x 1.51D x 1.82Hm Assemble the front door Step 6: Fit parts J32 (jamb), 42 (jamb) and part 23 (bottom channel) to the front wall and fix with self-tapping screws. Make sure the joints are fixed as per the below diagrams. NOTE: Screws marked with a cross should not be fixed at this stage.
- Page 15 Assemble the front door (continued) Step 6: Fix part 18A (pre-assembled door) to the front wall panel using a rivet gun and the provided 4.0 x 10mm rivets. FIX WITH 4.0 X 10MM RIVETS...
- Page 16 FOWLHOUSE 1.51W x 1.51D x 1.82Hm Assemble the front door (continued) Step 6: Now fix part 70 (pad bolt) using the pre-drilled holes with self-tapping screws or 3.0 x 10mm rivets. FIX WITH 10MM SCREWS FIX WITH 3.0 X 10MM RIVETS...
- Page 17 Fit the panels together Step 7: Attach the two side walls to the back wall, then fit the front wall by fixing 2 x parts Z32 and part Z33 (corner bracing) followed by the roof. Fix all of these components together using the provided self-tapping screws. NOTE: Fix the pad bolt keeper (71) with the provided 16mm self-tapping screws or 3.0 x 10mm rivets at this stage as well.
- Page 18 FOWLHOUSE 1.51W x 1.51D x 1.82Hm Fit the panels together (continued) Step 7: A bolt down kit can be purchased from your local Bunnings store and attached to this fowl house. Please refer to diagram below for installation. BOLT & NUT WALL SHEET STEEL ANGLE SLAB...
- Page 19 Process of claiming Warranty: To make a claim under the Warranty within the Warranty Period, you will need to contact the manufacturer directly by phone or email: Australian Customers please contact Pinnacle Hardware on: Claims Department contact number: 1800 349 776 Claims Department email: support@pinnacle.net.au...
- Page 20 FOWLHOUSE 1.51W x 1.51D x 1.82Hm – Where assessment is required in case of replacing or repairing the product, the manufacturer will appoint an assessor within 10 working days to identify the alleged defect. The manufacturer will bear the repair costs by appointing a local tradesman. The manufacturer may choose to replace the product if the repair or the cost of repair is not feasible.
Need help?
Do you have a question about the Fowl House Series and is the answer not in the manual?
Questions and answers