Table of Contents
Advertisement
変更箇所黄色
別紙 改訂履歴も参照してく ださい
Cordless endodontic treatment motorized handpiece
INSTRUCTIONS FOR USE
Thank you for purchasing the EndoSync PLUS.
For optimum safety and performance, read this manual thoroughly before using the unit and pay close attention to warnings
and notes. Keep this manual in a readily accessible place for quick and easy reference.
Brasseler USA
Advertisement
Table of Contents

Subscribe to Our Youtube Channel
Related Manuals for BRASSELER USA EndoSync PLUS


Summary of Contents for BRASSELER USA EndoSync PLUS
- Page 1 Cordless endodontic treatment motorized handpiece INSTRUCTIONS FOR USE Thank you for purchasing the EndoSync PLUS. For optimum safety and performance, read this manual thoroughly before using the unit and pay close attention to warnings and notes. Keep this manual in a readily accessible place for quick and easy reference.
-
Page 2: Table Of Contents
Table of Contents Accident Prevention Precautions Features Parts Identification and Accessories Usage (1) Operating Environments (2) Before Use Charge Battery Connect Contra Angle File Installation Calibration Check Operation (3) Operation Basic Operation Memory Settings Memory Setting: OTR Mode Memory Setting: Normal Mode (CW) Memory Setting: Normal Mode (CCW) Memory Settings: Other Settings Restore Default Memories... - Page 3 Replacement Parts and Storage (1) Replacement Parts Battery Replacement Built-in Electrode Replacement (2) Transport and Storage Environments Inspection and Warranty Regular Inspection Inspection Items Warranty Troubleshooting Technical Specifications Technical Specifications Symbols Electromagnetic Disturbances (EMD) Trademarks (™) and Registered Trademarks (®) : The names of companies, products, services, etc.
-
Page 4: Accident Prevention
This equipment must only be used by dentists and other legally licensed professionals. Do not use the EndoSync PLUS for anything other than its specified dental purpose. CAUTION: Federal law restricts this device to sale by or on the order of a dentist. (Valid only for U.S.A.) - Page 5 Condition : Conscious and mentally alert person. (Person who can stay still during treatment.) • When the EndoSync PLUS is connected to the EndoSync A.I., an apex locator, it is not recommended that this device be used with children under 12 years of age.
-
Page 6: Precautions
• Except for ways described in this manual, this unit must not be connected to or used in combination with any other apparatus or system. It must not be used as an integral component of any other apparatus or system. Brasseler USA will not be respon- sible for accidents, equipment damage, bodily injury or any other trouble which results from ignoring this prohibition. -
Page 7: Features
Features Instructions for how to use the EndoSync PLUS when it is connected to the EndoSync A.I. are printed on a blue background. ⹅ Liquid Crystal Display (LCD) The LCD is easy to read and shows all settings as well as how the motor is running. -
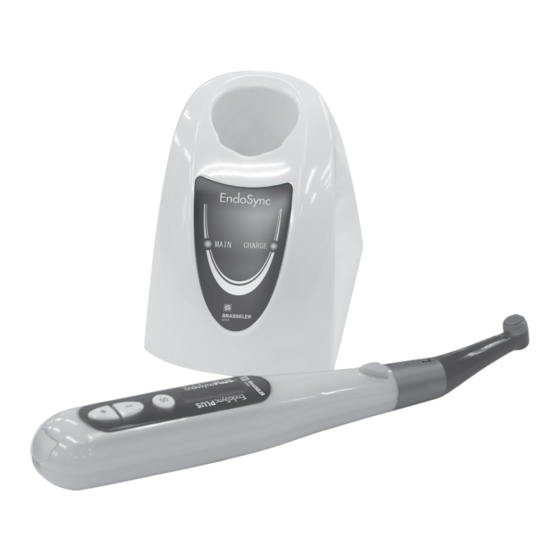
Page 8: Parts Identification And Accessories
Parts Identifi cation and Accessories Parts Identifi cation Contra Angle Main Switch Motor Handpiece Liquid Crystal Display Select Switch Plus and Minus Switches Charger Charger Switch Power LED (green) Charge LED (orange) Power Supply Cord Accessories ⹅ Standard Accessories Power Supply Cord EndoSync Oil Guide Bar Use the guide bar when cleaning and... -
Page 9: Usage
* Charging time is about 120 minutes. Do not use any charger; use only the one that comes with the EndoSync PLUS. Charge the battery as soon as the battery power indicator gets down to its last bar. If the orange charge LED goes off immediately or doesn’t light up when the motor handpiece is put into the charger, the battery is probably fully charged. -
Page 10: Connect Contra Angle
The number of bars shows how much battery power is left. Recharge the battery when there is only one bar left. If the battery runs almost completely out, the EndoSync PLUS will automatically turn itself off after about 10 seconds. Recharge the battery as soon as possible. -
Page 11: File Installation
• Use caution when inserting and removing fi les to avoid injury to fi ngers. • Inserting and removing fi les without holding the fi le release button down will damage the chuck. • Make sure the EndoSync PLUS is turned off before inserting or removing fi les. Instructions for Use 2019-02-21... -
Page 12: Check Operation
• Do not press the fi le release button while the motor is running. It could heat up and cause a burn, or the fi le could come out and cause an injury. • Stop using the EndoSync PLUS if you feel or notice anything unusual. The EndoSync PLUS cannot be used for every canal and should be used along with manual enlargement. -
Page 13: Operation
5. Turn EndoSync PLUS Off: Hold the Select Switch and then press the Main Switch. The EndoSync PLUS turns itself off automatically if it is not used for 3 minutes (initial setting). For meter readings and operation connected to the EndoSync A.I.;... -
Page 14: Memory Settings
Down** Apical Torque Reduction** Torque Slow Down These functions are available only when the EndoSync PLUS is connected to the EndoSync A.I. ⹅ Operation Mode There are three modes for canal shaping. OTR : Used for canal shaping. CW : Normal 360º... -
Page 15: Memory Setting: Otr Mode
When this is set to “ON”, the fi le starts rotating when it is inserted and stops when it is taken out of the canal. These functions are available only when the EndoSync PLUS is connected to the EndoSync A.I. Instructions for Use 2019-02-21... -
Page 16: Memory Setting: Normal Mode (Cw)
Cannot be used along with Apical Torque Reduction function. If the Torque Reverse Less (TRL) is turned on, the Torque Slow Down function is disabled. These functions are available only when the EndoSync PLUS is connected to the EndoSync A.I. Instructions for Use 2019-02-21... -
Page 17: Memory Setting: Normal Mode (Ccw)
When this is set to “ON”, the fi le starts rotating when it is inserted and stops when it is taken out of the canal. These functions are available only when the EndoSync PLUS is connected to the EndoSync A.I. Instructions for Use 2019-02-21... -
Page 18: Memory Settings: Other Settings
Memory Settings: Other Settings Other Settings: The initial settings are shown below. Beeper (BEEP VOLUME) High Backlight (B.L.COLOR CHANGE) Auto Power Off (AUTO PWR) 3 min. Return to Standby Time (S.S.R TIME) 10 sec. Positive/Negative Display (DISP. TYPE) Pos i Memory Setting Lock (SETTING LOCK) Right or Left Handed (DOMI. -
Page 19: Restore Default Memories
Restore Default Memories Restore the initial settings for the memories in the following way. * This will restore the original memory settings. You cannot restore settings for just one memory. 1. With the unit turned off, hold down the Select Switch, the Plus Switch and the Minus Switch and then turn the unit on with the Main Switch. -
Page 20: Usage; Operation With Endosync A
Usage; Operation with EndoSync A.I. Install File Electrode 1. Hold down the fi le release button. File Release Button 2. Insert the fi le and turn it back and forth until it lines up with the latch mechanism. 3. Push the fi le all the way into the latch. Release the fi le release button. -
Page 21: Connect Transmission Cable
Do not mix up the cable plugs. Do not put stress on the transmission cable by twisting, bending, or stretching by wrapping it around the EndoSync PLUS or EndoSync A.I. Check Operation ■ Make sure fi le electrode is making good contact with the fi le. -
Page 22: Meter Display
If the fi le tip goes past the Flash Bar, an alarm will sound and the backlight will blink. Operation Turn on the EndoSync PLUS and EndoSync A.I. The backlight for the display will be yellow. Hook the Contrary Electrode in the corner of the pa- tient’s mouth. - Page 23 Operation Select a memory number (M1 to M6) with the Plus or Minus Switch. * Before using motor handpiece, use a small hand fi le, such as #10 or #15, to penetrate the root canal manually down to the apical constriction. * In some cases, a root canal cannot be measured because of an overfl ow of blood, saliva or chemicals or because the root canal is Plus and Minus...
-
Page 24: Rotor Axle And Built-In Electrode Cleaning
Rotor Axle and Built-in Electrode Cleaning * If the bars fl icker during use, or if all the bars in the meter do not light up when the fi le touches the contrary electrode, clean the rotor axle and the built-in electrode in the following way. Rotor Axle Take out the screw and then take out the built-in electrode. - Page 25 Slowly turn the screw and make sure the built-in electrode Tighten the screw up securely and then hold down the fi le goes into the head properly. release button and pull out the guide bar. Contact is too high Right Wrong Autoclave the contra angle.
-
Page 26: Maintenance
Maintenance There are three ways to clean and disinfect components depending on the component. Be sure to follow the procedure below when performing daily maintenance. Wash and Wipe with Ethanol Autoclavable Components Wipe with Ethanol (70 vol% to 80 vol%) (70 vol% to 80 vol%) Motor Handpiece Guide Bar... - Page 27 • Use only ethanol (70 vol% to 80 vol%) and OPTI-CIDE-3™ Surface Wipes for cleaning. Any other cleaning chemical or products should not be used including but not limited to the following cleaning products and similar cleaning products listed below because of the potential damage to the plastic components of the EndoSync PLUS. ・CaviWipes™ ・CaviCide™ ・SANI-CLOTH™...
- Page 28 Lubrication * Only the contra angle needs to be lubricated. Before autoclaving, the contra angle must be lubricated with the EndoSync Oil. (1) Place the contra angle in a paper cup with the connec- tion end facing up. (2) Put 5 drops of the EndoSync Oil on the gear and wait Gear for 10 minutes.
-
Page 29: Wipe With Ethanol (70 Vol% To 80 Vol%)
• Use only ethanol(70 vol% to 80 vol%) and OPTI-CIDE-3™ Surface Wipes for cleaning. Any other cleaning chemical or products should not be used including but not limited to the following cleaning products and similar cleaning products listed below because of the potential damage to the plastic components of the EndoSync PLUS. ・CaviWipes™ ・CaviCide™ ・SANI-CLOTH™... -
Page 30: Wash And Wipe With Ethanol (70 Vol% To 80 Vol%)
• Use only ethanol (70 vol% to 80 vol%) and OPTI-CIDE-3™ Surface Wipes for cleaning. Any other cleaning chemical or products should not be used including but not limited to the following cleaning products and similar cleaning products listed below because of the potential damage to the plastic component of the EndoSync PLUS. ・CaviWipes™ ・CaviCide™ ・SANI-CLOTH™... -
Page 31: Replacement Parts And Storage
Do not tighten the cover screw too much; this could strip the threads. • Use only the battery designed for the EndoSync PLUS. Other types could cause overheating. • Do not use a battery if it is leaky, deformed, discolored or if its label is peeled off. It might overheat. -
Page 32: Built-In Electrode Replacement
Built-in Electrode Replacement Rotor Axle Take out the screw and then take out the built-in electrode. Put a little ethanol (70 vol% to 80 vol%) on a brush and clean the rotor axle with it. Guide Bar Hold the fi le release button and slide the guide bar straight Blow air on the electrode to remove any remaining mois- in as shown in the illustration. - Page 33 Contact is too high Right Wrong Tighten the screw up securely and then hold down the fi le Autoclave the contra angle. release button and pull out the guide bar. p. 25 “Autoclavable Components” • Make sure the screw is tight enough. Otherwise, it might come out and be swallowed. Also, measurements might not be accurate. Instructions for Use 2019-02-21...
-
Page 34: Transport And Storage Environments
(2) Transport and Storage Environments Temperature: -10°C to +45°C (+14°F to +113°F) Humidity: 10% to 85 % (without condensation) Atmospheric Pressure: 70 kPa to 106 kPa * Do not expose to direct sunlight frequently or for long times. * If the unit has not been used for a long time, make sure it works properly before using. * Always remove the battery prior to storing or shipping the unit. -
Page 35: Inspection And Warranty
* Maintenance and inspection are generally consider to be the duty and obligation of the user, but if, for some reason, the user is unable to carry out these duties, contact Brasseler USA for technical support. * Replace the parts listed in the Parts Lists as necessary depending on degree of wear and length of use. -
Page 36: Warranty
Brasseler USA. 2. Warranty repair and service: In the event of a claim under this guarantee, the device is to be sent to Brasseler USA. For customers in the U.S., call 1-800-841-4522. -
Page 37: Troubleshooting
If the unit does not seem to be working properly, the user should first try to inspect and adjust it himself. * If the user is unable to inspect the unit himself or if the unit fails to work properly after being adjusted or after parts are re- placed, contact Brasseler USA. Problem... - Page 38 • If the same error occurs after disconnecting the transmission cable, there is probably something wrong with the unit. Contact Brasseler USA. • Is there some debris on the connector for • If there is, clean the connector. the transmission cable? •...
-
Page 39: Technical Specifications
Type BSL PLUS Degree of Protection (IEC 60529) IPX0 The EndoSync PLUS motorized handpiece can be used to enlarge and prepare root canals, remove gutta-percha points, and for professional tooth cleaning. Indications for Use When connected to the Brasseler USA EndoSync A.I. or J. MORITA ROOT ZX mini, an apex locator (sold separately), the EndoSync PLUS can be used to measure the length of root canals. -
Page 40: Symbols
Symbols * Some symbols may not be used. CAUTION: Federal law restricts this device to sale by Serial Number or on the order of a dentist. (Valid only for U.S.A.) Date of manufacture GS1 DataMatrix cTUVus certifi cation mark Keep away from rain (Valid only for U.S.A. -
Page 41: Electromagnetic Disturbances (Emd)
Electromagnetic Disturbances (EMD) The EndoSync PLUS (Model: TR-CM, hereafter “this device”) conforms to IEC 60601-1-2:2014 Ed. 4.0, the relevant international standard for electromagnetic disturbances (EMD). The following is the “Guidance and Manufacturer’s Declaration” which is required by IEC 60601-1-2:2014 Ed. 4.0, the relevant international standard for electromagnetic disturbances. - Page 42 Guidance and Manufacturer’s Declaration – Electromagnetic Immunity This device is intended for use in the electromagnetic environment specifi ed below. The customer or the user of this device should assure that it is used in such an environment. Immunity Test IEC 60601 Test Level Compliance Level Electromagnetic Environment –...
- Page 44 One Brasseler Boulevard, Savannah, GA 31419, U.S.A. Pub. No.: K323-80001-501 (EN) Printed in Japan...
Need help?
Do you have a question about the EndoSync PLUS and is the answer not in the manual?
Questions and answers