
Related Manuals for RHealthCare Dash E-Fold

Summary of Contents for RHealthCare Dash E-Fold
- Page 1 Dash E-Fold Powerchair Owner’s Manual Please read this owner's manual carefully before operating your E-Fold Powerchair and keep it for future reference. Rev.: V.01...
- Page 2 Dear Customer: Thank you for purchasing your E-Fold Powerchair. Please read this owner's manual thoroughly before operating your E-fold Powerchair. If there is anything in this manual you do not understand, or if you require any additional assistance, please contact your local dealer. This owner’s manual specifies the ways to operate and assemble the E-fold Powerchair, and disposal solutions as well in case of accident.
-
Page 3: Table Of Contents
CONTENTS 1. SAFETY............4 2. PARTS INTRODUCTION......6 3. SPECIFICATIONS........7 4. BATTERY AND BATTERY CHARGING...8 5. ASSEMBLY AND OPERATION....10 6. TROUBLE SHOOTING.......19 7. CARE AND MAINTENANCE....20 8. WARRANTY……...……......22 P a g e 3 | 22... -
Page 4: Safety
1. SAFETY ■ Pre-ride safety notice ● Please drive on the pavement where possible. Otherwise, drive on the proper side of the road. ● Mind the traffic once there is no pavement ahead or you have to drive on the carriageway. ●... - Page 5 ● Be careful when getting to the bottom or approaching an incline, and driving on raised ground or unprotective borderland (such as side of the road, porch, stairs etc.) ● Do not change initial setting and modify the Powerchair. ● Drive carefully when getting through the busy streets and shopping centers. Never drive on unsafe areas or roads that are forbidden to pass.
-
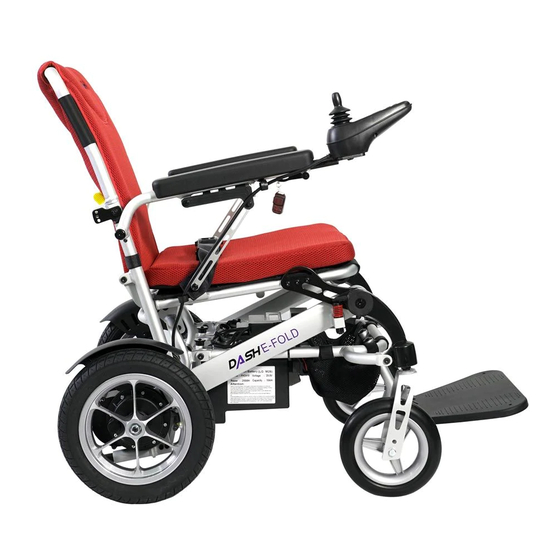
Page 6: Parts Introduction
2.PARTS INTRODUCTION . Armrest 2. Cushion 3. Footrest 4. Front Wheel Assembly 5. Rear Wheel Assembly 6. Motor 7. Backrest 8. Cup Holder(optional) 9. Storage bag 10. Controller 11. Front Suspension 12. Battery box 13. Anti-tip wheel 14. Reflector 15. Folding and Locking Mechanism 16. -
Page 7: Specifications
3. SPECIFICATION Model Dash E-Fold Size Length:102cm(40.16inch) Width:56cm(22.05inch) Height:84.5cm(33.27inch) Max Speed 4mph Min. turning radius 92.5cm Maximum Climbing Capacity 10°±1° Drive system 2 gears, rear wheel drive 2*24Vdc*250W Braking system Intelligent brake system(joystick control) Weight Capacity 125kg Rear wheel 2 x 12.5” Air PU, plastic hub (optional... -
Page 8: Battery And Battery Charging
4. Battery and Battery Charging ★ Attention: to avoid accidents caused by abnormal charging, please follow the following rules. ★ Use the designated charger only for this powerchair and make sure the battery is fully charged. If the designated charger is not used, charging failure or battery damage may happen. - Page 9 you can unplug from the wall, then unplug the microphone plug from the charging socket. ModesⅠ) (Charging ● Charging Method II 1. Switch off the Powerchair. 2. Remove the battery from the slot under the chassis and place on a sturdy surface. 3.
-
Page 10: Assembly And Operation
5.ASSEMBLY AND OPERATION ● Assembling the joystick 1. Put the fixing rod of the joystick into tube of right armrest (see image below), hold the locknut with left hand, rotating the quick release handle (1) clockwise, then press the quick release handle towards the arm rest to lock it properly. - Page 11 3.3. Speed control button Press the increase speed control button sequentially to accelerate the powerchair. The speed button offers 5 discrete steps to speed up. Similarly, then press the reduce speed button sequentially to decelerate, also the speed button offers 5 discrete steps for speed reduction. 3.4.
- Page 12 ●Operation of Electromagnetic Brake Push the handle into the unlocked position and the brake will disengage. The powerchair can then be pushed (no matter if the power is on or off) Pull the handle to the locked position and the brake will engage. The powerchair will now not be able to be pushed (no matter if the power is on or off).
- Page 13 1.Metal shrapnel 2.Anti-tip wheel assembly Position 1 Position 2 Folding and unfolding Hold down the open button ( ) on the controller for unfolding the wheelchair and the fold button ) for folding. Stand the powerchair upright and push it to move forward. P a g e 13 | 22...
- Page 14 You can side the slip cover over the buttons when the controller is not in use, so as to protect the buttons on the controller and avoid unnecessary damage by touching the key accidently. Replace the battery when the LED indicator on the controller is not bright enough and folding or unfolding the wheelchair becomes difficult.
- Page 15 Actuator Clip 2.Pull the button to unreeve the pin (see the following image) and push forward the backrest to fold it at the sample, alternatively, pull backward the backrest to unfold it. P a g e 15 | 22...
- Page 16 Backrest adjustment The backrest angle can be adjusted by the lever into three different positions, as below. P a g e 16 | 22...
- Page 17 Operation of Powerchair 1. Make sure the operator is well seated in the powerchair. 2. Switch on using the power button near the joystick until 5 LED’s are shown on the power indicator. 3. Push the joystick slowly forwards until you hear the magnetic brakes disengage, the powerchair may start to move.
- Page 18 EMI/RFI Dash E-Fold Powerchair is certified with CE. However, all electrically powered vehicles including powerchairs are susceptible to EMI and RFI. This interference could result in abnormal, unintended movement of a powerchair. We advise you keep your powerchair far away from that high frequency equipment, emission and receiving devices.
-
Page 19: Trouble Shooting
6. TROUBLE SHOOTING Trouble shooting for Micon controller The controller contains procedures for identifying problems and trouble shooting. As soon as the diagnostic program detects problems or errors, 5 LED’s will become lit and rapidly flash on the battery gauge of the controller. The owner can try the following method to address the problem. -
Page 20: Care And Maintenance
7.CARE AND MAINTENANCE To ensure the performance of the powerchair and minimize the occurrence of failures so that you are able to have a safe and comfortable drive, we recommend performing the following checks. Please pay attention to the following in daily use. 1. - Page 21 Monthly check: 1. Make sure the battery is in good condition, clean the battery connections if necessary. 2. Ensure every connector along the electric system is in good condition. 3. Check if the fasteners are loose. 4. Ensure the front and rear wheels are not shaking. 5.
-
Page 22: Warranty
8.WARRANTY ● Warranty From the manufacture date: (1) Main frame: 1 year repairing guarantee (2) Motors: 6 months free replacement and 1 year repairing guarantee (3) Charger and controller: 6 months free replacement and 1 year repairing guarantee. (4) Battery: free replacement if capacity of battery less than 60% of rated capacity within 6 months.
Need help?
Do you have a question about the Dash E-Fold and is the answer not in the manual?
Questions and answers