Table of Contents
Advertisement
2.4 GHZ 6 AXIS R/C QUADCOPTER
FEATURE:
1.Four-Rotor design allows great speed and maneuverability for indoor
and outdoor use.
2.Built-in 6-axis Gyro ensures excellent stability.
3.loading capacity up to 500g.
4.Auto hover/Headless function/One key to return.
5.360-degree 3-dimensional stunt and tumbling function.
6.WIFI Photo/Video.
7. 2MP camera Photo/Video.
8. 5MP camera Photo/Video.
9. 5.8G FPV real time transmission.
The materials and specifications stated in this instruction manual
are for reference only.
Advertisement
Table of Contents

Related Manuals for KaiDeng K70 Sky Warrior


Summary of Contents for KaiDeng K70 Sky Warrior
- Page 1 2.4 GHZ 6 AXIS R/C QUADCOPTER FEATURE: 1.Four-Rotor design allows great speed and maneuverability for indoor and outdoor use. 2.Built-in 6-axis Gyro ensures excellent stability. 3.loading capacity up to 500g. 4.Auto hover/Headless function/One key to return. 5.360-degree 3-dimensional stunt and tumbling function. 6.WIFI Photo/Video.
- Page 2 Catalog Sky warrior K70 Key Introduction of K70 Remote Controller Specification of K70 Preparation before flight Basic Operation Guide Special function button guide CF mode Upgrade accessories (Selective Buying) Drone accessories (Selective Buying) Trouble Shooting...
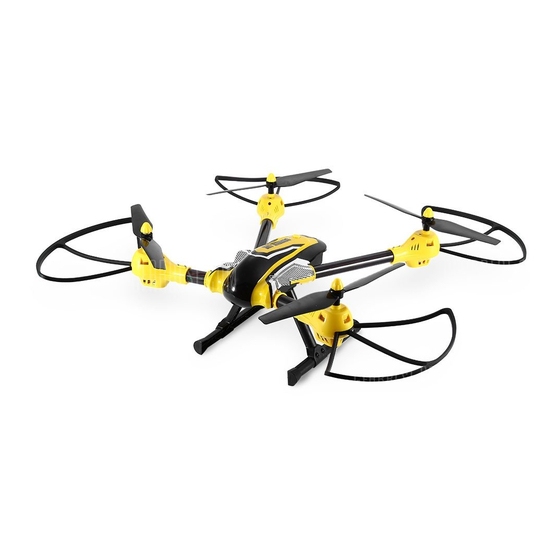
- Page 3 Sky warrior K70 Wonderful design could win player’s favor. High pixel and stable flying could bring much more entertainment. 1.LED Light 2.Blade 3.Landing Gear 4.Camera 5.Motor 6.Protect Shield Key Introduction of K70 Remote Controller 1. one key to return 10. left/right side-fly trimmer/long 2.
- Page 4 Specification of K70 539X559X178MM Weight Aprx 580g ( Basic version) Max Flight Time 8 MIN Operating Temperature Range 0°C to 40°C Lens Angle Control Range 90° SD Card Types 4G Micro SD Card Battery Capacity 2000mAh 539mm 159.6X163X92MM Weight 233g (without battery) Operating Temperature Range 0°C to 40°C Battery...
- Page 5 Figure 1 Figure 2 Figure 3 Figure 4 Figure 5 Figure 6 1.Insert the landing gear firmly to the slots on the drone.( Figure1) 2.Use screwdriver to tighten the landing gear in clockwise direction. ( Figure2) Figure 1 Figure 2 1.Use screwdriver to loose the landing gear in anti-clockwise direction.
- Page 6 1. Use screwdriver to loose the camera in anti- clockwise direction. 2. Take out the camera. NOTE: Please make sure the drone is off while mount/dismount the camera. 1.Insert the blade into main axis as figure (1)show. 2.Insert the main axis sleeve into main axis tube as figure (2) show. Make sure the notch of the main axis sleeve match with the hole on the main axis tube and then insert the iron axis.
- Page 7 See diagram below: 1.Insert protect shield into the slot on the drone as shown in figure (1). 2.Use screwdriver to tighten the screw on the protect shield in clockwise direction as shown in figure (2). Figure 1 Figure 2 1.Use screwdriver to loose the protect shield in anti-clockwise direction. 2.Take out the protect shield.
- Page 8 Figure 1 Figure 2 Figure 3 1. Use screwdriver to loose the screws on the motor cover in anti-clockwise direction. Figure(1) 2.Pull out the motor socket as figure (2) show. 3.Use screwdriver in counterclockwise direction to loose the screws on the motor as figure (3) show.
- Page 9 1.Take out the battery cover on the back of the controller. 2.Insert 4*1.5V AA battery then put on the battery cover. Remote controller low power indicator:When the remote controller under low power status,the light on the remote controller change from constantly in to flicker,and the buzzer on the remote controller make the alarm sound "DI DI"...
- Page 10 1.Use screwdriver in anti-clockwise direction to loose the screws in the fixed clip as figure (1) show. 2.Put the fixed clip on the handle of the controller then use screwdriver in clockwise direction to tighten it as figure (2) show. Figure 1 Figure 2 Figure 1...
- Page 11 1.Insert the USB pin to the monitor and connect the USB with adaptor or computer to charge the monitor. 1.Turn on the power switch of the remote controller as figure (1) show, the light indicator will blink when power on and the buzzer makes the sound “DI DI”...
- Page 12 Here are the basic operation guide(Mode 1), the left stick controls altitude and direction, while the right stick controls the rotation forward, backward, left or right movement. Push up/down the left control Ascend/ stick, the quadcopter ascends/ descend descends accordingly. Push left/ right the left control Turn left/ stick, the quadcopter turn left/...
- Page 13 Push the throttle up slightly and release it, the drone will stick to a specific height steadily, push the throttle down when decent the drone. 3D Flip Ascending the drone to 2 meters high, press the 3D flip button(remote controller will make two sound didi continuously, the sound will stop when finished the movement) and then push the right control stick in any direction at the utmost, the drone will roll over accordingly.
- Page 14 One key to return When in CF mode, press the “one key to return” key, the quadcopter will fly towards the operator. Press this key again or push up the right control stick to exit this function.(To make a safe return, push the right control stick to left/right if the quadcopter’...
- Page 15 Figure(1) Figure(2) In CF mode, the forward direction is the direction which the quadcopter pointed to in the previous step. The operator should face this forward direction, otherwise the direction will not in the correct control. Please follow the below steps: Push the right control stick up, Push the control stick to make...
- Page 16 200W Camera 500W Camera FPV WIFI+0.3MP Resolution of photo/ Resolution of photo/ Camera resolution video: 1280X720 video:1980X1080 of photo/video: 640X480 FPV WIFI+2MP Camera FPV 5.8G +2MP Resolution of photo/video: Camera resolution 1280X720 of photo/video: 1280X720 Main body Base body Blade Landing gear Mobile fixed clip Protect shield(black)
- Page 17 Card reader SD Card Long tube frame Short tube frame Gear accessory Switch Motor Blade cover Remote controller Problem Reason Solution 1.The quadcopter and the The indication light of the 1.Repeat the connecton transmitter are out of radio quadcopter is flashing and procedure.
- Page 18 Warning: Changes or modifications to this unit not expressly approved by the party responsible for compliance could void the user’ s authority to operate the equipment. NOTE: This equipment has been tested and found to comply with the limits for a Class B digital device, pursuant to Part 15 of the FCC Rules.
Need help?
Do you have a question about the K70 Sky Warrior and is the answer not in the manual?
Questions and answers