Table of Contents
Advertisement
Available languages
Available languages
Quick Links
I. Product Overview
1. Camera Lens
2. USB Port
3. Power Switch
4. Micro SD Card Slot
5. Red Indicator Light
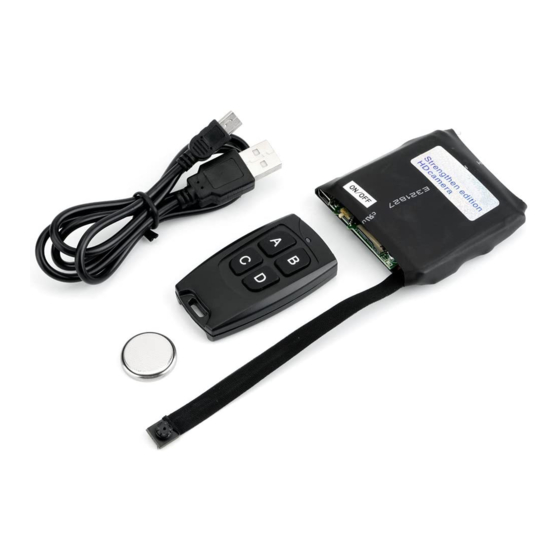
II. What's In the Box
-1×Mini Module Camera
-1×Remote Controller
-1×USB Cable
-1×Backup Battery for Remote Controller
-1×DC 5V Charging Adapter
III. Operation
>> Before using, make sure that the camera is fully recharged.
T183
User Guide
6. Button A
7. Button C
8. Button B
9. Button D
10. Blue Indicator Light
Advertisement
Table of Contents

Related Manuals for Wiseup T183


Summary of Contents for Wiseup T183
- Page 1 T183 User Guide I. Product Overview 1. Camera Lens 6. Button A 2. USB Port 7. Button C 3. Power Switch 8. Button B 4. Micro SD Card Slot 9. Button D 5. Red Indicator Light 10. Blue Indicator Light II.
-
Page 2: Power On/Off
>> Please make sure the Micro SD card (4GB-32GB, format it for the first usage) is securely fitted into the camera’s SD card slot. The camera will not work without a Micro SD card. A SDHC Class 10 Micro SD card is recommended. >>... -
Page 3: Motion Detection Recording
3.3.2. Press Button B once to take a photo. The red indicator light will flash once and then stay illuminated, indicating the camera is back to standby mode. 3.4. MOTION DETECTION RECORDING 3.4.1. Power on the camera by holding down Button A for 3 seconds. The red indicator light will flash once and then stay illuminated, indicating the camera has entered into standby mode automatically. - Page 4 6.2. It will take 4 hours to obtain a full charge. 6.3. The red indicator light will keep flashing during the charging process. 6.4. When the camera is fully charged, the red indicator light will stay illuminated. [Note]: The camera can be charged whether it is on or off.
- Page 5 T183 Benutzerhandbuch I. Produktübersicht 1. Kamera-Objektiv 6. Taste A 2. USB-Anschluss 7. Taste C 3. Netzschalter 8. Taste B 4. Micro-SD-Kartensteckplatz 9. Taste D 5. Rote Anzeigeleuchte 10. Blau-Anzeigelampe II. Was ist in der Box -1×Mini-Modul-Kamera -1×Fernbedienung -1×USB-Kabel -1×Backup-Batterie für Fernbedienung -1×DC 5V Ladeadapter...
-
Page 6: Einschalten / Ausschalten
>> Vor der Verwendung, stellen Sie sicher, dass die Kamera vollständig aufgeladen ist. >> Bitte stellen Sie sicher, dass die Micro SD-Karte (4GB-32GB, formatieren Sie es für die Erstausstattung) fest in die Kamera SD-Kartensteckplatz ausgestattet. Die Kamera funktioniert nicht, ohne eine Micro-SD-Karte. Eine SDHC Class 10 Micro-SD -Karte wird empfohlen. - Page 7 3.3. CAMERA / FOTOGRAFIE 3.3.1. Schalten Sie die Kamera durch die Taste A für 3 Sekunden gedrückt halten. Die rote Kontrollleuchte blinkt einmal und dann beleuchtet bleiben, was auf die Kamera hat sich automatisch in den Standby-Modus. 3.3.2. Drücken Sie die Taste B einmal um ein Foto aufzunehmen. Die rote Kontrollleuchte blinkt einmal und dann beleuchtet bleiben, ist die Kamera anzeigt, zurück in den Standby-Modus.
- Page 8 Jahr-Monat-Tag Stunde: Minute: Sekunde. (Zum Beispiel: 2016-04-12 14:24:32). Speichern Sie diese Datei. 5.6. Starten Sie die Kamera und das System-Upgrade, das Programm automatisch. VI. Lade 6.1. Schließen Sie die Kamera an eine Steckdose an Steckdose mit dem USB-Kabel und DC 5V Ladeadapter zur Verfügung gestellt. 6.2.
-
Page 9: Présentation Du Produit
T183 Mode d'emploi I. Présentation du produit 1. Objectif de la caméra 6. Bouton A 2. Port USB 7. Bouton C 3. Interrupteur 8. Bouton B 4. Carte mémoire sd Slot 9. Bouton D 5. Témoin lumineux rouge 10. Témoin lumineux bleu II. - Page 10 >> Avant d'utiliser, assurez-vous que la caméra est complètement rechargée. >> Assurez-vous que la carte Micro SD (4 Go-32GB, formater pour la première utilisation) est solidement fixée dans la fente de la carte mémoire SD de l'appareil photo. La caméra ne fonctionne pas sans une carte Micro SD. Une SDHC Classe 10 carte Micro SD est recommandée.
- Page 11 3.3. CAMERA / PHOTOGRAPHIE 3.3.1. Allumez l'appareil photo en appuyant sur le bouton A pendant 3 secondes. Le voyant rouge clignote une fois, puis reste allumé, indiquant que l'appareil est entré en mode veille automatiquement. 3.3.2. Appuyez sur le bouton B une fois pour prendre une photo. Le voyant rouge clignote une fois et puis rester allumé, indiquant que l'appareil est en mode veille.
- Page 12 automatiquement. VI. Se charger 6.1. Branchez l'appareil photo à une prise de courant alternatif de sortie en utilisant le câble USB et DC 5V adaptateur de charge fourni. 6.2. Il faudra 4 heures pour obtenir une charge complète. 6.3. Le voyant rouge continue de clignoter pendant le processus de charge. 6.4.
-
Page 13: Descrizione Del Prodotto
T183 Guida utente I. Descrizione del prodotto 1. Obiettivo della fotocamera 6. pulsante A 2. Porta USB 7. Tasto C 3. Interruttore 8. Pulsante B 4. Slot per scheda micro SD 9. Tasto D 5. Spia rossa 10. Indicatore luminoso blu II. -
Page 14: Registrazione Video
>> Prima di utilizzare, assicurarsi che la fotocamera è completamente carica. >> Si prega di accertarsi che la scheda Micro SD (4GB-32GB, formattarlo per la prima fornitura) è montato saldamente nella slot per scheda SD della fotocamera. La fotocamera non funziona senza una scheda Micro SD. Si raccomanda un SDHC Classe 10 scheda Micro SD. - Page 15 3.3.1. Accendere la fotocamera tenendo premuto il pulsante A per 3 secondi. La spia rossa lampeggia una volta e poi rimanere illuminato, indicando la telecamera è entrato in modalità standby automaticamente. 3.3.2. Premere il pulsante B una volta per scattare una foto. La spia rossa lampeggia una volta e poi rimanere illuminato, indicando la fotocamera è...
- Page 16 VI. Ricarica 6.1. Collegare la fotocamera ad una presa di corrente alternata presa utilizzando il cavo USB e ricarica DC 5V adattatore in dotazione. 6.2. Ci vorranno 4 ore per ottenere una carica completa. 6.3. La spia rossa continua a lampeggiare durante il processo di carica. 6.4.
-
Page 17: Operación
T183 Guía del usuario I. Visión general del product 1. Lente de la cámara 6. Botón A 2. Puerto USB 7. Botón C 3. Interruptor de Potencia 8. Botón B 4. Ranura para tarjeta Micro SD 9. Botón D 5.Indicador de luz roja 10. -
Page 18: Grabación De Vídeo
>> Antes de usar, asegúrese que la cámara está completamente recargada. >> Por favor asegúrese que la tarjeta Micro SD (4GB-32GB, formato para el primer uso) está montado de forma segura en la ranura para tarjetas SD de la cámara. La cámara no se funciona sin una tarjeta Micro SD. - Page 19 3.3. CÁMARA / FOTO FIJA 3.3.1. Encienda la cámara manteniendo y pulse el botón A durante 3 segundos. El indicador de luz roja parpadea una vez y luego se permanece encendido, lo que indica que la cámara ha entrado en el modo de espera automáticamente. 3.3.2.
- Page 20 este archivo. 5.6. Reiniciar la cámara y el sistema actualizará el programa automáticamente. VI. Carga 6.1. Conectar la cámara a una toma de alimentación de CA de salida mediante el cable USB y el adaptador de carga CC 5V proporcionada. 6.2.
- Page 21 T183 ユーザーガイド I. 製品の概要 6. ボタンA 1. カメラレンズ 7. ボタンC 2. USBポート 8. ボタンB 3. 電源スイッチ 9. ボタンD 4. SDメーモリーカードスロッ ト 10. 青いインジケータライト 5. 赤いインジケータライト II. ボックスについて -1×ミニモジュールカメラ -1×リモコン -1×USBケーブル -1×リモコン用のバックアップバッテリ -1×DC 5V充電アダプタ III. 操作...
- Page 22 >> 使用する前に、 カメラが完全に再充電されていることを確認してください。 >>マイクロSDカードしっかりとカメラのSDカードスロッ トに装着されている (最 大4GB-32ギガバイトは、 初めての使用の前にはフォーマッ トしてください) を確認 してください。 カメラは、 マイクロSDカードがなく ても動作しません。 SDHCクラ ス10マイクロSDカードをお勧めします。 >> ON位置に電源スイッチをスライドさせてください。 >>カメラのリモートコントローラを使用すると、 カメラを指してくだ。 毎回あなたがボタンを押したら>>リモコンの青色のインジケータライトが点滅しま す. マイクロSDカードがカメラに装着されていない場合は、 赤色のインジケータライトが8回点 [注意]: 滅し、 その後消灯します. 3.1. 電源のオン/オフ 3.1.1. 3秒間ボタンAを押してカメラの電源をオンにします。 赤のインジケータライ トが一回点滅し、 その後、 自動的にスタンバイモードに入ったカメラを示し、 点灯し たままになります。 3.1.2. 一度ボタンAを押してカメラの電源をオフにします。 赤のインジケータライト が3回点滅し、 オフになります。 OFFの位置に電源スイッチをスライドさせ. それが2分以上何も操作せずにスタンバイモードになっている場合はカメラが自動的にシャ [注意]: ッ...
- Page 23 トが一回点滅し、 その後、 自動的にスタンバイモードに入ったカメラを示し、 点灯 したままになります。 3.3.2. 押しボタンBは、 一度写真を取ります。 赤のインジケータライトが点灯滞在 一旦点滅します、 カメラを示すことは戻ってスタンバイモードにあります. 3.4. モーション検知録画 3.4.1. 3秒間ボタンAを押してカメラの電源をオンにします。 赤のインジケータライ トが一回点滅し、 その後、 自動的にスタンバイモードに入ったカメラを示し、 点灯し たままになります。 3.4.2. 押しボタンDは、 一旦、 動き検知録画モードに入ります。 赤のインジケータラ イトが6回点滅し、 オフになります。 3.4.3. 動きが検出されると、 赤のインジケータライトが一回点滅し、 カメラが自動 的にビデオの録画を開始します。 3.4.4. Dボタンを再び押す検知録画モードを終了し。 赤のインジケータライトがカメ ラはスタンバイモードに入り、 照らされたままになります。 IV. ビデオ/画像ファイルのアップロード 4.1. カメラの電源がオフのときは、 マイクロSDカードを取り外し、 カードリーダー に挿入してください。 4.2. PCのコンピュータにカードリーダーを挿入してください。 4.3. マイクロSDカードは、 ディスクドライブにも認識されます。 4.4. すべてのファイルは、...
- Page 24 セントのAC電源ソケッ トにカメラを接続します。 6.2. これは、 フル充電を取得するために4時間かかります。 6.3. 赤のインジケータライトは、 充電プロセス中に点滅します。 6.4. カメラが完全に充電されると、 赤のインジケータライトが点灯したままになり ます. カメラは、 電源がオンまたはオフであるかを充電することができます。 [注意]: ...
Need help?
Do you have a question about the T183 and is the answer not in the manual?
Questions and answers