Table of Contents
Advertisement
Advertisement
Table of Contents
Troubleshooting

Related Manuals for Johnson Outdoors MINN KOTA ULTREX 80 Series


Summary of Contents for Johnson Outdoors MINN KOTA ULTREX 80 Series
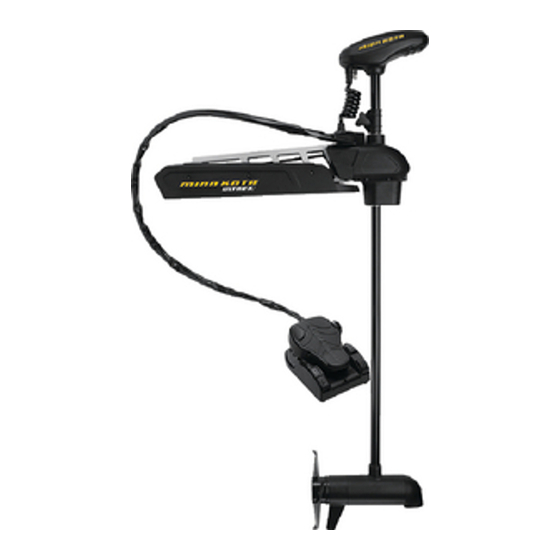
- Page 1 ULTREX ™ BOW-MOUNT TROLLING MOTOR Owner's Manual...
- Page 2 Minn Kota authorized service center. A list of authorized service centers is available on our website, at minnkotamotors.com. Please include proof of purchase, serial number and purchase date for warranty service with any of the above options. 2 | minnkotamotors.com ©2018 Johnson Outdoors Marine Electronics, Inc.
-
Page 3: Table Of Contents
SERVICE & MAINTENANCE ....................51 Propeller Replacement ..................... 51 General Maintenance ....................52 Troubleshooting ....................... 52 For Further Troubleshooting and Repair ..............53 COMPLIANCE STATEMENTS....................54 PARTS DIAGRAM & PARTS LIST ..................56 minnkotamotors.com | 3 ©2018 Johnson Outdoors Marine Electronics, Inc. -
Page 4: Safety Considerations
WARNING It is recommended to only use Johnson Outdoors approved accessories with your Minn Kota motor. Using non-approved accessories including to mount or control your motor may cause damage, unexpected motor operation and injury. Be sure to use the product and approved accessories, including remotes, safely and in the manner directed to avoid accidental or unexpected motor operation. -
Page 5: Warranty
WaRRaNTY WARRANTY ON MINN KOTA FRESHWATER TROLLING MOTORS Johnson Outdoors Marine Electronics, Inc. (“JOME”) extends the following limited warranty to the original retail purchaser only. Warranty coverage is not transferable. Minn Kota Limited Three-Year Warranty on the Entire Product JOME warrants to the original retail purchaser only that the purchaser’s new Minn Kota freshwater trolling motor will be materially free from defects in materials and workmanship appearing within three (3) years after the date of purchase. -
Page 6: Know Your Boat
KNOW YOUR bOaT Port Starboard Inboard Outboard Keel Port Starboard Gunwale Transom Stern Gunwale Stern Hull 6 | minnkotamotors.com ©2018 Johnson Outdoors Marine Electronics, Inc. -
Page 7: Features
Composite Material Power AutoPilot Cool Quiet Spot-Lock Power Motor Propeller Constant On NOTICE: Specifications subject to change without notice. This diagram is for reference only and may differ from your actual motor. minnkotamotors.com | 7 ©2018 Johnson Outdoors Marine Electronics, Inc. -
Page 8: Installation
 Only available with models factory installed with i-Pilot Link. Ì Only available with models factory installed with Universal Sonar. â Only available with models factory installed with Built-in MEGA Down Imaging. 8 | minnkotamotors.com ©2018 Johnson Outdoors Marine Electronics, Inc. -
Page 9: Assembly Of Motor To Mount
Lower the Motor Assembly straight down until the Steering Module is seated. End Links WARNING Steering Module Carefully lower the Steering Module into place to avoid creating a pinch point between the Steering Module and Mount. minnkotamotors.com | 9 ©2018 Johnson Outdoors Marine Electronics, Inc. -
Page 10: Installing The Bow-Mount
Place the Hold-Down Strap (Item #20) under the This motor weighs approximately 55 lbs. base of the Mount Plate so that it is below the Mount We recommend having a second person help with the when placed. installation. 10 | minnkotamotors.com ©2018 Johnson Outdoors Marine Electronics, Inc. - Page 11 Mount. Double check that it can close around the Mount when stowed. minnkotamotors.com | 11 ©2018 Johnson Outdoors Marine Electronics, Inc.
-
Page 12: Installing The Gas Spring Pin
Pull Grip and Cable to disengage the latch bar, allowing the motor to fold into a flat position. Once in the stowed or flat position, the Gas Spring Pin and Spacers can be installed. 12 | minnkotamotors.com ©2018 Johnson Outdoors Marine Electronics, Inc. -
Page 13: Indexing The Motor
Foot Pedal is parallel to the deck of the boat. Inboard Outboard Pedal Control Sleeve Assembly Control Head Deck of Boat Pedal Control Sleeve Assembly Deck of Boat Keel Keel minnkotamotors.com | 13 ©2018 Johnson Outdoors Marine Electronics, Inc. - Page 14 Cover Cover the Steering Motor Connection Plug that is visible. Steering Motor Connection Plug NOTICE: Please note the orientation and routing of the Wrap Drum Cover plug and wires for re-installation. 14 | minnkotamotors.com ©2018 Johnson Outdoors Marine Electronics, Inc.
- Page 15 Wrap Drum so that they do not become intertwined or pop off. Be sure that the electric wire is not damaged as the Wrap Drum is lifted. Cable Gear minnkotamotors.com | 15 ©2018 Johnson Outdoors Marine Electronics, Inc.
- Page 16 Cables are under tension or re-tighten the same number of turns as was used in step 4f. Cable Tension CAUTION Screw Do not over tighten the Cable Tension Screw, as excessive tension will cause damage to the unit. 16 | minnkotamotors.com ©2018 Johnson Outdoors Marine Electronics, Inc.
- Page 17 Orientate the wires connecting the Steering Motor Wires Connection Plug as noted so that the wires do not Wrap Drum touch moving parts. Cover Replace the Connector Cover. minnkotamotors.com | 17 ©2018 Johnson Outdoors Marine Electronics, Inc.
-
Page 18: Orientate The Pedal Control Sleeve Assembly For A Starboard Mount
"off" the breaker if equipped. WARNING Foot Pedal To avoid electric shock, make sure the motor is not connected to a power source. Power Switch 18 | minnkotamotors.com ©2018 Johnson Outdoors Marine Electronics, Inc. - Page 19 Wrap drum from the top down. The left cable begins winding on the Wrap drum from the Over loosening the Cable Tension Screw may cause the bottom up. cables to disengage from the Wrap Drum. minnkotamotors.com | 19 ©2018 Johnson Outdoors Marine Electronics, Inc.
- Page 20 The top of the Wrap Drum has rounded and smooth edges. The bottom of the Wrap Drum is flat and the teeth that engage the Cable Gear are visible in the center. 20 | minnkotamotors.com ©2018 Johnson Outdoors Marine Electronics, Inc.
- Page 21 Wrap Drum with the nearest tooth on the splined shaft of the Cable Gear. Press the Wrap Drum securely down so that it is seated on top of the Cable Gear. minnkotamotors.com | 21 ©2018 Johnson Outdoors Marine Electronics, Inc.
- Page 22 Wrap Drum Housing. Secure the Wrap Drum Housing in place with the two screws that were originally Wrap Drum Cover removed using a #1 Phillips screwdriver. Tighten to 6 in-lbs. Wires 22 | minnkotamotors.com ©2018 Johnson Outdoors Marine Electronics, Inc.
-
Page 23: Placing The Bow-Mount Stabilizer
Steering Module. When mounting the bracket onto the Ultrex, the two Nylock Nuts (Item #16) are discarded because the bolts are secured directly into the Steering Module. minnkotamotors.com | 23 ©2018 Johnson Outdoors Marine Electronics, Inc. - Page 24 Lack of mount support may cause damage. Cut the Aluminum Rod with a Hack Saw at the mark. Round the cut edge of the rod with a file or sandpaper to remove any sharp edges. 24 | minnkotamotors.com ©2018 Johnson Outdoors Marine Electronics, Inc.
-
Page 25: Mounting The Foot Pedal
Toe End of the Foot Pedal. We recommend using a 1/8" or 3/16" diameter screw and only tighten enough to slightly compress the Bumper Pads underneath the Foot Pedal. Mounting Holes Bumper Pad minnkotamotors.com | 25 ©2018 Johnson Outdoors Marine Electronics, Inc. -
Page 26: Identifying Trolling Motor Features By Their Associated Cables
2. i-Pilot Link and Built-in MEGA Down Imaging One Connection Two Connections Control Head i-Pilot Link Coil Cord Built-in MEGA Control Down Imaging or Head Coil Universal Sonar Built-in MEGA Cord Down Imaging or Universal Sonar 26 | minnkotamotors.com ©2018 Johnson Outdoors Marine Electronics, Inc. -
Page 27: Routing Connection Cables
Do not over tighten the cable ties as it may damage the wires. Use a tie wrap cable to secure the cables to the top of the Coil Cord, leaving only enough slack to let the cables hang comfortably. minnkotamotors.com | 27 ©2018 Johnson Outdoors Marine Electronics, Inc. - Page 28 Inspect the selected route carefully to ensure that there are no sharp edges, obstacles, or obstructions that may damage the cables. 28 | minnkotamotors.com ©2018 Johnson Outdoors Marine Electronics, Inc.
-
Page 29: Feature Overview And Connecting The Cables
Terrova, Ulterra and Ultrex motors. It may be pre-installed on a Fortrex motor without other i-Pilot features that require external connections. Link Fourteen Pin Connector Built-in MEGA Down Imaging cable from Control Head minnkotamotors.com | 29 ©2018 Johnson Outdoors Marine Electronics, Inc. -
Page 30: Universal Sonar
To minimize trolling motor interference, ensure that the fish finder and trolling motor are powered by separate batteries. Please refer to the Battery & Wiring Installation and Motor Wiring Diagram sections of this manual for correct rigging instructions. 30 | minnkotamotors.com ©2018 Johnson Outdoors Marine Electronics, Inc. - Page 31 Four Pin NOTICE: If the cable length does not reach the desired Connector Universal Sonar Cable from fish finder installation location, a 14.5’ extension cable is Control Head available (MKR-US2-11) (sold separately). minnkotamotors.com | 31 ©2018 Johnson Outdoors Marine Electronics, Inc.
-
Page 32: I-Pilot Link
Refer to your fish finder operations manual or see the i-Pilot Link Compatibility Chart on our web site with a list of all compatible Humminbird Units and SC Cards. 32 | minnkotamotors.com ©2018 Johnson Outdoors Marine Electronics, Inc. - Page 33 Adaptor Cable AS EC QDE for Helix fish finders), installation. install it on the end of the i-Pilot Link Ethernet Cable and refer to your fish finder installation manual for complete installation instructions. minnkotamotors.com | 33 ©2018 Johnson Outdoors Marine Electronics, Inc.
-
Page 34: Removal Of The Steering Module
Once the screws are removed, the pin and spacers Outer Arm can be removed from the Upper Cylinder. Now it is safe to move the motor into the deployed position. Gas Spring Cylinder Outer Arm 34 | minnkotamotors.com ©2018 Johnson Outdoors Marine Electronics, Inc. -
Page 35: Remove Motor From Mount
Module with the End Links on the mount. Do this by positioning the Steering Module above the End Links on the mount. Lower the Steering Module straight down until End Links seated. minnkotamotors.com | 35 ©2018 Johnson Outdoors Marine Electronics, Inc. - Page 36 NOTICE: Screws have a pre-applied thread locker. DO Outer Arm Gas Spring Spacer Phillips Screw NOT apply additional thread-locker to the screws as it Cylinder Phillips Screw may prevent future removal. 36 | minnkotamotors.com ©2018 Johnson Outdoors Marine Electronics, Inc.
-
Page 37: Battery & Wiring Installation
Maximum Amp Draw values only occur intermittently during select conditions and should not be used as continuous amp load ratings. Reference United States Code of Federal Regulations: 33 CFR 183 – Boats and Associated Equipment ABYC E-11: AC and DC Electrical Systems on Boats minnkotamotors.com | 37 ©2018 Johnson Outdoors Marine Electronics, Inc. -
Page 38: Selecting The Correct Batteries
The negative (-) connection must be connected to the negative terminal of the same battery that the trolling motor negative lead connects to. In the diagrams below this battery is labeled “Low Side” Battery. Connecting to any other trolling motor battery will input positive 38 | minnkotamotors.com ©2018 Johnson Outdoors Marine Electronics, Inc. -
Page 39: Connecting The Batteries In Series
• Improper wiring of 24/36 volt systems could cause battery explosion. • Keep leadwire wing nut connections tight and solid to battery terminals. • Locate battery in a ventilated compartment. minnkotamotors.com | 39 ©2018 Johnson Outdoors Marine Electronics, Inc. - Page 40 • Improper wiring of 24/36 volt systems could cause battery explosion. • Keep leadwire wing nut connections tight and solid to battery terminals. • Locate battery in a ventilated compartment. 40 | minnkotamotors.com ©2018 Johnson Outdoors Marine Electronics, Inc.
-
Page 41: Motor Wiring Diagram
Red B+ Black B- Battery 1 Battery 2 Battery 3 NOTICE: This is a multi-voltage diagram. Double-check your motor's voltage for proper connections. Over-Current Protection Devices are not shown in this illustration. minnkotamotors.com | 41 ©2018 Johnson Outdoors Marine Electronics, Inc. -
Page 42: Using & Adjusting The Motor
The Hold-Down Strap should be secured every time the motor is stowed to prevent damage from high wind, rough water or vibrations, including while the boat is trailered. 42 | minnkotamotors.com ©2018 Johnson Outdoors Marine Electronics, Inc. -
Page 43: Stowing And Deploying The Motor
Shaft will be incorrectly captured in the Yoke. Not following the recommended placement for the Lower Unit will cause damage to the product and void your product Mount Rest Area warranty. minnkotamotors.com | 43 ©2018 Johnson Outdoors Marine Electronics, Inc. -
Page 44: Adjusting The Depth Of The Motor
12" Minimum Depth NOTICE: Please be sure the top of the motor is submerged at least 12” below the surface of the water to Propeller avoid churning or agitation of surface water. Motor 44 | minnkotamotors.com ©2018 Johnson Outdoors Marine Electronics, Inc. -
Page 45: Adjusting The Pull Grip And Cable
Cable Pull Bracket. Locate the end of the Cable and the Pull Cable Cable Clamp inside the Aluminum Arm of the Mount. Latch Strap Cable Pull Bracket Cable Pull Cable Clamp minnkotamotors.com | 45 ©2018 Johnson Outdoors Marine Electronics, Inc. - Page 46 Latch Strap Cable Pull Bracket. After the Cable is in place, refer to the Removal of the Steering Module section and follow the precedure to Reassemble the Steering Module. Aluminum Arm Pull Cable Clamp 46 | minnkotamotors.com ©2018 Johnson Outdoors Marine Electronics, Inc.
-
Page 47: Installing An External Transducer
Tie Wrap Cable NOTICE: For additional details on cable routing see the "Routing Connection Cables" section of this Lower Unit manual. External Transducer minnkotamotors.com | 47 ©2018 Johnson Outdoors Marine Electronics, Inc. -
Page 48: Using The Foot Pedal
Speed Knob, or by the i-Pilot or i-Pilot Link remote. The green light next to the Constant On icon on the Indicator Panel will be lit when the motor is in Constant Motor Operation. 48 | minnkotamotors.com ©2018 Johnson Outdoors Marine Electronics, Inc. - Page 49 You must always be prepared to regain manual control of your boat. Learn to operate your Ultrex in an area free from hazards and obstacles. AutoPilot The AutoPilot button is located on the bottom right corner of the Foot Pedal and is indicated by the directional symbol. Pressing the minnkotamotors.com | 49 ©2018 Johnson Outdoors Marine Electronics, Inc.
-
Page 50: Adjusting The Steering Cable
Pulley in the foot pedal. Foot Pedal CAUTION Cable Tension Screw Do not over-tighten the Cable Tension Screw past 10 - 12 in-lbs. Over-tightening the screw will cause damage from excessive tension. 50 | minnkotamotors.com ©2018 Johnson Outdoors Marine Electronics, Inc. -
Page 51: Service & Maintenance
Install the Prop Washer and Prop Nut. Prop Nut Tighten the Prop Nut 1/4 turn past snug at Prop Washer 25-35 inch-lbs. Propeller CAUTION Drive Pin Do not over tighten as this can damage the prop. minnkotamotors.com | 51 ©2018 Johnson Outdoors Marine Electronics, Inc. -
Page 52: General Maintenance
For all other malfunctions, visit an Authorized Service Center. You can search for an Authorized Service Center in your area by visiting our Authorized Service page, found on-line at minnkotamotors.com, or by calling our customer service number at 800-227-6433. 52 | minnkotamotors.com ©2018 Johnson Outdoors Marine Electronics, Inc. -
Page 53: For Further Troubleshooting And Repair
Minn Kota has over 800 authorized service providers in the United States and Canada where you can purchase parts or get your products repaired. Please visit our Authorized Service Center page on our website to locate a service provider in your area. Scan to visit Minn Kota service online. minnkotamotors.com | 53 ©2018 Johnson Outdoors Marine Electronics, Inc. -
Page 54: Compliance Statements
This symbol (WEEE wheelie bin) on product indicates the product must not be disposed of with other household refuse. It must be disposed of and collected for recycling and recovery of waste EEE. Johnson Outdoors Inc. will mark all EEE products in accordance with the WEEE Directive. It is our goal to comply in the collection, treatment, recovery, and environmentally sound disposal of those products;... - Page 55 This device may not cause harmful interference. This device must accept any interference that may be received, including interference that may cause undesired operation. Changes or modifi cations not expressly approved by Johnson Outdoors Marine Electronics, Inc. could void the user’s authority to operate this equipment.
-
Page 56: Parts Diagram & Parts List
Tools required, but not limited to: flat head screwdriver, Phillips screwdriver, socket set, pliers, wire cutters. ULTREX CONTROL HEAD Control Head Parts Diagram 56 | minnkotamotors.com ©2018 Johnson Outdoors Marine Electronics, Inc. - Page 57 Ì Only available with models factory installed with Universal Sonar. t Only available with models factory installed with i-Pilot. â Only available with models factory installed with Built-in MEGA Down Imaging. minnkotamotors.com | 57 ©2018 Johnson Outdoors Marine Electronics, Inc.
- Page 58 Ì Only available with models factory installed with Universal Sonar. t Only available with models factory installed with i-Pilot. â Only available with models factory installed with Built-in MEGA Down Imaging. 58 | minnkotamotors.com ©2018 Johnson Outdoors Marine Electronics, Inc.
- Page 59 PARTS DIAGRAM & PARTS LIST ULTREX 24 vOLT 4” MOTOR 24 Volt 4” Motor Parts Diagram CC DD HH MM minnkotamotors.com | 59 ©2018 Johnson Outdoors Marine Electronics, Inc.
- Page 60 Ì Only available with models factory installed with Universal Sonar. t Only available with models factory installed with i-Pilot. â Only available with models factory installed with Built-in MEGA Down Imaging. 60 | minnkotamotors.com ©2018 Johnson Outdoors Marine Electronics, Inc.
- Page 61 Ì Only available with models factory installed with Universal Sonar. t Only available with models factory installed with i-Pilot. â Only available with models factory installed with Built-in MEGA Down Imaging. minnkotamotors.com | 61 ©2018 Johnson Outdoors Marine Electronics, Inc.
- Page 62 PARTS DIAGRAM & PARTS LIST ULTREX 36 vOLT 4.5” MOTOR 36 Volt 4.5” Motor Parts Diagram 186 188 148 160 EE FF 172 174 62 | minnkotamotors.com ©2018 Johnson Outdoors Marine Electronics, Inc.
- Page 63 Ì Only available with models factory installed with Universal Sonar. t Only available with models factory installed with i-Pilot. â Only available with models factory installed with Built-in MEGA Down Imaging. minnkotamotors.com | 63 ©2018 Johnson Outdoors Marine Electronics, Inc.
- Page 64 Ì Only available with models factory installed with Universal Sonar. t Only available with models factory installed with i-Pilot. â Only available with models factory installed with Built-in MEGA Down Imaging. 64 | minnkotamotors.com ©2018 Johnson Outdoors Marine Electronics, Inc.
- Page 65 PARTS DIAGRAM & PARTS LIST ULTREX STEERING MODULE Steering Module Parts Diagram minnkotamotors.com | 65 ©2018 Johnson Outdoors Marine Electronics, Inc.
- Page 66 Ì Only available with models factory installed with Universal Sonar. t Only available with models factory installed with i-Pilot. â Only available with models factory installed with Built-in MEGA Down Imaging. 66 | minnkotamotors.com ©2018 Johnson Outdoors Marine Electronics, Inc.
- Page 67 PARTS DIAGRAM & PARTS LIST ULTREX FOOT PEDAL Foot Pedal Parts Diagram minnkotamotors.com | 67 ©2018 Johnson Outdoors Marine Electronics, Inc.
- Page 68 Ì Only available with models factory installed with Universal Sonar. t Only available with models factory installed with i-Pilot. â Only available with models factory installed with Built-in MEGA Down Imaging. 68 | minnkotamotors.com ©2018 Johnson Outdoors Marine Electronics, Inc.
- Page 69 Ì Only available with models factory installed with Universal Sonar. t Only available with models factory installed with i-Pilot. â Only available with models factory installed with Built-in MEGA Down Imaging. minnkotamotors.com | 69 ©2018 Johnson Outdoors Marine Electronics, Inc.
- Page 70 PARTS DIAGRAM & PARTS LIST ULTREX MOUNT Mount Parts Diagram 70 | minnkotamotors.com ©2018 Johnson Outdoors Marine Electronics, Inc.
- Page 71 Ì Only available with models factory installed with Universal Sonar. t Only available with models factory installed with i-Pilot. â Only available with models factory installed with Built-in MEGA Down Imaging. minnkotamotors.com | 71 ©2018 Johnson Outdoors Marine Electronics, Inc.
- Page 72 Ì Only available with models factory installed with Universal Sonar. t Only available with models factory installed with i-Pilot. â Only available with models factory installed with Built-in MEGA Down Imaging. 72 | minnkotamotors.com ©2018 Johnson Outdoors Marine Electronics, Inc.
- Page 73 Ì Only available with models factory installed with Universal Sonar. t Only available with models factory installed with i-Pilot. â Only available with models factory installed with Built-in MEGA Down Imaging. minnkotamotors.com | 73 ©2018 Johnson Outdoors Marine Electronics, Inc.
- Page 74 Minn Kota Consumer & Technical Service 121 Power Drive Johnson Outdoors Marine Electronics, Inc. Mankato, MN 56001 PO Box 8129 Phone (800) 227-6433 ©2018 Johnson Outdoors Marine Electronics, Inc. minnkotamotors.com Mankato, MN 56001 Fax (800) 527-4464 All rights reserved. Part #2297160...
Need help?
Do you have a question about the MINN KOTA ULTREX 80 Series and is the answer not in the manual?
Questions and answers