
Related Manuals for Prolux Hard Floor Cleaner

Summary of Contents for Prolux Hard Floor Cleaner
- Page 1 Prolux Hard Floor Cleaner Owners Manual For your safety please read the Owners Manual in its entirety...
- Page 2 Hardfloor Cleaner you can quickly clean, scrub, polish, buff, wax, and shampoo. From cleaning floors to scrubbing tile to polishing floors the Prolux Hardfloor Cleaner is designed to do it all. With its 2 year warranty, simple to use design, and multiple cleaning attachments it is designed to be one of your most used...
-
Page 3: Safety Instructions
Index Page Product Specifications …...................3 Safety Instructions….….…..................3 Parts List & Unit Description….…………………………………………………….4 Assembling the Unit …..…..................7 Using the Unit in Waxing/Polishing/Scrubbing/Waxing..........9 Storing the Unit…………………...………………………….…………………….14 Suggest Settings for Cleaning different floor surfaces..........17 Polishing Precautions..…..................18 Frequently Asked Questions……................19 Warranty Information…………..…..............20 Specifications: • Can be used to clean any hard floor surface from laminate to hardwood to tile. -
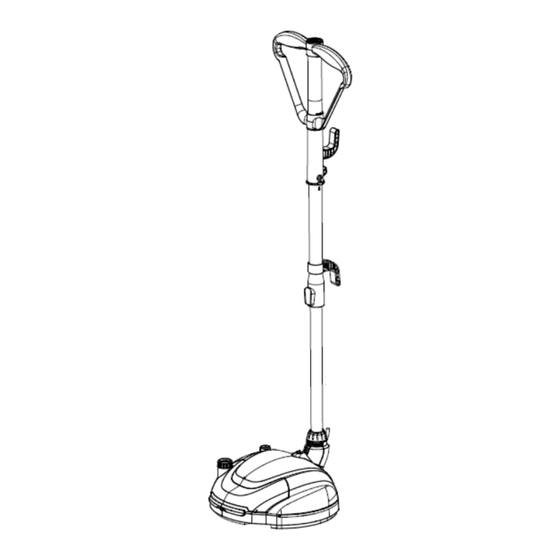
Page 4: Included Parts List
·During operation of the floor waxing machine, don’t tilt the waxing head or insert hands or other body parts into the bottom of the waxing head to prevent danger. ·When stopping using this floor cleaning machine or changing discs, please remove the power plug firstly. -
Page 5: Parts Description
Floor polishing fine pad Fine Polishing Seat Floor polishing scouring pad Rough Polishing Brush Disc Parts Description ·Rough Polishing Brush Disc:... - Page 6 The Rough Polishing Brush Disc is composed of Nylon brushes and is used for aggressive cleaning and scrubbing. Users tend to use this brush for tile and grout scrubbing and hardwood floor stripping. ·Fine Polishing Seat + Polishing Fine Pad: The Fine Polishing Seat + Floor Polishing Fine Pad is used for final polishing, buffing or cleaning of floor surfaces.
- Page 7 ·In order to get better polishing and cleaning effect, please uniformly polish every square yard of ground for more than one minute. ·Do not clean the Fine Polishing Seat with water to avoid degumming. Installation of Parts to Assemble Unit ·...
- Page 8 near the roller by hand, until the Rough Polishing Brush Disc (or Fine Polishing Seat) pops off. Align at the special section hole and slightly press it · Connection of handle, extension pipe component and waxing head Connect the lower end of the extension pipe with the Polishing head connector until the locking ring can’t be rotated clockwise anymore.
- Page 9 ·Two-handed operation (best for cleaning side to side) After left and right handles are rotated by 90° leftwards and rightwards and completely folded opened by 180°, they are available for two-handed operation. Two-handed operation can more accurately control movement direction and speed of the floor polishing machine; therefore, during fine polishing, two-handed operation mode is recommended to get excellent polishing/buffing/scrubbing/waxing effect.
- Page 10 Standby Mode Switch between Standby Mode and Polishing Mode. Polishing Mode ·Adjusting the handle length to fit the user Push the sliding button on the extension pipe and pull the extension pipe to adjust the length of the extension pipe.
- Page 11 Adjust the extension pipe length ·Properly adjust the application angle Slightly tilt the waxing head and then slightly step on it with feet to adjust the application angle of the handle. Slightly step on it with feet ·Wax oil or Cleaning Solution Loosen the Solution Knob and fill the solution container with Solution or Wax and avoid spilling.
- Page 12 ·Instructions of the Polishing Machine Before starting the polishing work, please clean the floor and ensure that there are no 1. Cleaning granular hard objects under the Polishing machine; otherwise, your floors may be and Check scratched. Install the Rough Polishing Brush Disc on the Unit. Adjust the metal extension pipe to a Preparations proper operation height and set the Unit with the handle locked in the upright position.
- Page 13 The solution spraying switch can only control the spraying pump. When the user presses the solution spraying switch the switch turns on and a green indicator light will turn on. When this happens, it will enter into the pre programmed solution spray work cycle. This is where it will spray solution then pause for several seconds and spray solution again.
- Page 14 · Polishing can be carried out on the floor or floor tile Floor Polishing Fine Pad Floor Tile Polishing Fine Pad and Scouring Pad ·In order to get the best effect during Spraying Solution cleaning it is suggested to use non sticky solution. If solution is to sticky the floor surface and floor waxing machine may be damaged.
- Page 15 · Storage with the unit disassembled (which can save space). ① Press down the locking button of the extension pipe and pull out the handle component upwards. ② After loosening the locking ring of the waxing head connector counterclockwise, pull out the extension pipe component.
- Page 16 Locking button of the extension pipe...
- Page 17 Suggestions for settings for different floor types Part Rough Polishing fine pad Polishing Solution Polishing Fine Polishing scouring pad + Brush Disc Seat brush disc Fine Polishing Hard Seat brush disc Floor Laminate floor Composite floor Rocky ground Artificial stone, marble, granite, etc.
- Page 18 Polishing Precautions 1. Before polishing, please check if there are granular hard objects (like sand) under the floor polishing machine or adhesive foreign matters on the polishing disc; otherwise, the floor waxing machine will be damaged and your floor will be scratched. Once the floor is scratched, it can’t be recovered. 2.
- Page 19 Supplementary instruction of cleaning: If the surface of the Rough Polishing Brush Disc and floor polishing fine pad has condensed wax water and dirt, it can be immersed in a suitable amount of warm water with enzymatic laundry powder for about 20 minutes and then rubbed. FAQs Frequent Problem Possible Cause...
-
Page 20: Warranty
Prolux dealer you bought the unit from. In case of warranty issues the customer is responsible for paying for all shipping costs to and from the warranty center and Prolux is responsible for paying for all parts and labor associated with the warranty claim. When making a claim under the warranty, the proof of purchase (with purchase date) must be submitted.
Need help?
Do you have a question about the Hard Floor Cleaner and is the answer not in the manual?
Questions and answers