Table of Contents
Advertisement
Quick Links
Advertisement
Table of Contents

Related Manuals for Samsung DIGIMAX 101


Summary of Contents for Samsung DIGIMAX 101
- Page 1 SERVICE MANUAL DIGIMAX 101 TECHWIN...
-
Page 2: Table Of Contents
C O N T E N T S Ⅰ Ⅰ . . S S P P E E C C I I F F I I C C A A T T I I O O N N 1. SPECIFICATION ……………………………………………………………………………………………… 4 2. -
Page 3: Specification
Large : Super fine 15, Fine 22, Normal 44 (8/16MB) Small : Super fine 30, Fine 60, Normal 121 These figures are measured by internal memory based. These figures are measured under Samsung standard conditions and may vary depending on shooting conditions and camera settings. Image Play... - Page 4 Ⅰ Ⅰ . . S S P P E E C C I I F F I I C C A A T T I I O O N N 2 x AA alkaline / 2 x Ni-MH / CR-V3 batteries Power Source AC adapter(Optional) Dimensions (WxHxD)
- Page 5 Ⅰ Ⅰ . . S S P P E E C C I I F F I I C C A A T T I I O O N N 4 4 . . T T F F T T L L C C D D P P a a n n e e l l M M a a r r k k ■...
- Page 6 Ⅰ Ⅰ . . S S P P E E C C I I F F I I C C A A T T I I O O N N 5 5 . . C C O O N N N N E E C C T T I I O O N N D D I I A A G G R R A A M M...
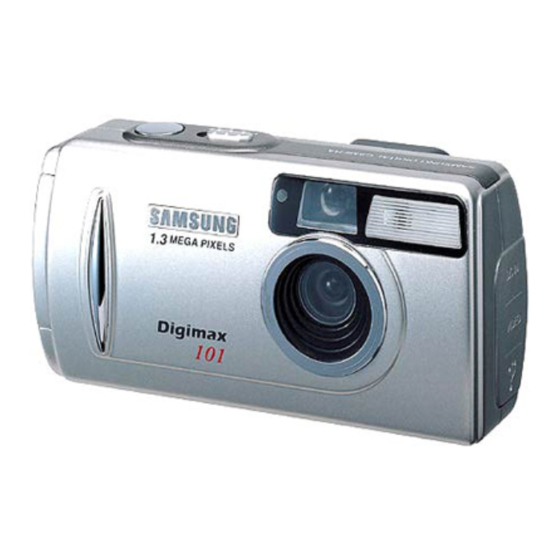
- Page 7 Ⅰ Ⅰ . . S S P P E E C C I I F F I I C C A A T T I I O O N N 6 6 . . P P r r o o d d u u c c t t E E x x t t e e r r i i o o r r Power switch Self-timer lamp Viewfinder...
- Page 8 Ⅰ Ⅰ . . S S P P E E C C I I F F I I C C A A T T I I O O N N Viewfinder LCD button Camera MODE button status LED (p.15) MENU button LCD monitor 5-function button...
- Page 9 . INSTALLATION Ⅱ Ⅱ All application programs (Digimax Viewer 1.0 for viewing images, MGI PhotoSuite III SE for editing images, and DirectX 8.1 for playing back movie clips) will be installed. If you installed all application programs by clicking the [Driver Storage Driver], you need not install Digimax Viewer 1.0 and MGI PhotoSuite III SE separately.
- Page 10 7. Select a destination folder and click [Next]. 6. The Software License Agreement window will display. If you agree to it, click [Yes]. 9. Installation is completed. Click [OK] button and the [MGI 8. Select the Program folder and click [Next]. PhotoSuite III SE] installation will be started.
- Page 11 12. The Software License Agreement window will be 13. A [Setup Type] window will open. Select setup type and click [Next >] button. displayed. If you agree to this, click [Yes] button. 14. If the installation is completed correctly, the autoplay is According to your operating system, the window as registered automatically into the start menu program as shown below may be displayed.
- Page 12 18. All application programs are installed correctly. Check 17. Installation is complete. Click the [Finish] button. [Yes, I want to restart my computer now.] button and click [Finish] button. You must restart your computer after the installation, or your computer can’ t recognize the camera as a Removable disk.
- Page 13 Ⅲ Ⅲ . . E E X X P P L L O O D D E E D D V V I I E E W W S S A A N N D D P P A A R R T T S S L L I I S S T T 1 1 .
-
Page 14: Ⅲ Ⅲ . . E E X X P P L L O O D D E E D D V V I I E E W W S S A A N N D D P P A A R R T T S S L L I I S S T T
Ⅲ Ⅲ . . E E X X P P L L O O D D E E D D V V I I E E W W S S A A N N D D P P A A R R T T S S L L I I S S T T ▶ ▶ PARTS LIST Fig.No. Parts No. Parts Name Q'ty Remarks 9007-1850-01A FRONT COVER ASS'Y-KENOX DIGIMAX 101 9007-1851-01A FRONT COVER ASS'Y-DIGIMAX 101 7217-2708-01A FRONT COVER-KENOX DIGIMAX 101 7217-2709-01A FRONT COVER-DIGIMAX 101 7217-2711-01A GRIP... - Page 15 Ⅲ Ⅲ . . E E X X P P L L O O D D E E D D V V I I E E W W S S A A N N D D P P A A R R T T S S L L I I S S T T 2 2 .
- Page 16 Ⅲ Ⅲ . . E E X X P P L L O O D D E E D D V V I I E E W W S S A A N N D D P P A A R R T T S S L L I I S S T T ▶...
- Page 17 Ⅲ Ⅲ . . E E X X P P L L O O D D E E D D V V I I E E W W S S A A N N D D P P A A R R T T S S L L I I S S T T 3 3 .
- Page 18 Ⅲ Ⅲ . . E E X X P P L L O O D D E E D D V V I I E E W W S S A A N N D D P P A A R R T T S S L L I I S S T T ▶...
- Page 19 Ⅲ Ⅲ . . E E X X P P L L O O D D E E D D V V I I E E W W S S A A N N D D P P A A R R T T S S L L I I S S T T 4 4 .
- Page 20 Ⅲ Ⅲ . . E E X X P P L L O O D D E E D D V V I I E E W W S S A A N N D D P P A A R R T T S S L L I I S S T T ▶ ▶ PARTS LIST Fig.No. Parts No. Parts Name Q'tY Remarks 7409-1300-01A FCC LABEL(MADE IN CHINA) 7409-1301-01A FCC LABEL(MADE BY SAMSUNG) 7409-1302-01A MIC LABEL_KENOX D 101 6804-0443-01A PRODUCT STICKER P960-2101-01A PE BAG(FOR CAMERA) 6904-0236-01A POUCH 6901-1693-01A G/T BOX_KENOX_D 101_KOR...
-
Page 21: Initial Parts List
Ⅲ Ⅲ . . E E X X P P L L O O D D E E D D V V I I E E W W S S A A N N D D P P A A R R T T S S L L I I S S T T 5. INITIAL PARTS LIST PARTS NO. PARTS NAME SPEC PAGE 9007-1850-01A FRONT COVER ASS'Y KENOX DIGIMAX 101 9007-1851-01A FRONT COVER ASS'Y DIGIMAX 101 9007-1853-01A REAR COVER ASS'Y 7217-2729-01A BATTERY COVER... -
Page 22: Focus Adjustment
1 1 . . R R e e p p l l a a c c e e m m e e n n t t P P a a r r t t s s a a n n d d A A d d j j u u s s t t m m e e n n t t I I t t e e m m s s Digimax 101 requires electrical adjustments when certain parts are replaced. - Page 23 Ⅳ Ⅳ . . A A D D J J U U S S T T M M E E N N T T 3 3 . . F F i i r r m m w w a a r r e e U U p p d d a a t t e e 1) Firmware version check method a.
- Page 24 Ⅳ Ⅳ . . A A D D J J U U S S T T M M E E N N T T 2) Bad pixel adjustment and inspection a. Contact to our website (www.ssa.net) and download the each programs. b.
- Page 25 Ⅳ Ⅳ . . A A D D J J U U S S T T M M E E N N T T c. After finishing a setup, run a adjustment program for Bad pixel. (Running program is in SUNAP0916 folder and if you dobule-click SunplusCam_AP.exe, adjustment program will run.) Double click d.
- Page 26 Ⅳ Ⅳ . . A A D D J J U U S S T T M M E E N N T T f. If a Product information will display, control a camera through MASS in upper menu. g. After checking Snap Rawdata by VC, press a Find Bad Pixel button and test a Bad pixel.
- Page 27 Ⅳ Ⅳ . . A A D D J J U U S S T T M M E E N N T T 3) AWB adjustmen.t a. Turn the power on, at the same time pressing LCD button of camera, MENU button and OK button.
- Page 28 Ⅳ Ⅳ . . A A D D J J U U S S T T M M E E N N T T 5) TFT LCD adjustment a. Disassemble Front cover and Rear cover of camera. b. Turn on the power of camera. (recommended to use Adapter) c.
- Page 29 Ⅳ Ⅳ . . A A D D J J U U S S T T M M E E N N T T 6) STROBO adjustment a. Fix a Reflector chart on the wall.. b. Turn the power on, at the same time pressing LCD button of camera, MENU button and OK button.
-
Page 30: Main Pcb Assembly
Ⅴ. PRODUCT CONSTRUCTION 1 1 . . P P A A R R T T S S A A R R R R A A N N G G E E M M E E N N T T F F O O R R E E A A C C H H P P C C B B A A S S S S ' ' Y Y 1)MAIN PCB Assembly a) Parts Arrangement <TOP>... - Page 31 Ⅴ Ⅴ . . P P R R O O D D U U C C T T C C O O N N S S T T R R U U C C T T I I O O N N <BOTTOM>...
-
Page 32: Power Pcb Assembly
Ⅴ Ⅴ . . P P R R O O D D U U C C T T C C O O N N S S T T R R U U C C T T I I O O N N 2) POWER PCB Assembly a) Parts Arrangement <TOP>... - Page 33 Ⅴ Ⅴ . . P P R R O O D D U U C C T T C C O O N N S S T T R R U U C C T T I I O O N N <BOTTOM>...
-
Page 34: Top Pcb Assembly
Ⅴ Ⅴ . . P P R R O O D D U U C C T T C C O O N N S S T T R R U U C C T T I I O O N N 3) TOP PCB Assembly a) Parts Arrangement Shutter Switch... - Page 35 Ⅴ Ⅴ . . P P R R O O D D U U C C T T C C O O N N S S T T R R U U C C T T I I O O N N 2 2 .
-
Page 36: Block Diagram
Ⅴ Ⅴ . . P P R R O O D D U U C C T T C C O O N N S S T T R R U U C C T T I I O O N N 3 3 . -
Page 37: Interface
Ⅴ Ⅴ . . P P R R O O D D U U C C T T C C O O N N S S T T R R U U C C T T I I O O N N 2) Interface... -
Page 38: Lcd
Ⅴ Ⅴ . . P P R R O O D D U U C C T T C C O O N N S S T T R R U U C C T T I I O O N N 3) LCD... -
Page 39: Cpu
Ⅴ Ⅴ . . P P R R O O D D U U C C T T C C O O N N S S T T R R U U C C T T I I O O N N 4) CPU... -
Page 40: Cmos
Ⅴ Ⅴ . . P P R R O O D D U U C C T T C C O O N N S S T T R R U U C C T T I I O O N N 5) CMOS... -
Page 41: Sdram, Flash & Sd Card
Ⅴ Ⅴ . . P P R R O O D D U U C C T T C C O O N N S S T T R R U U C C T T I I O O N N 6) SDRAM, FLASH &... - Page 42 Ⅴ Ⅴ . . P P R R O O D D U U C C T T C C O O N N S S T T R R U U C C T T I I O O N N 7) UI...
- Page 43 METHOD OF MAIN DISPRODUCT METHOD OF MAIN DISPRODUCT REPAIR IN EACH BOARD REPAIR IN EACH BOARD MODEL : DIGIMAX 101...
- Page 44 MAIN BOARD TOP MAIN BOARD TOP BAD SD CARD CARD LOCK LIGHT ERROR RECOGNITION (BAD SOLDRING) (BAD SOLDRING) C MOS – U2 BAD WORKING – Y2 BAD WORKING – U5 -. HAULT ON SAVING IMAGES -. INTERNAL MEMORY -. INCLUDING EEPROM...
- Page 45 MAIN BOARD BOTTOM BATTERY CAPACITY FOR DISPLAY BAD WORKING – Y1 -.ELETRIC CURRENT : UNDER 10uA VR FOR TFT LCD BAD WORKING – IC4 ADJUSTMEN -. ELECTRIC CURRENT IS 200ma TFT LCD REAR SCREEN WITH IT’ S POWER ON. -. ADJUST F/W UP, AWB, TRIG STROB ,WHEN CHANGING.
- Page 46 2. STROBO DISPRODUCT BAD WORKING – J1 (DC JACK) BAD S/T FLASH–XE TUBE -. ONE IS WORKING, ANOTHER ONE IS NOT BETWEEN BATTERY AND ADAPTER. BAD S/T CHARGE – BAD S/T FLASH–T2 BAD WORKING –F1 (3A) BAD WORKING – U2 (SWITCH POWER IC) -.
- Page 47 3. TOP BOARD BAD S/H WORKING –SB BAD WORKING –SW1...
- Page 48 REDKLAS DG-101 DOMESTIC DISPRODUCT RECEPTION ANALYSIS PRODUCE ORDER BODY NO DISPRODUCT NAME(EFFECT) CAUSE DATE -. STRIP NOISE WHEN TAKING A -. WORKING ON FIRM WARE IMPROVEMENT PICTURE IN WHITE BACKGROUND,AND IN FLUORESCENT LAMP. 83108698 '03.01 -. DOESN'T WORK WITH "MEMORY FULL" -.THERE IS AN ERROR WHEN SAVING IMAGES IN FLASH MEMORY.
- Page 49 DISPRODUCT #1 DISPRODUCT #8 DISPRODUCT #9 비고 DISPRODUCT #19~ #25 DISPRODUCT # 26 DISPRODUCT #29 비고 - 2 -...
Need help?
Do you have a question about the DIGIMAX 101 and is the answer not in the manual?
Questions and answers