Table of Contents
Advertisement
Pro
line
Gavita Pro
1
Introduction
Thank you for purchasing the Gavita Pro 1700 LED EU. This manual describes the mounting and installing of the product and
also describes how to use the product. Mounting and installing of the Gavita Pro 1700 LED EU may only be executed by certified
service personnel. Please read and understand this manual completely before using the product. Only use the product as
specified in this manual.
1.1
Used Symbols
Warning! A warning indicates severe damage to the user and/or product may occur when a procedure is not carried
out as described.
Caution! A caution sign indicates problems may occur if a procedure is not carried out as described. It may also serve
as a reminder to the user.
Note: A note gives additional information, e.g. for a procedure.
This symbol is an internationally recognized symbol used to designate recyclable materials.
With this symbol Gavita declares that this product complies with European requirements.
The symbol on the material, accessories or packaging indicates that this product may not be discarded as household
waste. By properly disposing the equipment, you will be helping to prevent possible risks to the environment and public
health, which might otherwise be caused by improper handling of the discarded equipment. Recycling of materials
contributes to the conservation of natural resources. Therefore, please do not dispose of old electronics and electrical
appliances via household waste.
A
B
This symbol indicates the minimum distance (B) between the LED fixture (A) and the lit surface.
2
Product description
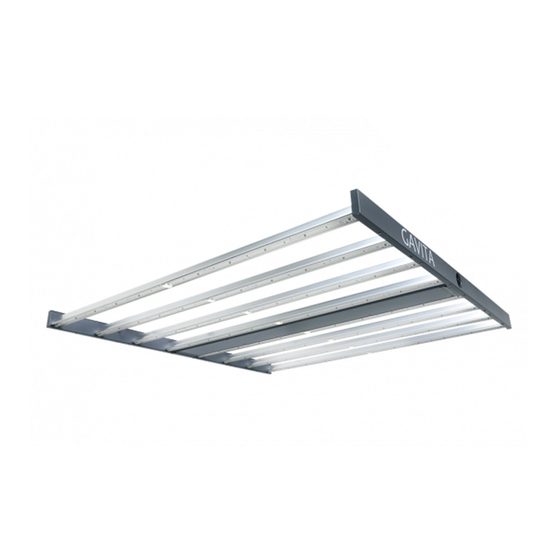
The Gavita Pro 1700 LED EU is an electronic horticultural LED fixture. It drives eight LED rails. The Gavita Pro 1700 LED EU
is intended to be used in greenhouses or in climate rooms. In this manual, the Gavita Pro 1700 LED EU will be referred to as:
"the LED fixture".
3
Product information and specifications
3.1
General product information
Product name
Manufacturer
Version
Part number
EAN Code
Plug type
1700 LED EU
Gavita Pro 1700
LED
e
Hawthorne Gardening Company
EU
UK
HGC906059
HGC906060
8718403056556
8718403056563
EU plug 230 V
UK plug 240 V
CH
ZA
HGC906065
HGC906067
8718403056570
8718403056600
CH plug 230 V
ZA plug 240 V
1
AUS
HGC906068
8718403056587
AUS/NZS Plug 240V
Advertisement
Table of Contents

Related Manuals for Gavita Pro 1700 LED EU 240

Summary of Contents for Gavita Pro 1700 LED EU 240
- Page 1 The Gavita Pro 1700 LED EU is an electronic horticultural LED fixture. It drives eight LED rails. The Gavita Pro 1700 LED EU is intended to be used in greenhouses or in climate rooms. In this manual, the Gavita Pro 1700 LED EU will be referred to as: “the LED fixture”.
- Page 2 The product is intended to be used in greenhouses and climate rooms. The product can be used in wet environments. The product may not be used outdoors. The Gavita Pro 1700 LED EU functions optimal when the max ambient temperature is between 20~40°...
-
Page 3: Safety Recommendations And Warnings
LED fixture. Damage to the LED fixture and electronic circuitry as a result of incorrect installation and use revokes the warranty. Contents (1) Gavita Pro 1700 LED EU 240 1. LED drivers 2. LED rails 3. -
Page 4: Installation
Installation Warning! Mounting and installing of the LED fixture may only be executed by certified service personnel, in accordance with the applicable local laws and regulations. Warning! The installer is responsible for correct and safe installation. Warning! Ensure the local cabling can support the voltage and current requirements of the LED fixture. Warning! Avoid coiled cords and keep mains leads separated. - Page 5 If you use the LED fixture with a Master Controller, connect the Wieland RST16i5 female connector on an E-series adapter (not included) to the Wieland RST16i5 male connector on the LED fixture (fig. 14). • Connect the power cable to the mains. Cable description Gavita Pro 1700 LED EU: Wire 230-240 V Brown...
- Page 6 Warning! Do not connect or disconnect the LED fixture under load. Contents E-series adapter (fig. 8) *Not included, sold separately. Wieland RST 16i5 male connector Gavita 2xRJ connector 1. RJ IN 2. RJ OUT Contents of the repeater bus connection kit *Not included, sold separately.
- Page 7 Connecting up to 100 E-series adapters • Remove the dummy plug from the input port on the first LED adapter (fig. 9). Note: Keep the dummy in a safe place! The dummy is necessary to operate the E-series adapter in standalone mode. •...
- Page 8 Connecting up to 500 or 1000 E-series adapters Using a setup with daisy chained splitters, up to 500 E-series adapters on EL1 and 1000 E-series adapters on EL2 (over two channels) can be connected as shown in fig. 12. • Use the controller cable (RJ45 - RJ9) to connect the primary channel of the controller to the input port of the first splitter (fig.
-
Page 9: Inspection, Maintenance And Repair
(5) years from the original date of purchase. If the product shows any defects within this period and that defect is not due to user error or improper use Gavita International b.v. - Page 10 GAVITA International bv Tel: +31(0)297-380 450 Manual: Gavita Pro 1700 LED EU Oosteinderweg 127 Fax: +31(0)297-380 451 Changes reserved - Version 20/18 1432 AH Aalsmeer info@.gavita.com Not for sale or use in the Netherlands The Netherlands www.gavita.com 121100...
Need help?
Do you have a question about the Pro 1700 LED EU 240 and is the answer not in the manual?
Questions and answers