Advertisement
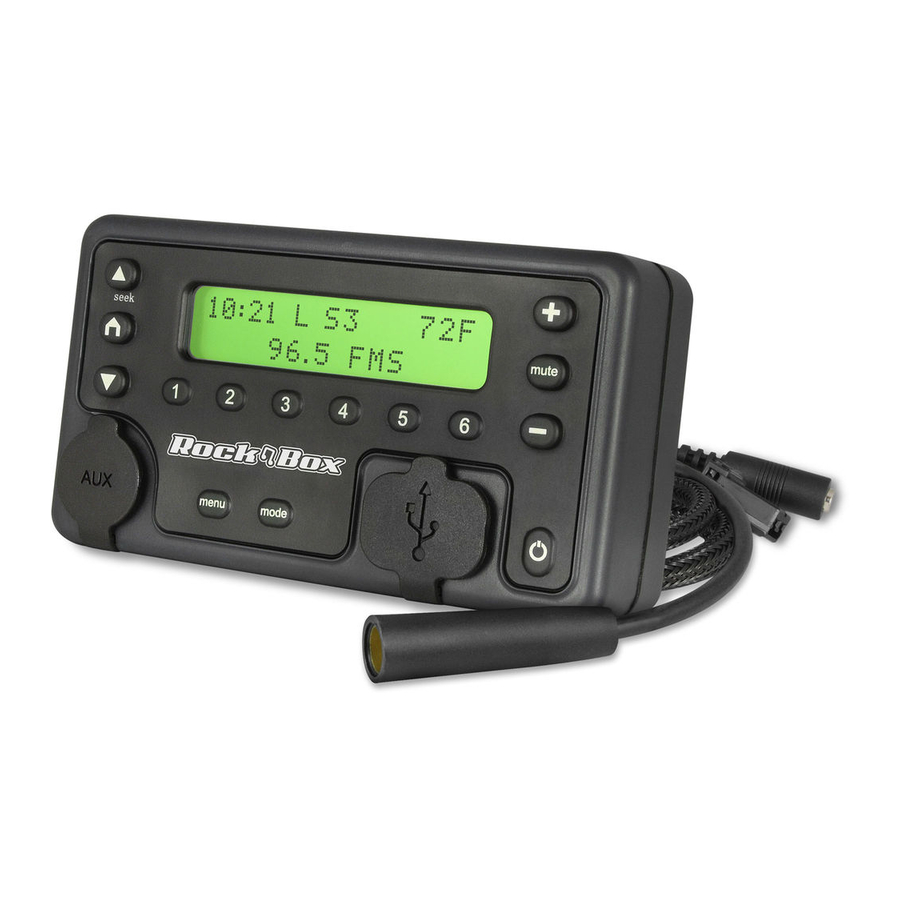
Rock Box™ Installation Instructions
Parts List:
(1) Rock Box All-in-One Audio Source
(1) Power Harness with Quick Disconnect
(1) Red T-Tap Wire Connector
(1) Blue T-Tap Insert Wire Connector
(1) Ground Ring Terminal Connector
(4) Plastic 1/4" Spacers
(4) 8-32 x 1/2" Screws
Before installing your unit read all instructions carefully and
completely to avoid damage to your equipment. Also, decide
your mounting location before routing wires to ensure an easy
installation.
Power Connections:
Locate the accessory power wire on your vehicle using a
1.
voltmeter or test light. You must use an accessory power
wire because the Rock Box should only receive power when
the vehicle is turned on to avoid draining your battery
when not in use. Consult your factory service manual or
maintenance technician for more information on locating
the accessory power wire on your particular vehicle.
2.
Before making any wire connections disconnect the
vehicle's battery and route the power harness wires from
the connection location(s) (power/ground) to the desired
Rock Box location on your vehicle. Make sure to keep wires
away from high temperature areas such as exhaust pipes,
engine covers and motor heads.
3.
Once you have located the accessory power wire on your
vehicle and routed the power harness wires, attach the
supplied Red T-Tap Wire Connector to the accessory wire
on the vehicle. Then attach the supplied Blue T-Tap Insert
onto the red wire of the power harness and connect the
two T-Tap pieces.
4.
Connect the black wire on the Rock Box power harness to
Advertisement
Table of Contents

Related Manuals for Cycle Sounds Rock Box


Summary of Contents for Cycle Sounds Rock Box
- Page 1 (power/ground) to the desired Rock Box location on your vehicle. Make sure to keep wires away from high temperature areas such as exhaust pipes, engine covers and motor heads.
- Page 2 Audio Output Connections Use the female 3.5mm jack on the Rock Box harness to get audio output to an amplifier. A. For Cycle Sounds Audio Systems simply connect the 3.5mm input jack coming from the amplifier to the 3.5mm output jack on the Rock Box.
- Page 3 Rock Box to the desired mounting bracket. Use of the provided screws without the spacers may damage the Rock Box. If using the Rock Box in a flush mounted application please note you will need to source screws of the correct length for the particular mount being used.
- Page 4 Additional Assistance For additional assistance and warranty information please contact Cycle Sounds® technical support department at 1-866- 427-2346 (toll free) or 816-525-2628 or email support@ cyclesounds.com. Rock Box™ Installation Instructions Cycle Sounds® LLC 275 NW Victoria Drive Lee's Summit, MO 64086...
Need help?
Do you have a question about the Rock Box and is the answer not in the manual?
Questions and answers