
Related Manuals for Puloon LCDM-1000


Summary of Contents for Puloon LCDM-1000
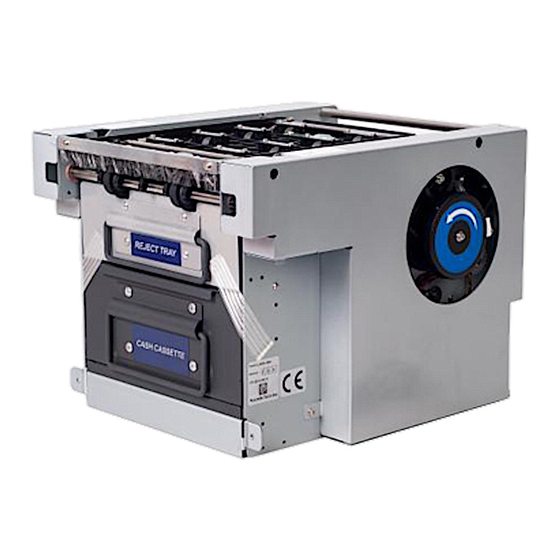
- Page 1 Install Manual Install Manual Model : LCDM-1000 (Cash Dispensing Unit) Total Page : 15 pages (including cover ) Date 2002. 3 Version V3.0(INT) PULOON Technology Inc.
-
Page 2: Table Of Contents
LCDM-1000 = Contents = 1. Mounting LCDM-1000 1-1. Preview 1-2. Left Side Mounting Points 1-3. Right Side Mounting Points 1-4. Layout of Mounting Points 2. Power Connection 2-1. Specification of Connector 2-2. Pin connection 3. Interface Connection 3-1. Pin Connection 3-2. -
Page 3: Mounting Lcdm-1000
LCDM-1000 1. Mounting LCDM-1000 1-1. Preview To mount LCDM-1000 on ATM, a shelf will be installed on the bottom of the system. The manufacturer of ATM can fix 4 points with M4 fixing screw, where every two mounting points are located both in front and on bottom of LCDM-1000. -
Page 4: Right Side Mounting Points
LCDM-1000 1-3. Right Side Mounting Points (Originated from Front View) M4 screw PULOON Technology Inc. -
Page 5: Layout Of Mounting Points
LCDM-1000 1-4. Layout of Mounting Points PULOON Technology Inc. -
Page 6: Power Connection
LCDM-1000 2. Power Connection The electric power connecter is located at the lower position of main control board in the back of LCDM-1000 and should be supplied with DC 24V. 2-1. Specification of Connector Main Control Board in LCDM-1000(Female) : MOLEX 5566VWO-02... -
Page 7: Interface Connection
LCDM-1000 3. Interface Connection The communication connecter is 9 Pin D-type and located at the lower position of main control board in the back of LCDM-1000. 3-1. Pin Connection Pin No Name Function Not used Received data Transmitted data Not used... -
Page 8: Location Of Communication Connector
LCDM-1000 3-3. Location of Communication Connector 9 Pin D-type PULOON Technology Inc. -
Page 9: Specification Of Dip Switch
< Display of Reject code > ON : Non-Display OFF: Display < Definition of Bill-End (option) > ON : 10~30 remain OFF: No bill remains CAUTION ! CAUTION ! Please turn on power again after changing the Dip Switch PULOON Technology Inc. -
Page 10: How To Charge Notes
The method of charging notes and the charging state give a great effect on the performance of a cash dispenser and should be carefully charged like below. 4-1. Aligning Notes First, all notes to be charged are aligned in order like the below picture. PULOON Technology Inc. -
Page 11: Laying Cassette
LCDM-1000 4-2. Laying Cassette 4-3. Arranging Notes PULOON Technology Inc. -
Page 12: Locking Plate And Charging Notes
LCDM-1000 4-4. Locking Plate and Charging Notes PULOON Technology Inc. -
Page 13: Unlocking Pushing Plate
LCDM-1000 4-5. Unlocking Pushing Plate Like below, the pushing plate should be unlocked by pressing the key. PULOON Technology Inc. -
Page 14: Check Point
LCDM-1000 4-6. Check point PULOON Technology Inc. -
Page 15: Insertion Of Cassette
LCDM-1000 4-7. Insertion of Cassette The cassettes should be completely inserted up to the latching into the main body PULOON Technology Inc.
Need help?
Do you have a question about the LCDM-1000 and is the answer not in the manual?
Questions and answers