
Related Manuals for Leader Evaporator WSE


Summary of Contents for Leader Evaporator WSE
- Page 1 WSE Evaporator Manual Leader Evaporator Co., Inc. 49 Jonergin Drive Swanton, VT 05488 Tel: 802-868-5444 www.leaderevaporator.com...
-
Page 2: Table Of Contents
Firing......................................3 Defoamer ..................................... 4 Minimize Reversal Effects ..............................4 EQUIPMENT DESCRIPTION ................................5 DIAGRAM OF THE WSE EVAPORATOR ............................ 8 SETUP OF THE WSE EVAPORATOR ............................9 SUGGESTED TOOLS: ..................................9 RECEIVING YOUR EVAPORATOR: ............................9 SUGAR HOUSE SETUP: ................................10 FOUNDATION FOR THE ARCH .............................. - Page 3 USE OF A HYDROMETER ................................. 39 Preparing A New Hydrometer For Use: ........................39 Using The Hydrometer ................................ 39 ATTACHMENT #2: INSTALLATION AND USAGE OF THE WSE UPGRADE BUTTERFLY ........41 INSTALLATION .................................... 41 USAGE ......................................43 LEADER EVAPORATOR WSE Evaporator...
-
Page 4: Introduction: Theory Of Operation
Wood should stay on the grates and 2” to 5” inside from the door so wood fire does not heat the arch face b. Criss-cross the wood as best possible so oxygen can reach all wood efficiently c. Do not hit the flues when loading wood LEADER EVAPORATOR WSE Evaporator 2018 Page:... -
Page 5: Defoamer
2. Add defoamer primarily to the flue pan. Modify this only under certain conditions. 3. The estimated usage for a 2 foot wide WSE is 3 drops. The usage may need to be changed as the sap characteristics change. NOTE: This is based on the use of ATMOS 300 Defoamer 4. -
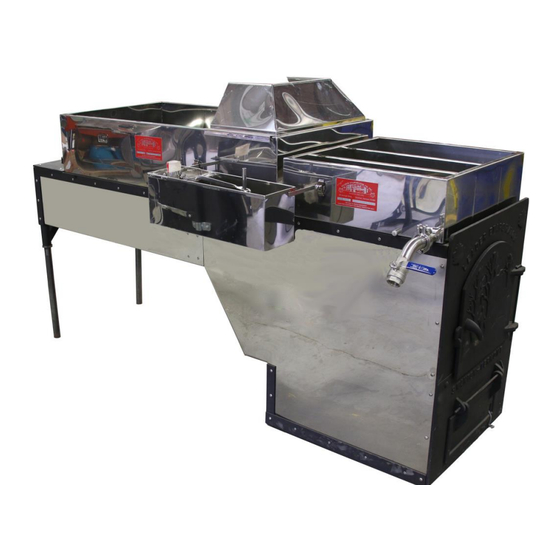
Page 6: Equipment Description
EQUIPMENT DESCRIPTION A standard wood fired arch from Leader Evaporator is designed to have a deeper and wider firebox to increase firing capacity. There is a large draft door to maximize airflow. The flue pan and the syrup pan are tig welded of 20 gauge bright annealed stainless steel which is the same as the larger evaporators. - Page 7 – 1’X3’ (3 sq. ft) 65000 Jack qty. 14 Side of Roof Style 3000 Full 3000 Half Brick Brick (2X6 65003 65006 (2X6 qty: 98) qty: 14) Refractory Jaco Firestop Cement qty: 65001 Plus (10.5 oz 65196 tube) LEADER EVAPORATOR WSE Evaporator 2018 Page:...
- Page 8 4 oz 63015 Firing Gloves 63123 Defoamer (Organic defoamer available Order # 63010) Green 63125 Short Syrup 61040 Gloves Hydrometer Short Test 59007 Cup 2” Diameter LEADER EVAPORATOR WSE Evaporator 2018 Page:...
-
Page 9: Diagram Of The Wse Evaporator
DIAGRAM OF THE WSE EVAPORATOR LEADER EVAPORATOR WSE Evaporator 2018 Page:... -
Page 10: Setup Of The Wse Evaporator
(See section titled SUGAR HOUSE SETUP). 2. Unpack all materials and check the received materials against the Equipment Description list provided above. 3. Immediately notify Leader Evaporator or your local dealer if there are questions on the received equipment. LEADER EVAPORATOR WSE Evaporator 2018... -
Page 11: Sugar House Setup
Prior to setup of the sugar house, it is suggested future needs be considered. The requirements for the setup of the WSE evaporator may not be adequate if in the future additional or larger equipment will be needed. If assistance is needed in determining possible future requirements please contact Leader Evaporator Sales or your local dealer. - Page 12 Allows room for firing and cleaning out of ashes 2. Back of the arch: three (3) feet a. Allows for cleaning and removal of the stack 3. Sides of the arch: four (4) feet a. Allows for draw off and movement LEADER EVAPORATOR WSE Evaporator 2018 Page:...
-
Page 13: Foundation For The Arch
FOUNDATION FOR THE ARCH The following is one suggested method of preparing a foundation for the WSE arch. SETTING THE ARCH ON THE FOUNDATION: 5. Place the arch on the foundation. a. The firebox of the arch should be centered on the foundation of the Ash Pit. -
Page 14: Insulating The Arch
1. Left Side Insulation 2. Right Side Insulation 3. Back Insulation 4. Insert the grates 5. Front Insulation 6. Top View Insulation starting with under the Grate Shelf then the Incline then the Rear Floor LEADER EVAPORATOR WSE Evaporator 2018 Page:... -
Page 15: Cementing Of Insulation Board And Bricks
Make sure all openings between the bricks are filled with cement.. 5. Allow the cement to dry for 36 hours at room temperature (65°F or higher). DECIMAL FRACTION 0.125 0.250 0.375 0.500 0.625 0.750 0.875 LEADER EVAPORATOR WSE Evaporator 2018 Page:... -
Page 16: Insulation Board
WSE EVAPORATOR MANUAL Insulation Board The following are dimensions for the parts labeled above. Always “dry fit” the parts prior to cementing to ensure proper fit. Print ID Length Width Notes 36" 9.25" 12" 9.5" 31.5" 9.75" Top: 36" Bottom: 29.5"... -
Page 17: Install The Grates
WSE EVAPORATOR MANUAL The following are dimensions for the parts labeled above. Always “dry fit” the parts prior to cementing to ensure proper fit. Print ID Length Width Notes 13.375" 8.5" 8.75" 8.5" Install The Grates Place three of the arch grates evenly spaced into the arch with the grates touching the front of the arch. - Page 18 WSE EVAPORATOR MANUAL The following are dimensions for the parts as labelled. Always “dry fit” the parts prior to cementing to ensure proper fit. NOTE: The insulation board will fit above the grates. Print ID Length Width Notes 4.5" 9.0"...
-
Page 19: Bricks
WSE EVAPORATOR MANUAL Bricks The following are dimensions for the bricks labeled above. Always “dry fit” the parts prior to cementing to ensure proper fit Brick Quantity Brick ID Type Length Width Thickness Needed NOTES Full 9.000" 4.500" 2.500" Half 9.000"... - Page 20 WSE EVAPORATOR MANUAL The following are dimensions for the bricks labeled above. Always “dry fit” the parts prior to cementing to ensure proper fit Brick Quantity Brick ID Type Length Width Thickness Needed NOTES Full 9.000" 4.500" 2.500" Half 9.000"...
- Page 21 WSE EVAPORATOR MANUAL The following are dimensions for the bricks labeled above. Always “dry fit” the parts prior to cementing to ensure proper fit NOTE: DO NOT CEMENT these bricks. They will need to be removed to take out grates.
- Page 22 WSE EVAPORATOR MANUAL The TOP VIEW will be divided into sections for easier illustration. The arch sections are as follows The following are dimensions for the bricks labeled above. Always “dry fit” the parts prior to cementing to ensure proper fit...
- Page 23 WSE EVAPORATOR MANUAL The following are dimensions for the bricks labeled above. Always “dry fit” the parts prior to cementing to ensure proper fit Brick Quantity Brick ID Type Length Width Thickness Needed NOTES Full 9.000" 4.500" 2.500" Full 5.375"...
- Page 24 WSE EVAPORATOR MANUAL The following are dimensions for the bricks labeled above. Always “dry fit” the parts prior to cementing to ensure proper fit. NOTE: The first row of bricks will overlap the bricks on the Incline. Use cement to fill openings between the bricks.
-
Page 25: Setting Up The Pans
WSE EVAPORATOR MANUAL SETTING UP THE PANS: NOTE: All arch side directions are as if you were facing the fire door of the arch. NOTE: The pictures used in this section are from a Right Draw Evaporator. In this section you will be using ferrules, Teflon gaskets and clamps to make connections. The ferrules are welded in place to the items being connected. - Page 26 WSE EVAPORATOR MANUAL 2. The rear of the flue pan is the end where the sides do not have ferrules welded. Place the flue pan on the arch so the rear of the pan is on the rail gasket and against the stack collar projection.
- Page 27 WSE EVAPORATOR MANUAL 8. Place the 4” X 24” pan gasket between the pans. It should be centered so the ends overlap the rails. If necessary, use a small piece of tape to hold the gasket in place. 9. Place the syrup pan on the arch so one welded ferrule is in the rear on the side opposite the float box.
- Page 28 WSE EVAPORATOR MANUAL 13. Install the draw off valve assembly. The draw off assembly should be as vertical as possible with the open end pointed down. a. Place a 1 ½” Teflon gasket between the ferrule on the front of the syrup pan and the draw off valve assembly.
- Page 29 WSE EVAPORATOR MANUAL 15. Install Hose Connector a. Locate the bridge of the float box. b. Ensure there is packing on the regulator arm. You can check this by looking down the bridge tube. There will be either a tan or black colored appearance.
-
Page 30: Install Taper And Stack
INSTALL TAPER AND STACK A roof jack should be installed prior to setting up your taper and stack. Leader Evaporator offers two styles of roof jack – a Leader style that is mounted on the peak of the roof and a Leader style that is mounted on the side of the roof. - Page 31 WSE EVAPORATOR MANUAL Roof penetration: 1. When installing a roof jack refer to the LEADER CUSTOMIZED ROOF JACK document. 2. If not using a roof jack, make a hole at the point marked on the inside of the roof in the previous step.
- Page 32 WSE EVAPORATOR MANUAL 2. If a roof jack is used, a. Insert one piece of stack into the roof jack until it is a lightly wedged. The Leader style roof jack is tapered from larger to smaller. The end to be inserted into the roof jack is the crimped end.
-
Page 33: The First Boil
WSE EVAPORATOR MANUAL THE FIRST BOIL The first boil is done to remove any residual materials from the pans and to “season” the bricking and insulation. 1. Fill the flue pan and syrup pan with a baking soda : water mix (1 pound:200 gallons) to a level of 2 to 3 inches. -
Page 34: Operating The Wse Evaporator
It is recommended in order to minimize the sugar sand and niter, the flow in the syrup pan be reversed daily or when it is noted the bubbles from boiling are drawn back down into the compartment as they break (appear like boiling mud). The following are the instructions for reversing the syrup pan on the WSE: SYRUP PAN REVERSAL DISASSEMBLE 1. - Page 35 Tighten the thumbscrew (at step i). NOTE: LEADER EVAPORATOR offers an upgrade to the WSE (LEADER EVAPORATOR part number 390002), which replaces the u-tube with a connector including a butterfly valve. If this upgrade is installed, the butterfly valve can be closed and the flue pan does not need to be drained.
-
Page 36: Making Syrup
WSE EVAPORATOR MANUAL MAKING SYRUP 1. Set the float so the level of sap over the flues is 1” in depth. To set the depth using the float, loosen the thumbscrew on the side of the float shaft collar. Raise the collar to lower the level of the sap. -
Page 37: Daily Shutdown
It will require a volume of sap from the last firing to embers and to flood the arch so ensure there is adequate volume left prior to the last firing. i. 2X4 WSE will require 20 gallons of sap after the last firing ii. 2X6 WSE will require 25 gallons of sap after the last firing 2. -
Page 38: Maintenance
WSE EVAPORATOR MANUAL sap remaining does not cover the pans to the 2” depth then add clean, non-chlorinated, potable water until the depth is reached. NOTE: The extra sap depth is required as the insulation of the arch (ex. bricks) will hold heat and continue the evaporation process until the heat has been dissipated. -
Page 39: Beginning Of Season Startup
WSE EVAPORATOR MANUAL 3. Discard the rail gasket and pan gasket. 4. Inspect the brick and cement. Replace missing or damaged bricks or loose cement. 5. Clean the grates. 6. Raise the flue pan out of the arch and finish draining. -
Page 40: Attachment #1: Hydrometer Usage
NOTE: Hydrometers from Leader Evaporator by law are calibrated by the State of Vermont. . The HOT and COLD test lines should be considered guidelines. Hydrometers should only be used by reading temperature and Brix/Baume readings. - Page 41 NOTE: To correctly determine the Brix/Baume, you need to read from the line of the syrup. LEADER EVAPORATOR Hydrometers: Hydrometers from LEADER EVAPORATOR are calibrated by the State of Vermont at two temperatures; 60°F Cold Test (66.9°Brix/36°Baume) and 211°F Hot Test (59.1°Brix/32.1°Baume). After numerous measurements it was determined 211°F is the average temperature of...
-
Page 42: Attachment #2: Installation And Usage Of The Wse Upgrade Butterfly
INSTALLATION AND USAGE OF THE WSE UPGRADE BUTTERFLY The WSE butterfly upgrade provides a valve to close the connection between the flue pan and the syrup pan. This eliminates the need to drain the flue pan when reversing or cleaning the syrup pan. Closing the valve additionally helps maintain the gradient as closed it minimizes the reverse flow of sap to the flue pan. - Page 43 WSE EVAPORATOR MANUAL 3. Attach the upgrade tube to the syrup pan using one of the clamps and Teflon washers from the u-tube that was removed. The end to be connected to the syrup pan is longer after the elbow. Do not fully tighten the clamp.
-
Page 44: Usage
WSE EVAPORATOR MANUAL 7. Insert the two bolts with the bolt head on top. Thread the wing nuts onto the bolts then tighten 8. Place the handle onto the shaft pointing in the same direction as the flapper valve. If you have maintained the flapper parallel to the rubber assembly then the handle should be mounted at right angles to the valve. - Page 45 WSE EVAPORATOR MANUAL g. Loosen and remove the clamp on the syrup pan side of the upgrade assembly. Remove the Teflon gasket. Do not remove the upgrade assembly on the flue pan side. h. Turn the pan 180 so the draw off ferrule is now the syrup pan upgrade assembly connection ferrule.
Need help?
Do you have a question about the WSE and is the answer not in the manual?
Questions and answers