
Related Manuals for Aiworth R198


Summary of Contents for Aiworth R198
- Page 1 Recording pen 189 An instruction manual E-mail: support@evistr.com Version number: V1.0...
-
Page 2: Table Of Contents
Catalog Ⅰ、Before Using 1.Features..........4 2.Safety Information......6 3.Product schematic.....7 Ⅱ、Voice recorder 1 Turn on/off........8 2 Key lock..........8 3 Key description.......9 4 LINE-IN REC........11 5 Microphone REC ......11 6 Save position........13 7 Record settings......13 8 Recording bitrate......14 Ⅲ、Files manage and play 1.Folders..........15 2.Folder view........15... - Page 3 3.Delete files........16 4.Flay files.........16 5.Flay settings......17 Ⅳ、FM Radio 1.Enter FM Radio......20 2.Auto search and FM REC..21 Ⅴ、System settings 1.Enter System settings....21 2.Sound settings......22 3.Tools..........22 4.Sleep timer........23 5.Display setting......24 6.Date and time.......24 7.Language........25 8.Information........25 9.Format device.......25 10.Factory setting......26 Ⅵ、Recording time(8GB)..26...
-
Page 4: Ⅰ、Before Using
Ⅶ、Specifications.....27 Ⅷ、Connected to PC 1.Connect to PC........33 2.Up/Down load files.......34 3.Disconnected........34 4.Battery and charging....35 Ⅰ、Before Using 1. Features External 360-degree surround sound microphone, all-round collection of audio, ultra-high sensitivity, weak sound can be clearly captured; the main structure of the separation design avoid electromagnetic... - Page 5 the use of high sensitivity differential stereo microphone, recording high sensitivity, strong stereo; Support storage TF card expansion, real- time expansion of storage space, the maximum support 128GB capacity; This machine adopts aluminum alloy metal body frame, strong wear resistance, compression and anti-drop, can withstand high strength use;...
-
Page 6: Safety Information
recording file time; Support FM FM listening and recording function, MP3 playback and repeat function; Support noise reduction function recording file editing function, you can cut the recording file, split, insert and other operations; 2. Safety Information In order to avoid short circuit, do not place the product in the damp water. -
Page 7: Product Schematic
use the headphones for a long time. In particular, be careful not to adjust the volume to the headphones so the range. Do not tune the volume to cover the surroundings. Be careful or pause the use of headphones in case of danger. Do not use headphones while driving a car, cycling, skateboarding. -
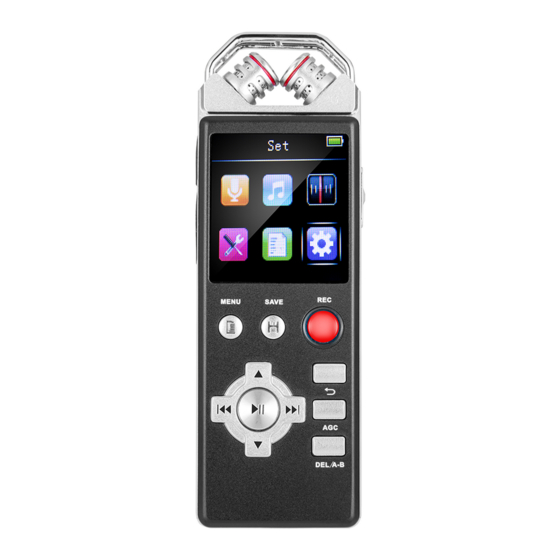
Page 8: Ⅱ、Voice Recorder
Ⅱ、Voice recorder Note : Short press means press within 1 seconds;long press means hold press for 2-3 seconds. 1 Turn on/off Hole switch down for 2 seconds to turn on/off voice recorder. When turning off will display 1,2,3 and “BYE- BYE”,off. -
Page 9: Key Description
3 Key description After turned on,anytime press this button,start recording. When recording,press save button,recording stop saved. Menu button,you could setting all option in the menu. Back button,back to last menu. Short press set A-B repeat; Long press for delete files. Before recording,press button to set the Auto Gain... - Page 10 nu o previous; Volume up when playing. In the menu to next; Volume down when playing. When recording or playing,short press pause, press again to continue. When playing,short press to previous one,long press to fast forward. When playing, short press to next one,long press to back forward.
-
Page 11: Line-In Rec
4 LINE-IN REC 3.5mm audio in jacket,you could recording Radio、CD、VCD、 LINE IN DVD by line-in recording. In the recording setting,select LINE-IN recording,and connect you player via line-in cable,then press REC button to start recording. Headphone jacket,listen files by your headphone NOTE:This device built... - Page 12 1、After turned on,anytime press REC button start recording,and REC indicator light. 2 、 Press“ PLAY / PAUSE ” to pause,press again to continue. 3、Press“SAVE” to stop recording and save.
-
Page 13: Save Position
6 Save position 1、In the menu,goes to Recordings,and enter Save position,press PLAY/PAUSE enter.Then you could select where your recorded files saved.Flash or TF CARD,and press PLAY/PAUSE to confirm. 7 Recording settings... -
Page 14: Recording Bitrate
1、In the menu,goes to Recordings,and enter the Recording settings,press PLAY/PAUSE to enter. 2 、 There Record folder,Bit rate,Record from, AVR(Voice activated recording),Monitor,Red LED indicator. 8Recording bit rate Recording bit rate: MP3 format : 192kbps 128kbps 64kbps 32kbps WAV format:1536kbps 1024kbps 768 kbps 512kbps Bit rate larger, recorded voice more clearer, need more space to save. -
Page 15: Folders
1.Folders There 4 folders:A/B/C/MUSIC;folders A/B/C are recorded files saved,MUSIC is for music files 2.Folder view 1、In the menu,goes to Recordings,and enter the Folder view,press PLAY/PAUSE to enter 2、Recorded files named as year/month/ day,01is the number. Example:17101201 means the first recorded file on 2017/10/12 3 、... -
Page 16: Delete Files
Long press DEL button to delete files,press PLAY/PAUSE to confirm. 4.Play files 1、In folder view,press PLAY/PAUSE to play file 2 、 When playing,press volume button to adjust play volume 3 、 When playing,press A-B set the start point,press again to set end point,then will playing A-B repeat.And then press again to cancel A-B repeat. -
Page 17: Flay Settings
4 、 Short press PLAY/PAUSE to pause,press again to continue. 5.Play settings Playing now When playing,press MODE Play mode button goes to play settings. Sound setting T-Mark Playing now Play mode Sound setting setting:Off,Rock,Funk,Hip T-Mark hop,Jazz,Classical,Techno,Cust Equalizer Variable speed play Play mode:... - Page 18 Shuffle:Shuffle play all files. Repeat play off Single repetition All repeat Browse play Bookmarks:enter add bookmark,then select a empty Play mode bookmark(hh;mm;ss),press Sound setting PLAY/PAUSE to confirm, T-Mark then it will back to play File clipping interface,and current time will add as a bookmark.10 bookmarks as most.
- Page 19 File clipping File cut apart:Playing to the File segmentation point you want to cut apart Insert file pause.Then press File cut apart MODE,select file cut apart,and confirm.And the file is been cut as two files(Only support Edit success WAV format) File insert :...
-
Page 20: Ⅳ Fm Radio
When playing and in the menu,press NEXT or PRE, you Playing now will find a NOW PLAYING interface, and press PLAY/ PAUSE quick enter to playing interface. Ⅳ FM Radio 1 Enter FM Radio Recording CH01 1、In the menu,select FM radio and enter; 2、FM radio works must plug in headphone as antenna 2 Auto search and FM REC... -
Page 21: Ⅴ、System Settings
CH01 1 、 Select Auto Tune,and auto search.Auto save the available channel 2、And you could Manual tune 3、When FM radio playing,press MODE could start FM radio recording. 4 、 Press PLAY/PAUSE pause radio playing,and press BACK to drop out FM radio Ⅴ、System settings 1 Enter system settings Set up... -
Page 22: Sound Settings
2 Sound settings Set up Storage location Sound setting Timing shutdown Display settings Close Equalizer acid rock Key tone Funk hip hop jazz Select Equalizers and turn on/off the key tone. 3 Tools 1In the menu, Tool select Tools... -
Page 23: Sleep Timer
There are Auto Timed recording record/ alarm clock Alarm/Password Password settings /Stop watch Stopwatch 4 Sleep timer Set up Storage location Sound setting Timing shutdown Display settings 1 Mins Close Set timing There 10/30/60/90/120 minutes to choose. -
Page 24: Display Setting
5 Display setting Set up Storage location Sound setting Timing shutdown Display settings Backlight Timer 10 seconds Screen saver 20 seconds Digital clock 30 seconds Always light up There are Backlight timer and screensaver. 6 Date and time Set up Date and time Language Information... -
Page 25: Language
Set date and time 7 language Set up Date and time Simplified Chinese Language Traditional Chinese Information English Information equipment Select display language 8 Information Set up Date and time Language Information Information equipment Player information Available space: 1058MB Model: R5591 disk space Total space: 100GMB Software version: V1.101.10... -
Page 26: Factory Setting
Set up Date and time All data will be deleted. Do you want to continue? Language Information Information equipment Will delete all files (Please back up) 10 Factory setting Set up Date and time Restore factory settings? Language Information Information equipment factory setting All settings back to default Ⅵ、Recording time (8GB)... -
Page 27: Ⅶ、Specifications
NOTE:The above recording time for the 8GB storage capacity of the maximum recording time, not the battery can be continuous recording time! Ⅶ、Specifications NAND Memory FLASH Firmware Firmware upgrade by upgrade upgrade tools File system Window XP、VISTA、 PC OS WINDOWS 7、 WINDOWS 8 File system FAT32... - Page 28 MP3、WMA、OGG、 Format WAV、APE、FLAC 8Kbps~ 320Kbps 32Kbps~ 320Kbps 32Kbps~ 320Kbps Bitrate 700Kbps~ 1536Kbps Playing 700Kbps~ FLAC 1536Kbps 32Kbps~ 1536Kbps Repeat 1,Repeat Repeat all,View Play mode playing,Shuf fle playing Bookma...
- Page 29 bookmarks at amost Sound EQ,Variable speed play A-B repeat Repeat Signal to noise ratio≥80db Format MP3、WAV Capacitive all point to the microphone (1536kbps4 8KHz16bit) (1024kbps Recording 32KHz Recording 16bit) type Format (768kbps 24KHz 16bit) (512kbps...
- Page 30 16KHz 16bit) (192kbps 32KHz) (128kbps 32KHz) Format (64kbps 16KHz) (32kbps 8KHz) 1536kbps(PCM) 1024kbps(PCM) 768kbps(PCM) 512kbps(PCM) You can cut off the unnecessary parts of File the recording file, the cutting(WA content is complete and save memory space...
- Page 31 Divide a recording File cut file into multiple apart(WAV) recording files Can be added in the middle of a recording File file recording, making insert(WAV) the content more complete File You can save the connect(WA sound recording file followed by recording Monitor Support Record from Microphone,LINE IN...
- Page 32 speakers Output 8Ω1W Key lock Support function Background Support play Stop watch Support Other Alarm Support Memory TF Card(128GB at expansion most) Password Support Transmissio mini5PIN USB2.0 n interface Transfer High speed speed Interface Line-in Line-in3.5mm Jacket Headphone Stereo output output Battery Lithium polymer battery 053048...
-
Page 33: Ⅷ、Connected To Pc
Ⅷ、Connected to PC For the first time, the computer will prompt to create the driver repository, find new hardware and other information, you can automatically detect the R198. At this point the shows the right picture, display connection indicating that the is successful。... -
Page 34: Up/Down Load Files
2 Up/Down load files drive letter appears Windows system, and you can copy the recording files to your computer. 3 Disconnected 在 After the file transfer is com plete, please close my computer or resource m manager, then follow the following method to remove the cable. -
Page 35: Battery And Charging
NOTE!: different operating sys stem picture tips slightly different, the fig gure is for reference only。 4 Battery and charging !Be sure to charge in the power o on. The built- in lithium battery can be conne ected to the computer by connecting the comp puter with the USB cable.
Need help?
Do you have a question about the R198 and is the answer not in the manual?
Questions and answers