
Summary of Contents for VALCO MELTON MCP-4J
- Page 1 MCP-4J Control Unit w/Jam Detection Manual Number: MC122 Revision Date: 9/2019 Software Version: C003.0002...
- Page 2 © Valco Melton All Rights Reserved This manual is provided with the MCP-4J Control Unit and may be used only in accordance with the terms of purchase. No part of this manual may be reproduced, stored in a retrieval system, or transmitted, in any form or by any means, electronic, mechanical, recording, or otherwise, without the prior written permission of Valco Cincinnati, Inc.
- Page 3 Hortonwood 32 Agustinos Telford TF1 7YN England calle G, n. 34 31160 Orcoyen Navarra, Spain declares that the product: MCP-4J Control Unit Product Name: w/Jam Detection complies with the following Council Directives: 2006/42/EC Safety of Machinery: 2014/35/EU Low Voltage Equipment:...
-
Page 5: Table Of Contents
Back Panel .............................. 23 MCP-4J Control, Horizontal; No EPC (074xx088) ....................24 Back Panel .............................. 24 MCP-4J Control, Horizontal; Folding Carton, Tipsealer (074xx089) ..............25 Back Panel .............................. 25 MCP-4J Control, Horizontal; Dual External EPC (074xx090) ................26 Back Panel .............................. 26... - Page 6 Table of Contents MC122 - MCP-4J Control Unit MCP-4J Valve Driver Instructions ........................... 27 Wiring Configurations for Triggering the Valves ..................27 Wiring the Scanner Cable ..........................27 Encoder Installation ..............................29 Mechanical Installation of Encoder ......................29 Wheel-Driven Encoder ..........................29 Gear-Driven Encoder ...........................
- Page 7 MC122 - MCP-4J Control Unit Table of Contents Scanner Settings ............................. 53 Encoder Settings ............................. 54 Valve - Voltage Settings .......................... 54 Valve - Timing Settings ........................... 54 Check Other Valves/Channels ..........................55 Memory ..................................55 Backup ..............................56 USB ................................56 SD .................................
- Page 8 MCP-4J, Vertical 3NC Tipsealer (074xx086) ......................100 MCP-4J, Horizontal, with EPC (074xx087) ......................103 MCP-4J, Horizontal, w/o EPC (074xx088) ......................106 MCP-4J, Horizontal, Folding Carton Tipsealer (074xx089) ................... 109 MCP-4J, Horizontal, Dual External EPC (074xx090) ..................... 112 Glue System Layouts with the MCP-4J ........................115 Layout using FC Tipsealer Unit 074xx089 .....................
- Page 9 Gluer Connection Setup with 1 Network Card ..................129 Gluer Connection Setup with 2 Network Cards ...................... 131 Hardware Installation ..........................131 Windows Configuration ........................... 132 Adding the Gluer Tab in BC7 system ...................... 134 Appendix C - Instruction Sheets for the MCP-4J ........... 135...
- Page 10 Table of Contents MC122 - MCP-4J Control Unit...
-
Page 11: Table Of Contents
“plug-and-run” connectors for easy installation and quick start up. Features/Capabilities The MCP-4J Control Unit works with a variety of Valco’s cold-glue or hot melt adhesive dispensing valves. Features/Capabilities of the MCP-4J Unit include: •... - Page 12 Section 1 Introduction MC122 - MCP-4J Control Unit...
-
Page 13: Section 2 - Safety And Use
MC122 - MCP-4J Control Unit Section 2 - Safety and Use Section 2 - Safety and Use Read Thoroughly Before Handling Equipment WARNING! Read and follow all safety precautions, warnings, cautions, and other recommendations in this manual. OTHERWISE, DEATH, PERSONAL INJURY OR EQUIPMENT DAMAGE COULD OCCUR. -
Page 14: Owner Responsibilities
Do not use this equipment for anything other than its intended use. Do not modify, change, or alter the equipment in any way. If you are unsure of the intended use and the limitations of use for the equipment, contact your Valco Melton... -
Page 15: Installation/Startup/Use Safety Information
Section 2 - Safety and Use Installation/Startup/Use Safety Information Valco Melton hot melt units, cold glue units, controllers, inspection systems and all related accessories have the following universal safety precautions (this is not intended to be an exhaustive list; follow all instructions and safety... -
Page 16: Shut Down Safety Information
MC122 - MCP-4J Control Unit Shut Down Safety Information Valco Melton hot melt units, cold glue units, controllers, inspection systems and all related accessories have the following universal safety precautions (this is not intended to be an exhaustive list; follow all instructions and safety... -
Page 17: What To Do If Contact With Hot Adhesive Occurs
MC122 - MCP-4J Control Unit Section 2 - Safety and Use WARNING! People with respiratory problems (e.g., asthma, bronchitis, etc.) should not work in the vicinity of molten adhesive. RESPIRATORY PROBLEMS MAY BE AGGRAVATED BY THE FUMES. Do not wear a face mask when working around molten adhesive. THE MASK MAY TRAP THE FUMES AND DEATH OR PERSONAL INJURY COULD OCCUR. -
Page 18: What To Do If Adhesive-Related Fire Or Explosion Occurs
Section 2 - Safety and Use MC122 - MCP-4J Control Unit What to Do if Adhesive-Related Fire or Explosion Occurs During the heating and melting process, the surface of the adhesive will be exposed to air. The mixture of polymer fumes and air can catch fire if the hot melt is overheated. -
Page 19: Hose Safety Information
MC122 - MCP-4J Control Unit Section 2 - Safety and Use Hose Safety Information DO NOT Do not use bindings, wire Do use approved ties, or unapproved wrapping (P/N fasteners around the KAP0434), making sure hoses. the wrapping is slightly snug but not tight. - Page 20 Section 2 - Safety and Use MC122 - MCP-4J Control Unit...
-
Page 21: Section 3 - Basic Features
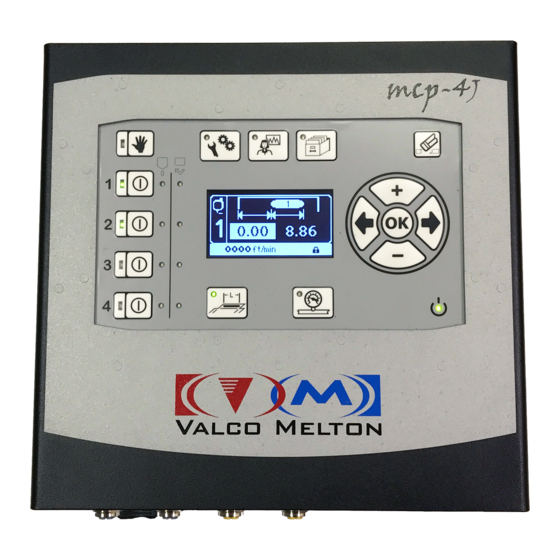
MC122 - MCP-4J Control Unit Section 3 - Basic features Section 3 - Basic features MCP-4J Control Front Panel Diagnostics Job Storage/ Button Recall Button Trigger LEDs Plus (+) Button Setup Button Purge Button Left Arrow Button Erase Button Right Arrow Button... -
Page 22: Back Panel
Section 3 - Basic features MC122 - MCP-4J Control Unit Back Panel *For the EPC Air Pressure Input, use an 8mm air line OR use the 1/4” tube adapter that is included in your Installation Kit. Enc 2 or Enc 1 out... -
Page 23: Pinouts, Standard
MC122 - MCP-4J Control Unit Section 3 - Basic features Pinouts, Standard Valve Output Valve Output Pin # Description Color Coil Return Brown Coil Out White Blue Purge Black GNDE Gray Scanner Input Valve Output Pin # Description Color +24V Fused... - Page 24 Section 3 - Basic features MC122 - MCP-4J Control Unit Alarm Beacon Alarm Beacon Pin # Description Color Brown White NO Beacon Blue Black Beacon Light Gray Pinout Drawing Encoder (Output/Input) Encoder (Output/Input) Pin # Description MCP-ENC A+ MCP +24V...
- Page 25 MC122 - MCP-4J Control Unit Section 3 - Basic features External EPC External EPC Pin # Description Color +24V FUSED Brown White Blue SIGNAL Black Gray Pinout Drawing External Communication Port External Communication Port Pin # Description RX IN TX OUT...
- Page 26 Section 3 - Basic features MC122 - MCP-4J Control Unit Pump Pump Pin # Description Color +24V FUSED Brown White Blue RX IN Black Gray Pinout Drawing Used on 074xx089 for the FC Tipsealer Tipsealer Pin # Description Color Tipsealer Output (+24V)
-
Page 27: Pinouts, Tri-Valve
MC122 - MCP-4J Control Unit Section 3 - Basic features Pinouts, Tri-Valve Feeder Signal Feeder Signal Pin # Description Color +24V FUSED Brown SCAN PNP1 SCAN PNP2 SCAN PNP3 SCAN PNP4 White Blue SCAN NPN1 SCAN NPN2 SCAN NPN3 SCAN NPN4... - Page 28 Section 3 - Basic features MC122 - MCP-4J Control Unit Alarm Beacon Same as Standard External Communication Port Same as Standard Encoder (Output/Input) Same as Standard Relay Same as Standard...
- Page 29 MC122 - MCP-4J Control Unit Section 3 - Basic features Valve Connections Valve Connections Pin # Description Color Panel Ref. Ch. 1-4 V1 RET Brown J1-1 V1 OUT Blue J2-2 V2 RET White J1-3 Green J1-4 V3 RET Yellow J1-5...
-
Page 30: Mcp-4J Control, Vertical; No Epc (074Xx084)
Section 3 - Basic features MC122 - MCP-4J Control Unit MCP-4J Control, Vertical; No EPC (074xx084) Front Panel Figure 3-3. MCP-4J Control, Vertical; No EPC - Front View Bottom Panel Valve Output 1-4 (blue) External Communication Port Scanner Input 1-4 (yellow) -
Page 31: Mcp-4J Control, Vertical; With Epc (074Xx085)
MC122 - MCP-4J Control Unit Section 3 - Basic features MCP-4J Control, Vertical; with EPC (074xx085) Front Panel Figure 3-5. MCP-4J Control, Vertical; with EPC - Front View Bottom Panel Valve Output 1-4 (blue) External Communication Port Scanner Input 1-4 (yellow) -
Page 32: Mcp-4J Control, Vertical; 3Nc Tipsealer (074Xx086)
Section 3 - Basic features MC122 - MCP-4J Control Unit MCP-4J Control, Vertical; 3NC Tipsealer (074xx086) Front Panel Figure 3-7. MCP-4J Control, Vertical; 3NC Tipsealer - Front View Bottom Panel Valve Output External Communication Port Feeder Signal Connection Manifold Connection... -
Page 33: Mcp-4J Control, Horizontal; With Epc (074Xx087)
MC122 - MCP-4J Control Unit Section 3 - Basic features MCP-4J Control, Horizontal; with EPC (074xx087) Front Panel Figure 3-9. MCP-4J Control, Horizontal; with EPC - Front View Back Panel Valve Output 1-4 (blue) Scanner Input 1-4 (yellow) Encoder Input... -
Page 34: Mcp-4J Control, Horizontal; No Epc (074Xx088)
Section 3 - Basic features MC122 - MCP-4J Control Unit MCP-4J Control, Horizontal; No EPC (074xx088) Front Panel Figure 3-11. MCP-4J Control, Horizontal; No EPC - Front View Back Panel Valve Output 1-4 (blue) Scanner Input 1-4 (yellow) Encoder Input... -
Page 35: Mcp-4J Control, Horizontal; Folding Carton, Tipsealer (074Xx089)
MC122 - MCP-4J Control Unit Section 3 - Basic features MCP-4J Control, Horizontal; Folding Carton, Tipsealer (074xx089) Front Panel Figure 3-13. MCP-4J Control, Horizontal; Folding Carton, Tipsealer - Front View Back Panel Valve Output 1-4 (blue) Scanner Input 1-4 (yellow) Encoder Input... -
Page 36: Mcp-4J Control, Horizontal; Dual External Epc (074Xx090)
Section 3 - Basic features MC122 - MCP-4J Control Unit MCP-4J Control, Horizontal; Dual External EPC (074xx090) Front Panel Figure 3-15. MCP-4J Control, Horizontal; Dual External EPC - Front View Back Panel Valve Output 1-4 (blue) Scanner Input 1-4 (yellow) -
Page 37: Mcp-4J Valve Driver Instructions
Otherwise, personal injury or death may occur! Wiring the Scanner Cable 1. Make sure the MCP-4J power switch is OFF and the unit is unplugged. 2. Cut the female connector off of the Scanner 1 cable. 3. Plug the male connector (on the Scanner 1 cable) into the Scanner 1 input port on the back of the MCP- 4J Control Unit. - Page 38 Section 3 - Basic features MC122 - MCP-4J Control Unit Wiring the Scanner Cable - Continued...
-
Page 39: Encoder Installation
MC122 - MCP-4J Control Unit Section 3 - Basic features Encoder Installation Mechanical Installation of Encoder An encoder must be installed in order for the control to determine the speed of the parent machine. For best results, 100 pulses per inch (25.4 mm) of product travel should be supplied to the VC3500. If less than 100 pulses per inch (25.4 mm) are supplied, poor resolution may result in pattern placement errors. - Page 40 Section 3 - Basic features MC122 - MCP-4J Control Unit To install a gear-driven encoder (Figure 3-12), follow these steps: 1. Install the driver gear on the line shaft. Tighten the set-screws. 2. Position and install the encoder so that it is square with the driver gear.
-
Page 41: Section 4 - Programming
Mounting The Horizontal MCP-4J Control Unit can be mounted on any flat, stable surface close to the machine glue station. 1. Be sure the four (4) rubber feet (horizontal version only) are firmly attached to the unit. The rubber feet reduce vibration to the unit. -
Page 42: The Main Menu Buttons
Pressure Button - Pressing the Pressure Button allows you to begin to enter the pressure settings. Setup Button - Pressing the Setup Button allows you to begin to setup the MCP-4J Control Unit. Diagnostics Button - Pressing the Diagnostics Button allows you to view the MCP-4J Control Unit diagnostics. -
Page 43: Flash Memory Storage
MC122 - MCP-4J Control Unit Section 4 - Programming The Navigation Buttons - Continued Left Arrow Button - Pressing the Left Arrow Button moves the cursor to the left, highlighting each editable field (see Figure 4-3A and 4-3B). If a Left Arrow Symbol appears in the lower left corner of the screen, it indicates there is an additional menu screen to the left of the current display (see Figure 4-3B). -
Page 44: The Edit Buttons
Section 4 - Programming MC122 - MCP-4J Control Unit The Edit Buttons There are 4 Edit Buttons: the Plus Button, the Minus Button, the Erase Button, and the OK Button. These Buttons are used to change/enter information. You can only change a value when it is highlighted (see Figure 4-5). -
Page 45: Thumbwheel Vs. Single Digit Edit
Status LEDs - The Status Display LEDs show on/off status. When an LED is on (lit up), the corresponding input or output is activated (see Figure 4-6). Be sure the encoder, scanners, valves, and the MCP-4J Control Unit have been properly mounted to the parent machine before setting up the control. -
Page 46: Screen Contrast Adjustment
The first time the MCP-4J Control Unit is switched on, it will guide you through a series of menus in order to setup your control for your unique production needs. If these needs change later, the settings can be changed in the setup. -
Page 47: Application
Timer Mode for monitoring product location in system flow Valve Driver Mode for controlling valve power levels based on PLC input Burn-In Test Test function used ONLY by Valco Melton personnel Others Unique applications not listed in standard options... -
Page 48: Measurement Mode
Section 4 - Programming MC122 - MCP-4J Control Unit Measurement Mode (Corrugated, Folding Carton, Envelope, Packaging, Core Winding, and Others) Measurement Mode - Sets the Encoder measurement to either mm or inch. Timer Mode - Sets the Encoder measurement to either [ms] or [s]. -
Page 49: Encoder
MC122 - MCP-4J Control Unit Section 4 - Programming Encoder (Corrugated, Folding Carton, Envelope, Packaging, Core Winding, and Others) Encoder - Set the encoder type. If the Wizard does not list the encoder your system uses, select “other.” The ratio compensation settings will be entered at a later time using the Encoder Menu Screen (discussed in this Section under “Encoder Menu Screen”). -
Page 50: Jog Mode
Section 4 - Programming MC122 - MCP-4J Control Unit Jog Mode (Corrugated, Folding Carton, Envelope, Packaging, and Others) Jog Mode - Adhesive will be applied in a “dot” pattern when the machine is running below a certain speed (V-jog). (Enabling jog mode allows Jog Mode Setup Menus to appear during setup; this is covered later in this manual.) -
Page 51: Additional Setup Button Parameters
MC122 - MCP-4J Control Unit Section 4 - Programming Additional Setup Button Parameters Some parameter screens that appeared in the “Wizard” may also appear in the Setup Button Menu. Use the Plus/Minus Buttons to scroll through all available choices. Make sure the desired choice is highlighted on the screen before moving to the next parameter setting. -
Page 52: Pattern Entry Mode
Section 4 - Programming MC122 - MCP-4J Control Unit Pattern Entry Mode Pattern Entry Mode - Sets the pattern mode to either Delay & Length or Start & End. Jog Mode (Corrugated, Folding Carton, and Others) Jog Mode - Adhesive will be applied in a “dot” pattern when the machine is running below a certain speed. Enabling jog mode allows Jog Mode Setup Menus to appear during setup (see Section 5 - Operation). -
Page 53: Purge Signal
MC122 - MCP-4J Control Unit Section 4 - Programming Purge Signal (All Applications) External Input - This is a collective purge. When the External Purge Signal is on, scanner input 3 is used as an external purge input. It cannot be used as a trigger input Pulse Mode - If this mode is active, and the purge button on the valve or control is pressed, the valve begins ‘pulsing’... -
Page 54: Menu Configuration
Section 4 - Programming MC122 - MCP-4J Control Unit Menu Configuration (All Applications) Menu Configuration--Maximum Patterns - Set the number of patterns being used. Up to ten patterns are available. Menu Configuration--Maximum Pressure Points - Set the number of pressure points being used, from two to four. -
Page 55: Com Interface Option
MC122 - MCP-4J Control Unit Section 4 - Programming COM Interface Option This function is an optional feature, and is not included in the standard control unit. Enable the Interface 1. Select ‘System Setup’ menu, and press OK. 2. Scroll to the ‘COM Interface.’... -
Page 56: Scanner Menu
3. Based on how the data is sent, select ‘ASCII - Metric,’ ‘ASCII - Inch,’ Extended ASCII, or SDOCOM. Scanner Menu The MCP-4J has a unique Setup menu to configure the scanner inputs. There is a debounce time and signal inversion setting for each of the four inputs. Each scanner input has its own screen. -
Page 57: Enter Password
MC122 - MCP-4J Control Unit Section 4 - Programming Enter Password To view, setup, and use the various functions of the MCP-4J Control Unit, passwords are used. This ensures safety and security of all settings. To enter a password, do the following:... -
Page 58: Password Levels
Section 4 - Programming MC122 - MCP-4J Control Unit Password Levels There are five password levels: Level 0: Protected When the unit is set to Level 0, only basic pattern settings can be entered or changed. Level 0 provides the ultimate safety settings to prevent unauthorized and/or accidental changes. - Page 59 MC122 - MCP-4J Control Unit Section 4 - Programming Protected Level Mode - Continued...
-
Page 60: Change The Level 2 Default Password
Section 4 - Programming MC122 - MCP-4J Control Unit Change the Level 2 Default Password The Level 2 Default Password (1234) can be changed to a different numerical password containing four digits. To change the Default Password for Level 2, do the following: Use the Plus/Minus Buttons to increase/decrease the numbers and the Left/Right Arrow Buttons to move from digit to digit. - Page 61 MC122 - MCP-4J Control Unit Section 4 - Programming Change the Level 2 Default Password - Continued The following is an example only. The password can be changed to any four digit number desired. If the new Level 2 password is forgotten, you may call Valco Cincinnati, Inc.
-
Page 62: Configure The Valve/Channel Settings
Section 4 - Programming MC122 - MCP-4J Control Unit Configure the Valve/Channel Settings The settings are preprogrammed for the specific application selected. It is best not to change any setting unless you are a trained technician and/or have assistance from a member of the Valco Technical Assistance Team. -
Page 63: Speed Settings
MC122 - MCP-4J Control Unit Section 4 - Programming Speed Settings V-min (Minimum Product Speed) - The minimum speed the machine must reach before glue is applied to the product. V-jog (Jog Speed) - Between minimum speed and jog speed, a glue line will be separated into dots in order to make the glue volume even more precise, when Jog Mode is enabled. -
Page 64: Encoder Settings
Section 4 - Programming MC122 - MCP-4J Control Unit Encoder Settings Based on the selected valve type. CAUTION! Encoder settings should be made by authorized Valco personnel only! Correction Factor - The scaling factor used to adjust an individual/system ratio for the selected channel. This feature is used on right angle machines when only one encoder is installed and the valves are mounted in sections that are running at different speeds. -
Page 65: Check Other Valves/Channels
Memory The MCP-4J can store one full system backup on the internal Micro-SD card as well as one on any USB flash drive. If a backup is saved it will overwrite any existing backup. When the system is restored from a backup, it is irreversible. -
Page 66: Backup
Section 4 - Programming MC122 - MCP-4J Control Unit Backup If there is no USB flash drive inserted into the USB port, it will show “No Device”. If pressing “Save” with no USB flash drive inserted, the control will display: If a USB flash drive is inserted, but has no backup saved to it, it will show “No Backup”. -
Page 67: Restore
MC122 - MCP-4J Control Unit Section 4 - Programming Restore If there is no USB flash drive inserted into the USB, it will show “No Device”. If pressing “Load” while no USB flash drive is inserted, the control will display: If a USB flash drive is inserted, but has no backup saved to it, it will show “No Backup”. -
Page 68: Initialize Settings
Section 4 - Programming MC122 - MCP-4J Control Unit If the Micro-SD card has no backup saved to it, it will show “No Backup”. If the Micro-SD card has a valid backup saved to it, it will show “Backup Exists”. Pressing “Load” will prompt the user... -
Page 69: Jam Detection
MC122 - MCP-4J Control Unit Section 4 - Programming Initialize Settings - Continued Jam Detection Does not apply to horizontal units (074xx087, 074xx088, 074xx089 or 074xx090). Jam Alarm Message Whenever a jam is detected, the screen will display the above message with the detected “jam channel.” This message will not prevent the unit from continuing normal operation or detecting further jams, but serve only as an alert. -
Page 70: Jam Setup Menus
Section 4 - Programming MC122 - MCP-4J Control Unit Jam Setup Menus Enter the Jam Setup Menu in the Settings Menu. Machine Stop Output: This setting enables or disables the machine stop output. This output uses the relay output on the back of the MCP- 4J. - Page 71 MC122 - MCP-4J Control Unit Section 4 - Programming Jam Setup Menus - Continued When enabled: • If I jam is detected, the beacon will turn on. • If Rearm Mode is set to “Rearm” after Timeout, the unit will wait for the duration of the Rearm Timeout setting, and then the beacon will turn off.
-
Page 72: Encoder Menu Screen
Section 4 - Programming MC122 - MCP-4J Control Unit Encoder Menu Screen Ratio Compensation Ratio Compensation Pulses/Repeat Length - The scaling factors used to calculate the correction factor. If the encoder type “Others” is entered in the Initial Setup (Wizard), it is necessary to input the encoder parameters on this screen. -
Page 73: Speed Calculation
However, if an immediate reaction to a change of the encoder speed is needed, the setting should be changed to “Immediate.” The MCP-4J can support two encoder inputs, or one encoder input and an output for that encoder input. By default, the control has just one encoder input and no second option installed. -
Page 74: Status Bar
Section 4 - Programming MC122 - MCP-4J Control Unit Status Bar Communication status is shown in the bottom right corner of the status bar: The icon above indicates that the last transmission was successful. If a ‘!’ is displayed, the interface has not yet... -
Page 75: Section 5 - Operation
Set the Pattern Menu Information After completing the mounting and the programming of the MCP-4J Unit, the unit is ready to operate. The first task is to input all pattern data and other essential information. Many of the options are “enabled” in the Setup Menu (see Section 4 - Programming). -
Page 76: Gluing Mode
Section 5 - Operation MC122 - MCP-4J Control Unit Gluing Mode Glue Mode - The gluing style. Use the Plus/Minus Buttons to scroll through the choices. These are (depending on the application chosen): 1. Pattern - Adhesive is applied in a pattern on each product. -
Page 77: Scanner Lockout
MC122 - MCP-4J Control Unit Section 5 - Operation Gluing Mode - Continued Auto Glue - Applies a strip of adhesive based on the length of the scanner signal. Input the start delay (length from the leading edge of the product to the beginning of the glue line) and the end delay (the end of the glue line to the trailing edge of the product). -
Page 78: Scanner Number/Z Pulse
Section 5 - Operation MC122 - MCP-4J Control Unit Scanner Number/Z Pulse To choose a scanner or the Z Pulse, press the Plus Button until the desired scanner number or Z Pulse shows in the upper right corner of the screen. -
Page 79: Batch Counter
MC122 - MCP-4J Control Unit Section 5 - Operation Batch Counter (All Applications) Batch Counter must be enabled under the Setup Menu (see Section 4 - Programming). Batch Counter--On/Off - Turn the batch counter on and off with the “switch” using the Plus/Minus Buttons. -
Page 80: Glue Mode Screen Information
Section 5 - Operation MC122 - MCP-4J Control Unit Glue Mode Screen Information Pattern Mode The Pattern Glue Mode can also be called “pattern-skip-pattern” mode or “normal mode.” The following is an example of setting up a pattern gluing mode with three patterns for valve one: 1. - Page 81 MC122 - MCP-4J Control Unit Section 5 - Operation Pattern Mode - Example - Continued 3. Press the Right Arrow Button to view the Delay Length for pattern 2. The control automatically fills in the Delay Length for pattern 2 (so the next pattern does not interfere with the previous pattern). This number can be adjusted if desired.
- Page 82 Section 5 - Operation MC122 - MCP-4J Control Unit Pattern Mode - Example - Continued 6. If the Delay Length is acceptable, press the Right Arrow Button to view the Pattern Length for pattern 3. Press the OK Button to view the thumbwheel, and use the Plus/Minus Buttons to change. Press the OK Button to enter the setting.
-
Page 83: Stitch Mode
MC122 - MCP-4J Control Unit Section 5 - Operation Stitch Mode Stitch Mode is very similar to Pattern Mode, with the exception that the glue “patterns” are applied in a stitch-like pattern. Setting the patterns for Stitch Mode is very similar to setting the patterns for Pattern Mode. -
Page 84: Stitch Mode Menus
Section 5 - Operation MC122 - MCP-4J Control Unit Stitch Mode Menus Auto Glue Mode In Auto Glue Mode, one Start Delay Length (the length from the leading edge of the product to the beginning of the glue line) and one End Delay Length (the end of the glue line to the trailing edge of the product) are entered. The glue is applied automatically based on the length of the scanner signal. -
Page 85: Continuous Glue Mode
MC122 - MCP-4J Control Unit Section 5 - Operation Continuous Glue Mode In Continuous Glue Mode, the glue will flow continuously as long as the speed is greater than Vmin. Continuous Glue Mode Menus Glue Pattern Length Range Pattern Length When adjusting the glue pattern length, the limits are: Minimum Length: 0”... -
Page 86: Jam Detection
Section 5 - Operation MC122 - MCP-4J Control Unit Jam Detection Does not apply to horizontal units (074xx087, 074xx088, 074xx089 or 074xx090). Jam Alarm Message Whenever a jam is detected, the screen will display the above message with the detected “jam channel.” This message will not prevent the unit from continuing normal operation or detecting further jams, but serve only as an alert. -
Page 87: Set The Pressures
MC122 - MCP-4J Control Unit Section 5 - Operation Set the Pressures The Pressure Button is used to enter/change the Electronic Pressure Control (EPC) parameter values. Pressure Offset Value (All Applications) Pressure Offset Value - Used to increase/decrease the current pressure. The Pressure Offset is used to do minor pressure adjustments instantly. -
Page 88: Pressure Point 1 (Pt1)
Section 5 - Operation MC122 - MCP-4J Control Unit Maximum Speed/Pressure (All Applications) When three pressure points are enabled, screen “PT1” will appear. When four pressure points are enabled, screens “PT1” and “PT2” will appear. These pressure points are set up just like the Maximum and Minimum Pressures. -
Page 89: Purge Pressure
MC122 - MCP-4J Control Unit Section 5 - Operation Purge Pressure The MCP-4J can have up to two EPC outputs. EPC 2 is always for an external EPC. EPC 1 can be an internal EPC, external, or no EPC. Set Purge Pressure At Machine Stop, On Demand Only - If set to “At Machine Stop”: The control will set the EPC output to the Purge... -
Page 90: Helpful Hints About Pressures
Section 5 - Operation MC122 - MCP-4J Control Unit Helpful Hints about Pressures The four pressures/speeds are dependent upon each other. For example, the first speed setting can never be greater than the second speed setting, and the second speed setting can never be greater than the third, and so on. Also, the second speed setting can never be less than the first speed setting, the third speed setting can never be less than the second speed setting, and so on. -
Page 91: Valve Status
The scanner/trigger information screen displays the scanner and trigger settings. Version Information The version information screen displays the CPU, the Logic (PLD), and the MCP-4J name. Control Information The control information screen displays the current application and glue station, if applicable. -
Page 92: Event History
The event history screen displays error messages. Job Button (All Applications) The Job Save/Recall Mode allows the MCP-4J Control Unit to save and recall up to 100 different jobs (via a Micro-SD card) for fast programming. Load - Load a previously saved job. -
Page 93: Save A Job
MC122 - MCP-4J Control Unit Section 5 - Operation Load a Job - Continued When the desired job number has been entered, press the Right Arrow Button to highlight “OK” and press the OK Button. The job is loaded. Enter the job number and information in a chart (see Appendix A - Job Charts) for quick job set up. - Page 94 Section 5 - Operation MC122 - MCP-4J Control Unit Save a Job - Continued Press the Right Arrow Button to highlight “OK.” Press the OK Button to save the job. Be sure to write the job name and job number for reference (see Appendix A - Job Charts).
-
Page 95: Section 6 - Maintenance
Performing Downtime Maintenance The type of downtime maintenance that is necessary for the MCP-4J Control Unit depends on the length of time the unit is down. During short periods of downtime, such as order changeover, follow these steps: 1. -
Page 96: Flushing The Glue System
Section 6 - Maintenance MC122 - MCP-4J Control Unit Flushing the Glue System To flush the glue system, follow these steps: Follow the procedures for your system. These are general guidelines only. 1. Turn on the tank and any hoses or valves that are to be cleaned. -
Page 97: Reprogramming With A Usb Flash Drive
MC122 - MCP-4J Control Unit Section 6 - Maintenance Reprogramming with a USB Flash Drive 1. Turn off power to the control. 2. Insert the programming USB Flash Drive. A USB Flash Drive for reprogramming (119xx310) will be found in the installation kit. -
Page 98: Replacing Micro-Sd Card
Section 6 - Maintenance MC122 - MCP-4J Control Unit Replacing Micro-SD Card 1. Loosen the four screws holding the control lid. There are two on either side. 2. Locate the Micro-SD card. Micro-SD card and holder... - Page 99 MC122 - MCP-4J Control Unit Section 6 - Maintenance Replacing Micro-SD Card - Continued 3. With a fingertip, slide the card holder in the direction shown by the arrow to release the holder cover. 4. Lift the holder cover. Micro-SD card holder - open 5.
- Page 100 Section 6 - Maintenance MC122 - MCP-4J Control Unit...
-
Page 101: Section 7 - Specifications
MC122 - MCP-4J Control Unit Section 7 - Specifications Section 7 - Specifications Item MCP-4J Unit, Horizontal MCP-4J Unit, Vertical 074xx087 074xx084 074xx088 074xx085 074xx089 074xx086 074xx090 Height: 5.86" (x mm) Height: 12.5" (x mm) Control dimensions: Depth: 10.11" (x mm) Depth: 5.83”... - Page 102 Section 7 - Specifications MC122 - MCP-4J Control Unit...
-
Page 103: Section 8 - Part Number List
MC122 - MCP-4J Control Unit Section 8 - Part Number List Section 8 - Part Number List How to Order Parts To order parts, please contact your closest Valco office by mail, phone, or Email: Valco Cincinnati, Inc. 411 Circle Freeway Drive... -
Page 104: Mcp-4J, Vertical With Epc (074Xx084)
Section 8 - Part Number List MC122 - MCP-4J Control Unit MCP-4J, Vertical with EPC (074xx084) JWT6119.dwg. - Page 105 MC122 - MCP-4J Control Unit Section 8 - Part Number List MCP-4J, Vertical with EPC (074xx084) - Continued Item Description Part Number Quantity PLATE MOUNTING MCP-4 026XX403 FRAME RAIL SIDE MCP-4 026XX404 COVER BOTTOM MCP-4 026XX405 COVER TOP MCP-4 VERTICAL...
- Page 106 Section 8 - Part Number List MC122 - MCP-4J Control Unit MCP-4J, Vertical with EPC (074xx084) - Continued Item Description Part Number Quantity BRIDGE RECTIFIER HEAT SINK 583XX823 BRACKET HEAT SINK 583XX824 SCREW CV10521 LABEL STOCK, SILVER 781XX780 HOLE PLUG...
-
Page 107: Mcp-4J, Vertical W/O Epc (074Xx085)
MC122 - MCP-4J Control Unit Section 8 - Part Number List MCP-4J, Vertical w/o EPC (074xx085) KMP0153.dwg... - Page 108 Section 8 - Part Number List MC122 - MCP-4J Control Unit MCP-4J, Vertical w/o EPC (074xx085) - Continued Item Description Part Number Quantity PLATE MOUNTING MCP-4 026XX403 FRAME RAIL SIDE MCP-4 026XX404 COVER BOTTOM MCP-4 026XX405 COVER TOP MCP-4 VERTICAL...
- Page 109 MC122 - MCP-4J Control Unit Section 8 - Part Number List MCP-4J, Vertical w/o EPC (074xx085) - Continued Item Description Part Number Quantity 092XX030 CABLE ASSY 029XX819 BRIDGE RECTIFIER HEAT SINK 583XX823 BRACKET HEAT SINK 583XX824 SCREW CV10521 LABEL STOCK, SILVER...
-
Page 110: Mcp-4J, Vertical 3Nc Tipsealer (074Xx086)
Section 8 - Part Number List MC122 - MCP-4J Control Unit MCP-4J, Vertical 3NC Tipsealer (074xx086) JWT6546.dwg... - Page 111 MC122 - MCP-4J Control Unit Section 8 - Part Number List MCP-4J, Vertical 3NC Tipsealer (074xx086) - Continued Item Description Part Number Quantity PLATE MOUNTING MCP-4 026XX403 FRAME RAIL SIDE MCP-4 026XX404 COVER BOTTOM MCP-4 026XX405 COVER TOP MCP-4 VERTICAL...
- Page 112 Section 8 - Part Number List MC122 - MCP-4J Control Unit MCP-4J, Vertical 3NC Tipsealer (074xx086) - Continued Item Description Part Number Quantity 092XX030 CABLE ASSY 029XX819 BRIDGE RECTIFIER HEAT SINK 583XX823 BRACKET HEAT SINK 583XX824 SCREW CV10521 LABEL STOCK, SILVER...
-
Page 113: Mcp-4J, Horizontal, With Epc (074Xx087)
MC122 - MCP-4J Control Unit Section 8 - Part Number List MCP-4J, Horizontal, with EPC (074xx087) JWT6113.dwg... - Page 114 Section 8 - Part Number List MC122 - MCP-4J Control Unit MCP-4J, Horizontal, with EPC (074xx087) - Continued Item Description Part Number Quantity PLATE MOUNTING MCP-4 026XX403 FRAME RAIL SIDE MCP-4 026XX404 COVER BOTTOM MCP-4 026XX405 COVER TOP MCP-4 026XX408...
- Page 115 MC122 - MCP-4J Control Unit Section 8 - Part Number List MCP-4J, Horizontal, with EPC (074xx087) - Continued Item Description Part Number Quantity HOLE PLUG 781XX228 WIRE 540XX090 WIRE TERMINAL 075XX075 WIRE TERMINAL 075XX078 TERMINAL,TAB 091XX453 CABLE ASSY 029XX819 CABLE ASSY...
-
Page 116: Mcp-4J, Horizontal, W/O Epc (074Xx088)
Section 8 - Part Number List MC122 - MCP-4J Control Unit MCP-4J, Horizontal, w/o EPC (074xx088) KMP0154.dwg... - Page 117 MC122 - MCP-4J Control Unit Section 8 - Part Number List MCP-4J, Horizontal, w/o EPC (074xx088) - Continued Item Description Part Number Quantity PLATE MOUNTING MCP-4 026XX403 FRAME RAIL SIDE MCP-4 026XX404 COVER BOTTOM MCP-4 026XX405 COVER TOP MCP-4 026XX408...
- Page 118 Section 8 - Part Number List MC122 - MCP-4J Control Unit MCP-4J, Horizontal, w/o EPC (074xx088) - Continued Item Description Part Number Quantity SCREW CV10521 LABEL STOCK, SILVER 781XX780 HOLE PLUG 781XX228 WIRE 540XX090 WIRE TERMINAL 075XX075 WIRE TERMINAL 075XX078...
-
Page 119: Mcp-4J, Horizontal, Folding Carton Tipsealer (074Xx089)
MC122 - MCP-4J Control Unit Section 8 - Part Number List MCP-4J, Horizontal, Folding Carton Tipsealer (074xx089) BAW 3667.dwg... - Page 120 Section 8 - Part Number List MC122 - MCP-4J Control Unit MCP-4J, Horizontal, Folding Carton Tipsealer (074xx089) - Continued Item Description Part Number Quantity PLATE MOUNTING MCP-4 026XX403 FRAME RAIL SIDE MCP-4 026XX404 COVER BOTTOM MCP-4 026XX405 COVER TOP MCP-4...
- Page 121 MC122 - MCP-4J Control Unit Section 8 - Part Number List MCP-4J, Horizontal, Folding Carton Tipsealer (074xx089) - Continued Item Description Part Number Quantity LABEL STOCK, SILVER 781XX780 HOLE PLUG 781XX228 WIRE 540XX090 WIRE TERMINAL 075XX075 WIRE TERMINAL 075XX078 TERMINAL,TAB...
-
Page 122: Mcp-4J, Horizontal, Dual External Epc (074Xx090)
Section 8 - Part Number List MC122 - MCP-4J Control Unit MCP-4J, Horizontal, Dual External EPC (074xx090) KMP0159.dwg... - Page 123 MC122 - MCP-4J Control Unit Section 8 - Part Number List MCP-4J, Horizontal, Dual External EPC (074xx090) - Continued Item Description Part Number Quantity PLATE MOUNTING MCP-4 026XX403 FRAME RAIL SIDE MCP-4 026XX404 COVER BOTTOM MCP-4 026XX405 COVER TOP MCP-4...
- Page 124 Section 8 - Part Number List MC122 - MCP-4J Control Unit MCP-4J, Horizontal, Dual External EPC (074xx090) - Continued Item Description Part Number Quantity BRIDGE RECTIFIER HEAT SINK 583XX823 BRACKET HEAT SINK 583XX824 SCREW CV10521 LABEL STOCK, SILVER 781XX780 HOLE PLUG...
-
Page 125: Glue System Layouts With The Mcp-4J
MC122 - MCP-4J Control Unit Section 8 - Part Number List Glue System Layouts with the MCP-4J Layout using FC Tipsealer Unit 074xx089... -
Page 126: Layout Using 3Nc Tipsealer Unit 074Xx086
Section 8 - Part Number List MC122 - MCP-4J Control Unit Layout using 3NC Tipsealer Unit 074xx086... -
Page 127: General Layout With One Valve And Scanner, Using The Vertical W/Epc Unit 074Xx084, Or Horizontal W/Epc Unit 074Xx087
MC122 - MCP-4J Control Unit Section 8 - Part Number List General Layout with one Valve and Scanner, using the Vertical w/EPC Unit 074xx084, or Horizontal w/EPC Unit 074xx087... -
Page 128: Layout For A Contact Boardrunner Setup Using The Vertical W/Epc Unit 074Xx084
Section 8 - Part Number List MC122 - MCP-4J Control Unit Layout for a Contact Boardrunner Setup using the Vertical w/EPC Unit 074xx084... -
Page 129: Layout Where An External Epc Is Used On The External Epc Unit 074Xx090
MC122 - MCP-4J Control Unit Section 8 - Part Number List Layout where an External EPC is used on the External EPC Unit 074xx090... - Page 130 Section 8 - Part Number List MC122 - MCP-4J Control Unit...
-
Page 131: Section 9 - Warranty
MC122 - MCP-4J Control Unit Section 9 - Warranty Section 9 - Warranty Warranty Information Valco Cincinnati, Inc. warrants its equipment worldwide against defects in material and workmanship as outlined in this section. Liability of the company is limited to repair of the product, or replacement of any part shown to be defective, and does not extend to defects caused by accidents, misuse, abuse, neglect, tampering or deterioration by corrosion. - Page 132 Section 9 - Warranty MC122 - MCP-4J Control Unit...
-
Page 133: Section 10 - Service
MC122 - MCP-4J Control Unit Section 10 - Service Section 10 - Service If a problem with your system persists, contact a ValcoMelton Technical Support representative. If your need is urgent, we encourage you to contact our corporate office in Cincinnati, Ohio, U.S.A. at (513) 874-6550. If the problem cannot be resolved, Valco Cincinnati, Inc. - Page 134 Section 10 - Service MC122 - MCP-4J Control Unit...
-
Page 135: Appendix A - Job Charts
MC122 - MCP-4J Control Unit Appendix A - Job Charts Appendix A - Job Charts Use the following tables to record saved jobs for quick reference and to prevent duplication/erasure of important job information. The tables may be copied for use. - Page 136 Appendix A - Job Charts MC122 - MCP-4J Control Unit Job Number Job Name Description...
-
Page 137: Appendix B - System Connectivity (Clearvision)
MC122 - MCP-4J Control Unit Appendix B - System Connectivity Appendix B - System Connectivity (Clearvision) MCP-8 1. Go to MCP-8 System and unlock the control to access level 4 2. Select the Setup Menu 3. Select option Ethernet Interface... -
Page 138: 128
Appendix B - System Connectivity MC122 - MCP-4J Control Unit MCP-8 - Continued 5. Reset the system using the main power switch. MCP-4 1. Go to MCP-4 System and unlock the control to access level 4 2. Select the Setup Menu... -
Page 139: Plugging The Control Gluer System In The Bc7 Cabinet
MC122 - MCP-4J Control Unit Appendix B - System Connectivity MCP-4 - Continued 4. Change the IP Address option to ‘192.168.30.91’ 5. Restart the system using the main power switch. Plugging the Control Gluer System in the BC7 Cabinet The control gluer system needs to be connected into the B7 Cabinet by plugging an Ethernet cable into a network port. - Page 140 Appendix B - System Connectivity MC122 - MCP-4J Control Unit Gluer Connection Setup with 1 Network Card - Continued 3. Right click on the device labeled ‘NIC3’ and select properties. 4. Next, click on ‘Internet Protocol Version 4’. 5. Then click on the ‘Properties’ button.
-
Page 141: Gluer Connection Setup With 2 Network Cards
MC122 - MCP-4J Control Unit Appendix B - System Connectivity Gluer Connection Setup with 2 Network Cards Hardware Installation If a second network card needs installation, follow the next steps. If the network card is already placed in the Cabinet, skip them and go directly to Windows Configuration. -
Page 142: Windows Configuration
Appendix B - System Connectivity MC122 - MCP-4J Control Unit Windows Configuration 1. Enter the Windows desktop environment 2. Navigate to Control Panel → Network and Internet → Network and Sharing Center → Change Adapter Settings. 3. In case you are installing the second network card, verify that you see four new connections named “Local Area Connection <#>“. - Page 143 MC122 - MCP-4J Control Unit Appendix B - System Connectivity Windows Configuration - Continued In case the network card was installed previously, the connection is already named “NIC7”, notice that the status changed to “Identifying...“ or “Connected“ or anything except “Network cable unplugged“.
-
Page 144: Adding The Gluer Tab In Bc7 System
Appendix B - System Connectivity MC122 - MCP-4J Control Unit Adding the Gluer Tab in BC7 system To complete the connection between the Glue Controller and the BC7 System, the BC7 System needs to read the Glue Controller. Follow the next steps in order to add the Gluer Tab (a level 4 user login is required): 1. -
Page 145: Appendix C - Instruction Sheets For The Mcp-4J
MC122 - MCP-4J Control Unit Appendix C - Instruction Sheets for the MCP-4J Appendix C - Instruction Sheets for the MCP-4J The attached Instruction Sheets apply to the assemblies, kits and functions associated with the MCP-4J control system. Document Number... - Page 146 Appendix C - Instruction Sheets for the MCP-4J MC122 - MCP-4J Control Unit...
- Page 147 MCP-4J MCP-4J MCP-4J MCP-4J MCP-4J Quick Start Guide Quick Start Guide Quick Start Guide Quick Start Guide Quick Start Guide IS0368 IS0368 IS0368 IS0368 IS0368 1/2018 1/2018 1/2018 1/2018 1/2018...
- Page 148 Mounting the Control Unit The Horizontal MCP-4J Control Unit can be mounted on any flat, stable surface close to the machine glue station. Be sure the four (4) rubber feet (horizontal version only) are firmly attached to the unit.
- Page 149 Valco makes a rolling cart (738xx878 Complete System Cart; 579xx322 Control Stand only) that can be used to securely mount the MCP-4J Control Unit. Please contact your Valco sales representative for purchasing information. The Vertical Control Units are vertically mounted. See the mounting footprints, below.
- Page 150 MCP-4J Quick Start Guide IS0368 Mounting the Encoder An encoder must be installed in order for the control to determine the speed of the parent machine. For best results, 100 pulses per inch (25.4 mm) of product travel should be supplied to the VC3500. If less than 100 pulses per inch (25.4 mm) are supplied, poor resolution...
- Page 151 IS0368 MCP-4J Quick Start Guide Mounting the Encoder - Continued To install a gear-driven encoder: Install the driver gear on the line shaft. Tighten the set- screws. Position and install the encoder so that it is square with the driver gear.
- Page 152 Connecting the Cables and Air Lines MCP-4J Control *For the EPC Air Pressure Input, use an 8mm air line OR use the 1/4" tube adapter that is included in your Installation Kit. MCP-4J Control, Vertical; No EPC (074xx084) Valco Melton...
- Page 153 IS0368 MCP-4J Quick Start Guide MCP-4J Control, Vertical; with EPC (074xx085) MCP-4J Control, Vertical; 3NC Tipsealer (074xx086) Valco Melton...
- Page 154 MCP-4J Quick Start Guide IS0368 MCP-4J Control, Horizontal; with EPC (074xx087) MCP-4J Control, Horizontal; No EPC (074xx088) Valco Melton...
- Page 155 IS0368 MCP-4J Quick Start Guide MCP-4J Control, Horizontal; Folding Carton, Tipsealer (074xx089) MCP-4J Control, Horizontal; Dual External EPC (074xx090) Valco Melton...
- Page 156 MCP-4J Quick Start Guide IS0368 Operator Panel Valco Melton...
- Page 157 Diagnostics Button - Diagnostics Button - Diagnostics Button - Diagnostics Button - Diagnostics Button - Pressing the Diagnostics Button allows you to view the MCP-4J Control Unit diagnostics. Job Button - Job Button - Job Button - Job Button - Job Button - Pressing the Job Button allows you to save a job and load a job.
- Page 158 Valve 1-4 Buttons - Valve 1-4 Buttons - Pressing the individual Valve Button(s) allows you to tell the MCP-4J Control Unit which valves you are going to use for the job you will run. The LED in the upper Left hand side of the Buttons indicates which valve is selected.
- Page 159 IS0368 MCP-4J Quick Start Guide Navigation Buttons - Continued Left Arrow Button - Left Arrow Button - Left Arrow Button - Left Arrow Button - Left Arrow Button - Pressing the Left Arrow Button moves the cursor to the left, highlighting each editable field (see Figure D and E).
- Page 160 MCP-4J Quick Start Guide IS0368 Edit Buttons There are 4 Edit Buttons: the Plus Button, the Minus Button, the Erase Button, and the OK Button. These Buttons are used to change/enter information. You can only change a value when it is highlighted.
- Page 161 IS0368 MCP-4J Quick Start Guide Thumbwheel vs. Single Digit Edit When editable information is numerical, the information may be edited with the Plus/Minus Buttons for single digit editing, or the OK Button may be pressed to bring up a thumbwheel for more detailed editing.
- Page 162 LED is on (lit up), the corresponding input or output is activated. Be sure the encoder, scanners, valves, and the MCP-4J Control Unit have been properly mounted to the parent machine before setting up the control. The glue and air lines are not connected until after the control is programmed.
- Page 163 The first time the MCP-4J Control Unit is switched on, it will guide you through a series of menus in order to setup your control for your unique production needs. If these needs change later, the settings can be changed in the setup.
- Page 164 Mode for monitoring product location in system flow Valve Driver Mode for controlling valve power levels based on PLC input Burn-In Test Test function used ONLY by Valco Melton personnel Others Unique applications not listed in standard options Valco Melton...
- Page 165 IS0368 MCP-4J Quick Start Guide First Use Setup (Wizard) - Continued Measurement Mode (Corrugated, Folding Carton, Envelope, Packaging, Core Winding, and Others). Measurement Mode - Measurement Mode - Measurement Mode - Measurement Mode - Measurement Mode - Set the units to Inch or Millimeter.
- Page 166 MCP-4J Quick Start Guide IS0368 First Use Setup (Wizard) - Continued Valve Type (Folding Carton, Envelope, Packaging, Timer, Valve Driver, Core Winding and Others) Valve Type - Valve Type - Valve Type - Valve Type - Valve Type - Set the valve type for valves 1-4. If the default valve type that appears is not applicable, use the Plus/Minus Buttons to scroll through the list of valve types available.
- Page 167 IS0368 MCP-4J Quick Start Guide First Use Setup (Wizard) - Continued Finish Configuration (All Applications) You must answer “Yes” to the “Finish Configuration” prompt and press the OK Button for all changes to take effect. Choosing “No” will return the unit to the wizard application screen.
- Page 168 MCP-4J Quick Start Guide IS0368 Enter Password To view, setup, and use the various functions of the MCP-4J Control Unit, passwords are used. This ensures safety and security of all settings. To enter a password: Enter Password (see Thumbwheel vs.
- Page 169 IS0368 MCP-4J Quick Start Guide Password Levels There are five password levels: Level 0: Protected Level 0: Protected Level 0: Protected Level 0: Protected Level 0: Protected When the unit is set to Level 0, only basic pattern settings can be entered or changed.
- Page 170 MCP-4J Quick Start Guide IS0368 Operation After completing the mounting and the programming of the MCP-4 Unit, the unit is ready to operate. The first task is to input all pattern data and other essential information. Many of the options are “enabled”...
- Page 171 IS0368 MCP-4J Quick Start Guide Operation - Continued Continuous Continuous Continuous Continuous - Applies adhesive continuously when speed is Continuous higher than the Vmin setting. The Continuous Glue Mode is available in the following applications: Core Winding and Others. Auto Glue -...
- Page 172 MCP-4J Quick Start Guide IS0368 Operation - Continued Valve to Scanner Distance (All Applications) Valve to Scanner Distance - Scanner Number - Valve to Scanner Distance - Scanner Number - Valve to Scanner Distance - Scanner Number - The Valve to Scanner Distance - Scanner Number - Valve to Scanner Distance - Scanner Number - number of the assigned scanner.
- Page 173 IS0368 MCP-4J Quick Start Guide Operation - Continued Jog Mode Parameter (Available in Corrugated, Folding Carton, Envelope, Packaging, Core Winding, and Others) The Jog Mode Parameter is only available when Jog Mode is enabled. Jog Mode—On/Off - Jog Mode—On/Off - Jog Mode—On/Off -...
- Page 174 MCP-4J Quick Start Guide IS0368 Operation - Continued Input Values/Gluing Mode Depending on the application and the gluing mode chosen, input your values: The screens above are unique to each gluing mode. Each screen is designed to show comprehensive information at a glance. The following subsection “Glue Mode Screen Information”...
- Page 175 IS0368 MCP-4J Quick Start Guide Operation: Pattern Mode - Continued The following is an example of setting up a pattern gluing mode with three patterns for valve one: Set the Delay Length for pattern 1. The Delay Length for pattern 1 is the measurement from the first edge of the product to where you want the first glue line to start.
- Page 176 MCP-4J Quick Start Guide IS0368 Operation: Pattern Mode - Continued Press the Right Arrow Button to view the Delay Length for pattern 2. The control automatically fills in the Delay Length for pattern 2 (so the next pattern does not interfere with the previous pattern).
- Page 177 IS0368 MCP-4J Quick Start Guide Operation: Pattern Mode - Continued Press the Right Arrow Button to view the Delay Length for pattern 3. If the Delay Length is acceptable, press the Right Arrow Button to view the Pattern Length for pattern 3. Press the OK Button to view the thumbwheel, and use the Plus/ Minus Buttons to change.
- Page 178 MCP-4J Quick Start Guide IS0368 Operation - Continued Stitch Mode Stitch Mode is very similar to Pattern Mode, with the exception that the glue “patterns” are applied in a stitch-like pattern. Pattern Number “ST” = Stitch Mode (Up to 10 patterns are available)*...
- Page 179 IS0368 MCP-4J Quick Start Guide Operation - Continued Stitch Mode Menus Auto Glue Mode In Auto Glue Mode, one Start Delay Length (the length from the leading edge of the product to the beginning of the glue line) and one End Delay Length (the end of the glue line to the trailing edge of the product) are entered.
- Page 180 MCP-4J Quick Start Guide IS0368 Operation - Continued Auto Glue Mode Menus Continuous Glue Mode In Continuous Glue Mode, the glue will flow continuously as long as the speed is greater than Vmin. Continuous Glue Mode Menus Valco Melton...
- Page 181 IS0368 MCP-4J Quick Start Guide Set the Pressures The Pressure Button is used to enter/change the Electronic Pressure Control (EPC) parameter values Pressure Offset Value (All Applications) Pressure Offset Value - Pressure Offset Value - Pressure Offset Value - Pressure Offset Value - Pressure Offset Value - Used to increase/decrease the current pressure.
- Page 182 MCP-4J Quick Start Guide IS0368 Set the Pressures - Continued Maximum Speed/Pressure (All Applications) When three pressure points are enabled, screen “PT1” will appear. When four pressure points are enabled, screens “PT1” and “PT2” will appear. These pressure points are set up just like the Maximum and Minimum Pressures.
- Page 183 Also see the tips below. Purge Pressure The MCP-4J can have up to two EPC outputs. EPC 2 is always for an external EPC. EPC 1 can be an internal EPC, external, or no EPC.
- Page 184 The number on the left side of the pressure screen refers to the EPC number (two EPCs are available on some models of the MCP-4J Control Unit. The second EPC is the 0-10 Volt output for speed tracking. Both EPCs are programmed in the same way;...
- Page 185 IS0368 MCP-4J Quick Start Guide Diagnostic Button (All Applications) Total Products/Products per Hour The first diagnostic screen shows the total number of products and the number of products per hour. The total number of products count can be reset to zero by pressing the Erase Button.
- Page 186 MCP-4J Quick Start Guide IS0368 Diagnostic Button - Continued Valve Status The second diagnostic screen shows the valve status. The top numbers show the valve type. The bottom numbers will switch back and forth from showing the valve voltage to showing the valve status (enabled or disabled).
- Page 187 Event History The event history screen displays error messages. Job Button (All Applications) The Job Save/Recall Mode allows the MCP-4J Control Unit to save and recall up to 100 different jobs (via a Micro-SD card) for fast programming. Load -...
- Page 188 MCP-4J Quick Start Guide IS0368 Job Button - Continued Load a Job Any level (including 0) can load a job. When “Load” is highlighted, press the OK Button to enter a job number. Use the Plus/Minus Buttons to change the job number.
- Page 189 IS0368 MCP-4J Quick Start Guide Job Button - Continued Save a Job Only password levels 2 or higher can save a job. Save - Save - Save all settings under a job number. Save - Save - Save - Press the Right Arrow Button to highlight “Save” and then press the OK Button.
- Page 190 If the glue is in the proper place on the products tested, you can run the machine at normal operating speed! Congratulations! You have just set and tested the MCP-4J Control. For more information, please see the MCP-4J Manual (MC122).
- Page 191 IS0368 MCP-4J Quick Start Guide © Copyright by Valco Cincinnati, Inc. All Rights Reserved. www.valcomelton.com www.valcomelton.com www.valcomelton.com www.valcomelton.com www.valcomelton.com IS0368 Valco Melton...
- Page 192 IS0369 - MCP-4J Encoder Option Kit Instructions IS0369 - MCP-4J Encoder Option Kit Instructions 2/18 This Instruction sheet describes how to install either the Encoder 2 input or Encoder 1 output to an MCP-4J unit, using either kit 091XX763 or 091XX764. Required Materials...
- Page 193 IS0369 - MCP-4J Encoder Option Kit Instructions Vertical Units (074XX084, 074XX085, 074XX086) 1. Remove the four screws holding the lid on. 2. Remove the hole plug. 3. Prep the Encoder 2 IN Connector (for the Enc 2 IN kit). For the Encoder 1 OUT kit, skip to step 7.
- Page 194 IS0369 - MCP-4J Encoder Option Kit Instructions Vertical Units (074XX084, 074XX085, 074XX086) - Continued Align and plug Encoder 2 IN Connector (for Enc 2 IN kit). a. Insert the connector to the backplate in the orientation shown. b. Plug in the connector as shown.
- Page 195 IS0369 - MCP-4J Encoder Option Kit Instructions Vertical Units (074XX084, 074XX085, 074XX086) - Continued 7. Prep the Encoder 1 OUT Connector (for Enc 1 OUT kit). a. Remove the retaining ring from the connector. 8. Align and plug the Encoder 1 OUT Connector (for Enc 1 OUT kit).
- Page 196 IS0369 - MCP-4J Encoder Option Kit Instructions Vertical Units (074XX084, 074XX085, 074XX086) - Continued 10. Replace the lid. a. Replace and tighten the four screws holding the lid on.
- Page 197 IS0369 - MCP-4J Encoder Option Kit Instructions Horizontal Units (074XX087, 074XX088, 074XX090, 074XX089) 1. Remove the four screws holding the lid on. 2. Remove the hole plug. 3. Prep the Encoder 2 IN Connector (for the Enc 2 IN kit).
- Page 198 IS0369 - MCP-4J Encoder Option Kit Instructions Horizontal Units (074XX087, 074XX088, 074XX090, 074XX089) - Continued Align and plug Encoder 2 IN Connector (for Enc 2 IN kit). a. Insert the connector to the backplate in the orientation shown. b. Plug in the connector as shown.
- Page 199 IS0369 - MCP-4J Encoder Option Kit Instructions Horizontal Units (074XX087, 074XX088, 074XX090, 074XX089) - Continued 7. Prep the Encoder 1 OUT Connector (for Enc 1 OUT kit). a. Remove the retaining ring from the connector. 8. Align and plug the Encoder 1 OUT Connector (for Enc 1 OUT kit).
- Page 200 IS0369 - MCP-4J Encoder Option Kit Instructions Horizontal Units (074XX087, 074XX088, 074XX090, 074XX089) - Continued 10. Replace the lid. a. Replace and tighten the four screws holding the lid on. © Valco Cincinnati, Inc. www.valcomelton.com IS0369 2/18 No part of this document may be reproduced without express permission from Valco Cincinnati, Inc. All rights reserved.
- Page 201 IS0371 - Adding External Comm Port to Horizontal MCP-4J Units IS0371 - Adding External Comm Port to Horizontal MCP-4J Units 2/18 Required Materials • KIT # 091XX766 ITEM PART # ITEM DESCRIPTION QTY 033XX166 RIBBON CABLE ASSY 091XX267 SCREW Required Tools •...
- Page 202 IS0371 - Adding External Comm Port to Horizontal MCP-4J Units Procedure - Continued Remove the hole plug. 3. Align and plug in the external comm port. a. Insert the DB9 connector (ref. 033xx166) to the backplate, in the orientation shown.
- Page 203 IS0371 - Adding External Comm Port to Horizontal MCP-4J Units Procedure - Continued 4. Attach the connector to the backplate with the included screws (item #2 - 091xx267), using a 3/16” nut driver. 5. Replace the lid and tighten the four (4) screws holding it on.
- Page 204 IS0372 - Adding Beacon and Relay Outputs for Jam Detection to Horizontal MCP-4J Units IS0372 - Adding Beacon and Relay Outputs for Jam Detection to Horizontal MCP-4J Units 2/18 Required Materials • Kit # 091XX767 ITEM ITEM DESCRIPTION PART # QTY...
- Page 205 IS0372 - Adding Beacon and Relay Outputs for Jam Detection to Horizontal MCP-4J Units Procedure - Continued 2. Remove the four (4) screws holding the bottom cover, using a Phillips screwdriver. 3. Remove the hole plugs, on the back plate, for the beacon and relay holes.
- Page 206 IS0372 - Adding Beacon and Relay Outputs for Jam Detection to Horizontal MCP-4J Units Procedure - Continued 4. Remove the existing pump cable. a. Remove the nut holding the pump connector in place on the back plate, using a 19mm socket or wrench.
- Page 207 IS0372 - Adding Beacon and Relay Outputs for Jam Detection to Horizontal MCP-4J Units Procedure - Continued 5. Prepare the beacon/relay/pump cable. a. Remove the nut from each connector on the 029xx599 cable and set them aside. 1) Verify the O-ring stays in place on each connector.
- Page 208 IS0372 - Adding Beacon and Relay Outputs for Jam Detection to Horizontal MCP-4J Units Procedure - Continued 8. Plug the 9-pin connector (029xx599 cable) into J20 on the board, inside the unit. 9. Secure the cable to the inside of the unit, using the included cable ties (067xx154), as shown.
- Page 209 IS0372 - Adding Beacon and Relay Outputs for Jam Detection to Horizontal MCP-4J Units Procedure - Continued 13. Return the four (4) feet on the bottom of the unit, using 4mm Allen wrench. © Valco Cincinnati, Inc. www.valcomelton.com IS0372 2/18 No part of this document may be reproduced without express permission from Valco Cincinnati, Inc.
- Page 210 IS0373 - Adding the Folding Carton Tipsealer to MCP-4J Units IS0373 - Adding the Folding Carton Tipsealer to MCP-4J Units 2/18 Required Materials • Kit # 091XX768 ITEM ITEM DESCRIPTION PART # CABLE ASSY, FC TIPSEAL, MCP-4J 029XX825 Required Tools •...
- Page 211 IS0373 - Adding the Folding Carton Tipsealer to MCP-4J Units Procedure - Continued 2. Remove the hole plug. 3. Prepare the FC Tipsealer cable. a. Remove the nut from the connector on the 029xx825 cable, and set it aside. 1) Verify the O-ring stays in place.
- Page 212 IS0373 - Adding the Folding Carton Tipsealer to MCP-4J Units Procedure – Continued b. Route the cable between the scanner cables, as shown. c. Plug the 8 pin connector into J14 on the board, inside the unit. 5. Use the 19mm socket or wrench to tighten the nut back onto the connector, securing it to the back plate.
- Page 213 IS0373 - Adding the Folding Carton Tipsealer to MCP-4J Units 7. Tighten the four (4) screws holding the lid. Vertical Units (074XX084, 074XX085, 074XX086) Horizontal Units (074XX087, 074XX088, 074XX090, 074XX089) © Valco Cincinnati, Inc. www.valcomelton.com IS0373 2/18 No part of this document may be reproduced without express permission from Valco Cincinnati, Inc. All rights reserved.