Advertisement
Imported Easels by Jack Richeson & Co., Inc. - Kimberly, WI - Phone: 1-800-233-2404 - www.richesonart.com
Bag contents:
Base Assembly
8 - Wooden dowels
5
12 - 1
/
" Wood screws
1
2
6 - 1
/
" Wood screws
3
8
16 -
/
" Wood screws
3
4
Screws shown at actual size.
Use for measurements.
A-1 through A-3 Base and Sides:
(1) BASE (R#1) - One edge will be finished
(2) FRAME PIECES (R#2) - One long end will be finished 27
(2) SIDE PIECES (R#3) - Finished on one side, wooden drawer guides on other
(1) BACK PIECE (R#4) - 39
A-1
1. Locate base,1 frame and 4 wooden dowels. Place dowels in base, align frame
with finished edge to finished edge of base, pre-drilled holes will face down.
Gently tap into place using a soft rubber mallet. Secure with 3 - 1
A-2
2. Find side pieces. You will be mounting these to the base. The finished edge
will be to the front. (Match up with existing finished edge pieces) Notched
edge MUST be to the back (unfinished edge). Place 4 plastic dowels in side
piece. Align with base piece. Gently tap into place using a soft rubber mallet.
Secure with 3 - 1
⁄
" wood screws. Repeat on other side.
1
2
A-3
3. Find last frame piece. Align with dowels placed in side pieces. You may
need to loosen a side piece for the initial fit. Once in, tighten side again.
Be sure to have finished side to front and pre-drilled holes facing up.
Once in place, secure with 6 - 1
Back and top:
Locate HARDBOARD (R#5) & FINISHED TOP (R#6)
A-4
4. Locate hardboard, 39
⁄
" x 16
1
2
holes. This is the back of your flat file. Align on
back of frame, smooth side out, fitting into slots
on both sides and bottom. Secure with 16 -
A-5
5. Locate top finished piece. Align with 4 wooden dowels and press top piece
into place. Be sure finished beveled edge is to front. Secure on inside with
" screws. Failure to use the correct size screw could result in
3 -1
⁄
3
8
damage to your flat file top.
It is recommended to dry fit the base and sides first. Then, for best results
and maximum stability, secure all wood dowels with wood glue. Be careful
⁄
"
8
to lay out and identify all parts before gluing. We also recommend laying
⁄
"
3
4
out all hardware as you take it out of the bags. Separate into exact lengths.
Several of the screws are similar in length.
(R#_): Reorder
1
⁄
"
1
⁄
"
3
1
8
2
6 Pieces as follows
⁄
" x 16
⁄
" Hardboard
1
3
2
8
⁄
" screws.
1
2
⁄
" with pre-drilled
3
8
⁄
" screws.
3
4
HOW TO ASSEMBLE THE
Richeson Flat File
Check and Organize all Parts
Number
⁄
" x 38
⁄
"
7
1
8
2
A-1
⁄
" screws.
3
8
Notched
edge
A-2
A-3
Top
Side
A-4
Hardboard
A-5
#880120
Finished front
Back
pieces
12/08
Advertisement
Table of Contents

Related Manuals for Jack Richeson Flat File 880120


Summary of Contents for Jack Richeson Flat File 880120
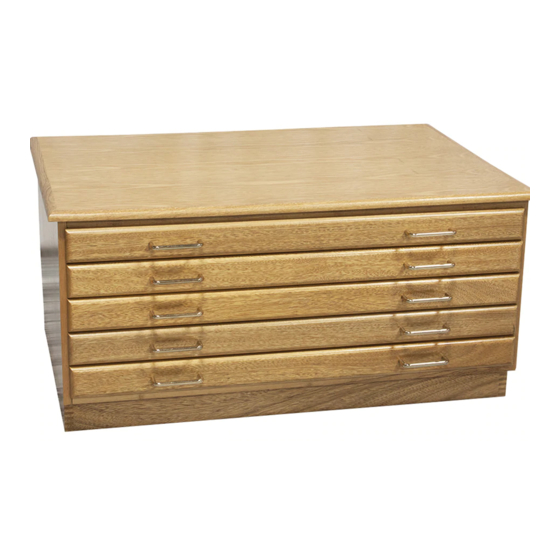
- Page 1 HOW TO ASSEMBLE THE Richeson Flat File #880120 Imported Easels by Jack Richeson & Co., Inc. - Kimberly, WI - Phone: 1-800-233-2404 - www.richesonart.com 12/08 Check and Organize all Parts Bag contents: Base Assembly It is recommended to dry fit the base and sides first. Then, for best results 8 - Wooden dowels and maximum stability, secure all wood dowels with wood glue.
- Page 2 Check and Organize all Parts Bag contents: Bag contents: Handles Drawer Assembly It is recommended to dry fit the 1st drawer as a pattern. Then, for best 4 - Gold bolts 8 - Plastic dowels results and maximum stability, secure all wood dowels with wood glue. 2 - Gold handles 2 - Wooden dowels Be careful to lay out and identify all parts before gluing.
Need help?
Do you have a question about the Flat File 880120 and is the answer not in the manual?
Questions and answers