Table of Contents
Advertisement
Quick Links
Advertisement
Table of Contents

Related Manuals for MBH Fitness M5-001


Summary of Contents for MBH Fitness M5-001
- Page 3 ▲Prior to assembling the machine and having your workout, please carefully read this manual. We assume that you have read it when you are using it. ▲Please carefully fill out the warranty card and well retain it after your purchase. Mail the stub on payment receipt to us so we can offer you more quality services conveniently.
-
Page 4: Table Of Contents
CONTENTS SAFE USE NOTICES............1 DESIGN ILLUSTRATION..........4 PRODUCT DESCRIPTION..........5 SPECIFICATIONS............6 ASSEMBLY TOOLS............6 ASSEMBLY INSTRUCTIONS...........7 TARGET MUSCLES..........…………11 HUMAN MUSCLE DIAGRAM..........11 USAGE GUIDANCE............12 EXERCISE NOTICES............13 MAINTENANCE&TROUBLE SHOOTING.......14 PREVENTIVE MAINTENANCE........15 WARRANTY..............20... -
Page 5: Safe Use Notices
SAFE USE NOTICES Before using the machine, please carefully read this manual and get acquainted with operation process. Keep this in mind: Please have an adequate warm-up prior to any workout in case of injuries. The manufacture and dealer assume no liability for any human injury or property damage caused by any disease or improper operation during usage. - Page 6 accident or damage to the machine. (WARNING) 7.Children under 14 must avoid using the machine in case of severe injuries or even physical disability while cardiac patients are prohibited from using the machine. (DANGER) 8.If at any time during exercise you feel dizziness, nausea or any other discomfort, stop immediately and consult your physician.
- Page 7 injury to fingers. (DANGER) 17.Do not return to the starting position too quickly in case of any damage to the weight plates, instead, you must slow down when it gets closed to the weight plate below. (WARNING) 18.The machine must be used in dry room in case of any damage. 19.Do not have movements beyond the machine’s functions.
-
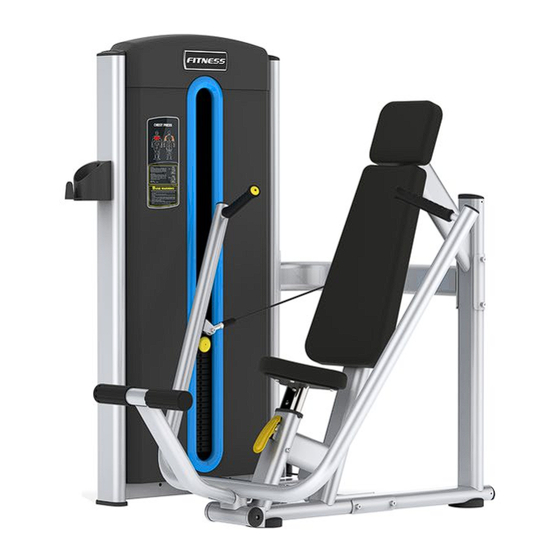
Page 8: Design Illustration
DESIGN ILLUSTRATION Weight Cage Assembly Headrest Exercise Placard Water Bottle Holder Press Arm Assembly Connecting Assembly (upper) Back Cushion Seat Cushion Seat Frame Assembly Main Frame Assembly Connecting Assembly (lower) -
Page 9: Product Description
PRODUCT DESCRIPTION Target muscles: Pectoralis major, Biceps Brachii, Triceps brachii and Deltoid muscle. The unit has a scientific, reasonable structure, and simplified, elegant look. Due to the movement trajectory that complies with the principle of human engineering, the exercise is safe and comfortable. Tower Frame: It is constituted of well welded flat oval tubes and quality steel which bring excellent solidity and durability. -
Page 10: Specifications
SPECIFICATIONS Unit Dimensions: 1435mm(L)×1445mm(W)×1535mm(H) Weight Stack: 100kg (standard); 100 ~ 120kg (optional) User Weight ≤ 150kg ASSEMBLY TOOLS NAME SPECIFICATION QUANTITY Screwdriver Philips Open-ended Spanner 17-19 Socket Wrench Allen Wrench Allen Wrench Allen Wrench Allen Wrench Allen Wrench... -
Page 11: Assembly Instructions
ASSEMBLY INSTRUCTIONS 1.As the unit has a large size, please assemble it in a space which is big enough. 2.Open the packing box, take out the parts and remove packing materials. Classify all parts and tidily put them on vacant floor. 3.Ensure that it's correctly assembled and the parts are complete according to assembly steps. - Page 12 (1) (2) (3) (4) (5) (6) ① ② ③ (7) (8) (9)...
- Page 13 II.Assemble User Frame (1)Put the assembled Weight Cage in the area where the machine will be used. Make an inventory of the other parts according to the diagrams below; remove packing materials and place the parts tidily. Assemble the main frame; firmly attach the Connecting Assemblies (upper and lower) (AE1;...
- Page 14 REF# DESCRIPTION SPEC. QTY. M261 Headrest 55*205*250 M262 Back Cushion 92*360*655 Hexagon Socket Button Head M8*25 Screw Washer Seat Frame Assembly M261 M262 6-B50 6-B89...
-
Page 15: Target Muscles
TARGET MUSCLES Deltoid Deltoid Pectoralis Major Triceps Brachii Biceps Brachii Primarily Secondarily HUMAN MUSCLE DIAGRAM... -
Page 16: Usage Guidance
USAGE GUIDANCE Instructions Select an appropriate weight resistance according to personal condition. Adjust the seat height by pulling the yellow adjustment lever beneath seat cushion. Sit with your back firmly against the back cushion. Please consult a coach if you are unsure. Exercise Movement Grasp handgrips with both hands;... -
Page 17: Exercise Notices
EXERCISE NOTICES 1.5~10 minutes of warm-up must be taken prior to having exercise on this machine. Record the time while having free exercise which aims to activate the joints in case of injury to them during training. 2.Inspection must be carried out prior to using the machine. For any potential problem, please contact the coach or maintenance staff immediately. -
Page 18: Maintenance&Trouble Shooting
MAINTENANCE AND TROUBLESHOOTING 1.Inspect bolts at all mechanical parts frequently for tightness; rotating parts should rotate smoothly without producing any abnormal sound. 2.When the machine is static, steel cable should be tightened while weight plates should not be suspended. 3.The machine should be kept clean but not wiped with strong cleaning solvents. -
Page 19: Preventive Maintenance
EXERCISE NOTICES 1.Daily Inspection Clean and inspect machine frame every day; clean upholsteries; inspect steel cable and the terminals for abrasion. Clean upholsteries and machine frame with neutral soapy water, remove dirt, oil stain and perspiration on the surfaces and air dry them completely. Inspect the frame for rupture, rustiness and other damage. - Page 20 (5)Cable sheath gets inflated. In addition, the following inspections must be carried out. (1)Make sure that steel cable is correctly adjusted and securely fastened to the top of weight plates. Make sure that cable is securely connected to pulleys and all assemblies are well fixed, all the seven cable strands pass through the selector bar and screws are well tightened.
- Page 21 in Picture 1 on Page 18. Wipe them with cloth to remove excessive oil. (3)Inspect the exposed parts of guide rods; keep them clean; remove dirt and oil stain on the rods with soft cloth. (Note: You can only inspect, clean and lubricate guide rods after dismantling shrouds.) (4)Spray silicone oil onto the exposed parts of guide rods or cloth, and then wipe guide rods with cloth.
- Page 22 bearing is damaged; in this case, dismantle pulley and inspect it. If any damaged bearing, it must be replaced immediately. (10)Inspect weight plates and selector pin: check if there’s burr or damage; wipe each weight plate and guide rod to remove dirt and dust. Make sure that selector pin can be fully inserted into each weight plate and stably retained there (Picture 2).
- Page 23 with wet grainy cloth, dry emery cloth, or steel wire (fine thread) ball and then repair paint chips. (5)If the selector pin cannot be easily inserted into weight plate, check whether the selector bar swings leftward and rightward when it's in vertical position.
-
Page 24: Warranty
WARRANTY 1.Scope of Warranty: Non-artificial damage during normal usage of product maintained properly is in the scope of warranty. The warranty card only belongs to the original purchaser and is non- transferable. 2.The warranty period is one year from the date of purchase. 3.Damages below are beyond the scope of warranty: (1)Damages which result from abuse, negligence, accident or unauthorized modification.
Need help?
Do you have a question about the M5-001 and is the answer not in the manual?
Questions and answers