Advertisement
Quick Links
Advertisement

Related Manuals for Comica CVM-AX3

Summary of Contents for Comica CVM-AX3
- Page 1 CVM-AX3 XLR/6.35mm/3.5mm(2-Groups) Audio Mixer USER MANUAL...
-
Page 3: Main Features
Thanks for purchasing COMICA CVM-AX3 XLR/6.35mm/3.5mm(2-Groups) Amplifier Audio Mixer. The Comica CVM-AX3 is a 3.5mm Dual-Groups Audio Mixer for shooting videos with any camera and camcorder . It is designed with support positive & passive mic, real-time monitoring, dual gain-control knobs functions etc. It provides a compact audio mixing solution. -
Page 4: Package Contents
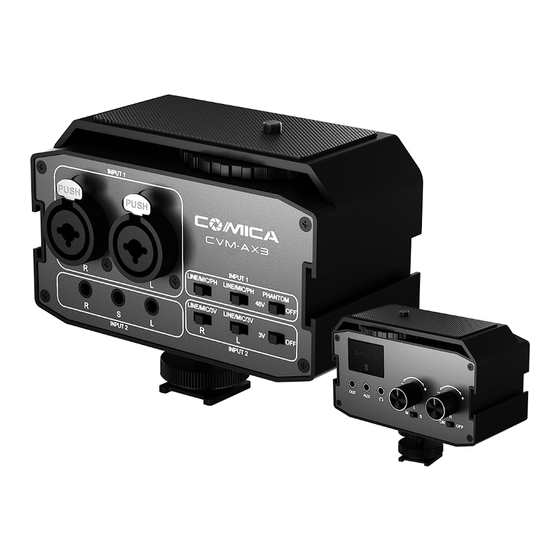
Package Contents Audio Mixer 3.5mm Audio Output Cable Cold Shoe Mount User Manual Warranty Card... - Page 5 Components and Instruction Audio Mixer Cold Shoe Interface INPUT2 Power Source Switch(Left) INPUT1 6.35mm Audio Input Jack(Right) INPUT2 3V Power Switch INPUT1 XLR Audio Input Jack (Right) 9V Battery Holder INPUT1 6.35mm Audio Input Jack(Left) Left Gain-Control Knob INPUT1 XLR Audio Input Jack(Left) Right Gain-Control Knob Locking Plate Audio Output Jack...
- Page 6 Function Switch Guide and Notice 1.INPUT1 For Microphone that’s designed with XLR and 6.35mm Audio Output XLR Audio Input Jack 6.35mm Audio Input Jack INPUT1 XLR and 6.35mm are in the same jack and cannot be used at the same time 2.INPUT2 For Microphone that’s designed with 3.5mm Audio Output...
- Page 7 3.LINE/MIC/PH (For INPUT1) If you’re using LINE IN function, set the switch to ‘LINE’ If you work in Non-Phantom Power Mode, set the switch to ‘MIC’ If you work in Phantom Power Opened Mode, set the switch to ‘PH’ Right LINE/MIC/PH Left LINE/MIC/PH 4.48V / OFF If you work with Phantom Power Opened, then set the switch to...
- Page 8 5.LINE/MIC/3V (For INPUT2) If you’re using LINE IN function, set the switch to ‘LINE’ If you’re using Positive Microphone (Mic with power driven), set the switch to ‘MIC’ If you’re using Passive Microphone (Mic with no power driven) , set the switch to ‘3V’...
- Page 9 7.L/R The Gain Control Button L/R is for adjusting sensitivity of Microphones (Corresponding with INPUT 1 & INPUT2 LEFT/RIGTH ) 8.OUT 3.5mm audio output 9.AUX Used as the auxiliary LINE IN input, to mix with some music,etc as background...
- Page 10 For Audio Monitoring 11.M/S M is for mono mode ; S is for Stereo mode If there’s only one group microphone connected with this device, then you have to set the M/S to M mode 12.ON/OFF Power ON/OFF ON/OFF...
- Page 11 Installation and Usage Installation method one: 1.Connect the camera to the 1/4 double-screw bolt of the mixer through the 1/4 screw hole 2.Rotate the locking plate to fix the camera...
- Page 12 Second methods of installation: 1. Mount the cold shoe mount to the audio mixer 2. Fix the audio mixer to the camera with the cold shoe mount...
- Page 13 3. Connect audio mixer’s Audio Output Jack(OUT) and camera Audio Input Jack with a audio cable...
- Page 14 4. Mount mics to the cold-shoe Interfaces of audio mixer...
- Page 15 5. Connect the mic and audio mixer...
- Page 16 For stereo mic, connect it to the stereo input jack ('S') For mono mic, connect it to the corresponding 'L' / 'R' input jack 6.Set Mono/Stereo switch Mono/Stereo switch a. When uses only one mic or one channel, select ‘M’ and the output is mono b.
- Page 17 7. To ensure the recording quality, please turn Gain-Control Knob of the left and right to the proper volume position to get the best audio effect Left Gain-Control Knob Right Gain-Control Knob 8.Power on, the indicator light up, and recording starts Indicator light Power Switch...
- Page 18 9.If you want to check the audio, you can plug headphone cable into the Real-time Monitoring Jack to monitor audio Real-time Monitoring Jack...
- Page 19 Tech Parameters Input XLR x 2(L/R), 6.35mm x 2(L/R), Mono x 2(L/R), Stereo x 1(S), AUX Output 3.5mm audio output, 3.5mm headphone output Frequency Response 20Hz~20kHz, ±1dB THD+Noise <0.02%, RL=2kΩ, f=20Hz~20kHz, Vo=1Vrms Battery 9V 6LR61/6F22 x 1 Size 123 x 71 x 60.6mm Net Weight 460g Working Temperature...
Need help?
Do you have a question about the CVM-AX3 and is the answer not in the manual?
Questions and answers