Table of Contents
Advertisement
Advertisement
Table of Contents

Related Manuals for Resolve Fitness Reactive Runner

Summary of Contents for Resolve Fitness Reactive Runner
- Page 1 Reactive Runner 6044.3-081919...
- Page 2 PLEASE DO NOT RETURN THIS PRODUCT TO THE STORE. STOP. Contact customer service if you have any questions regarding assembly or proper operation of the machine. Email us at: Service@paradigmhw.com Or call us at: 1-844-641-7923 Hours: 8:00 am to 5:00 pm (PST) Monday thru Friday...
-
Page 3: Table Of Contents
TABLE OF CONTENT SERVICE ---------------------------------------------------------------------- 2 LABEL PLACEMENT ------------------------------------------------------- 3 IMPORTANT SAFETY GUIDELINES ---------------------------------- OVERVIEW DRAWING ---------------------------------------------------- 6 PARTS LIST ------------------------------------------------------------------ 7 HARDWARE & TOOL LIST----------------------------------------------- ASSEMBLY ------------------------------------------------------------------- 10 CONSOLE ------------------------------------------------------------------ 15 ADJUSTMENTS ------------------------------------------------------------ TRANSPORTING----------------------------------------------------------- MAINTENANCE AND TROUBLESHOOTING --------------------- WARRANTY ------------------------------------------------------------------ 21 PARTS REQUEST FORM ------------------------------------------------... -
Page 4: Service
SERVICE IMPORTANT: FOR NORTH AMERICA ONLY For damaged or defective product, questions, replacement parts or any other service support, please contact our customer service department by the below methods: For The Best Service, please Email: service@paradigmhw.com Response Time: 1-2 Business Days Emailing us with the information above will be the best method to receive a response during peak business hours Website:... -
Page 5: Label Placement
LABEL PLACEMENT... -
Page 6: Important Safety Guidelines
IMPORTANT SAFETY GUIDELINES Basic precautions should always be followed, including the following safety instructions when using this treadmill: Read all instructions before using this treadmill. NOTE: Failure to follow these instructions may lead to personal injury and cause damage to the treadmill. WARNING: To reduce the risk of burns, fire, electric shock or injury to any persons, please read the following:... - Page 7 IMPORTANT SAFETY GUIDELINES WARNING: Before beginning, any exercise program consult your physician. This is especially important for the persons who are over 35 years old or who have pre-existing health problems. Read all instructions before using any fitness equipment. We assume no responsibility for personal injury or property damage sustained by or through the use of this product.
-
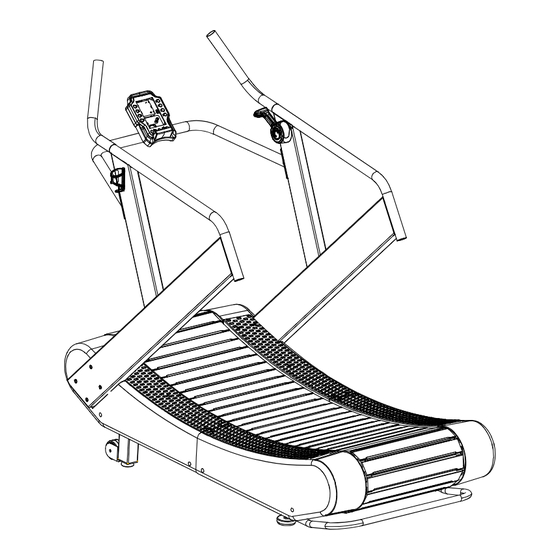
Page 8: Overview Drawing
OVERVIEW DRAWING... -
Page 9: Parts List
PARTS LIST Description Description Main Frame (R) 45 Rear cover (L) Main Frame (L) 46 Rear cover (R) Front Connecting Tube 47L Antiskid plate 1(L) Connecting Tube 47R Antiskid plate 1(R) Front Wheel Bracket 48L Antiskid plate 2(L) Right Upright Post 48R Antiskid plate 2(R) Left Upright Post 49 Adjustable Pad... - Page 10 PARTS LIST Description Description Philips C.K.S. full thread screw Tension Cable L-450mm Allen Screw M4×10 Slide rheostat Slide rheostat fix frame Philips Screw M5×10 Magnet Cover Brake wire fix frame Round Cover Round Magnet Drive Shaft Self-Tapping Screw ST3*10 Allen Screw M8×20 VR Connection wire L-950mm Ball bearing VR Connection wire L-1250mm...
-
Page 11: Hardware & Tool List
HARDWARE & TOOLS PACK... -
Page 12: Assembly
ASSEMBLY Tool: Screwdriver 1PC Step 1 1a. Battery Installation: Loosen the screw that holds the battery cover in place to remove the battery cover from the back of the Console (42). Insert 4 AA batteries into the console and then reattach the battery cover. - Page 13 ASSEMBLY Tool: Screwdriver 1PC Step 2 2a. Hardware Removal: Remove four Phillips Screws (80) from the back of Console (42) using the Screwdriver provided. 2b. Connecting the Wires: Connect the Wire (38) to the Console Wire (42) See Fig A. Connect the VR Connection Wire (108) to the Console Wire (42) See Fig B.
- Page 14 ASSEMBLY Fig.C Fig.D Tool: Open Wrench Step 3 3a. Installing the Left Upright Post: Attach the Left Upright Post (7) onto the Left Main Frame (2) with four Plastic Washers (110), and four Hex Bolts (74) using the Open Wrench provided. 3b.
- Page 15 ASSEMBLY Tool: T-shaped Spanner 6mm Allen Wrench Hardware: (61) Hex Bolt Step 4 4 PCS 4a. Connecting the Wires: Connect the VR Connection Wire A (108) from the Console Frame (10) to the VR Connection Wire B (109) from the Right Upright Post (6). See Fig. F. Connect Wire (38) from the Console Frame (10) with the Wire B (36) from the Right Upright Post (6).
- Page 16 ASSEMBLY Tool: Screwdriver 1PC Hardware: (121) Phillips Screw 2 PCS Step 6 6a. Installing the Bottle Holder: Attach the Bottle Holder (101) onto the Left Upright Post (7) with two Phillips Screws (121) using the Multi-Hex Tool with Phillips Screwdriver provided. Step 7 7a.
-
Page 17: Console
CONSOLE Buttons START/PAUSE: 1. Press at the main screen to begin a “Quick Start” workout. 2. Starts the selected workout when setting up a HIIT, Heart rate, or Goal option. 3. During workout, pressing it once to pause the workout. Press again to resume a paused workout session. - Page 18 CONSOLE Workouts TARGET GOAL WORKOUT: 1. Use the TARTGET button to set target goal for Workout Time, Calories Burned, or Distance Traveled. 2. Press multiple times to see all the workout options. TIME goals can be set from 5:00 to 99:00 minutes, default time is 10:00 ...
- Page 19 CONSOLE 20/10, 10/20, 20/20 INTERVAL CUSTOM INTERVAL WORKOUT SETUP WORKOUT SETUP ROUND: 1. Press UP or DOWN to set the 1. Press UP or DOWN to set the value of value of “ROUND”. “ROUND”. The total number of 2. The number of rounds changes by 2.
-
Page 20: Adjustments
ADJUSTMENTS Adjustable Pads: Stabilize the treadmill by turning the Adjustable Pads (49) as needed to level the treadmill before working out. (94) Adjustable Resistance Level: Increase and decrease the resistance level of the workout by moving the Resistance Control (94). Shifting the lever forward will allow the running surface to move quickly. -
Page 21: Transporting
TRANSPORTING Transporting the treadmill: 1. Hold the Support Tube (21) and slowly lift the machine until the Transport Wheels (50) makes contact with the floor. 2. Push or pull the unit to the desired location. 3. Gently lower the Support Tube (21) until the Adjustable Pad (49) touches the ground when you have found an appropriate storage area. -
Page 22: Maintenance And Troubleshooting
MAINTENANCE & TROUBLESHOOTING MAINTENANCE: Clean the entire machine daily using water and a mild soap solution (Cleaning agents should be alcohol and ammonia-free) TROUBLESHOOTING: PROBLEM: There is no display on the computer console. SOLUTION: Verify that the wires from the computer console are properly connected to the mainframe wires frame. -
Page 23: Warranty
WARRANTY MANUFACTURER’S LIMITED WARRANTY Paradigm Health & Wellness warrants to the original purchaser that this product is free from defects in material and workmanship when used for the purpose intended, under the conditions that it has been installed and operated in accordance with Paradigm’s Owner’s Manual. -
Page 24: Parts Request Form
PARTS REQUEST FORM Paradigm Health & Wellness, Inc. EMAIL THIS FORM WITH YOUR RECEIPT OF PURCHASE TO Service@paradigmhw.com NAME:_____________________________________________________________________________________ ADDRESS:__________________________________________________________________________________ CITY:________________________ STATE:_____________ ZIP:_______________________________________ TELEPHONE: (Day)__________________________________________________________________________ (Night)_________________________________________________________________________ SERIAL#:___________________________________________________________________________________ MODEL#:___________________________________________________________________________________ PURCHASE DATE:___________________________________________________________________________ PLACE OF PURCHASE:_______________________________________________________________________ PART # DESCRIPTION “YOUR ORDER WILL BE PROCESSED WITHIN 3 BUSINESS DAYS” * This form can also be faxed in Fax #: 626-810-2166...
Need help?
Do you have a question about the Reactive Runner and is the answer not in the manual?
Questions and answers