Table of Contents
Advertisement
Advertisement
Table of Contents

Related Manuals for Yamaha MA190


Summary of Contents for Yamaha MA190
- Page 1 SERVICE MANUAL MA190 7JD-F8197-E0...
- Page 3 FOREWORD HOW TO USE THIS MANUAL PARTICULARLY IMPORTANT This manual was written by the Yamaha Motor Powered Products Co., Ltd. primarily for use INFORMATION by Yamaha dealers and their qualified mechan- ics. It is not possible to put an entire mechan- Particularly important information is distin- ic’s education into one manual, so it is...
- Page 4 ILLUSTRATED SYMBOLS (Refer to the illustration) SYMBOL DEFINITION SYMBOL DEFINITION Tightening torque Wear limit, clearance Engine speed Electrical data Special tool...
-
Page 5: Table Of Contents
I. PARTS DESCRIPTION 4-1-3 Unstable speed ......23 4-1-4 Unable to ignite ......23 4-1-5 Engine overheat ......24 1-1 Part description ........1 4-1-6 Abnormal sound ......24 1-1-1 Feature ...........1 4-1-7 Exhaust gas color abnormal..25 1-1-2 Model & serial number ....1 4-2 Preparation of servicing .....25 1-2 Specification ..........2 4-2-1 Safety precautions ......25 1-3 Service limit ...........3... -
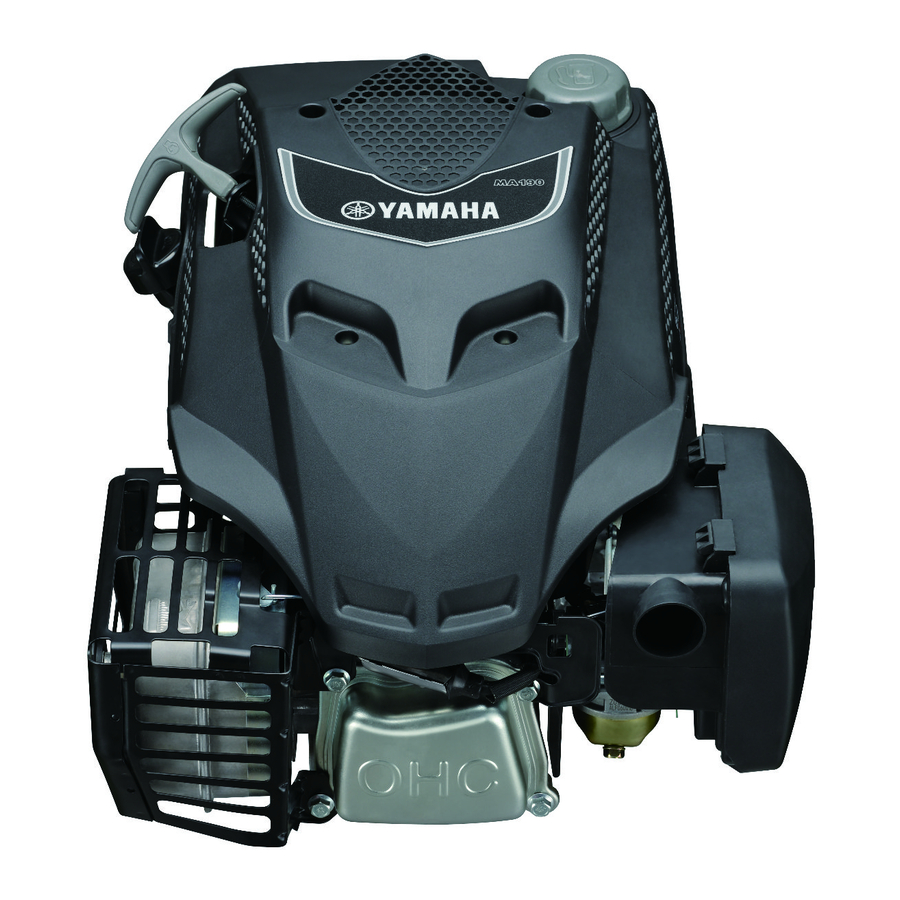
Page 6: Parts Description
1-1 Part description I. PARTS DESCRIPTION 1-1 Part description 1-1-1 Feature Starting lever Oil dipstick Spark plug Drain plug Muffler Air cleaner Fuel tank Fuel tank cap Engine switch 1-1-2 Model & serial number YAMAHA MA190 Engine model Serial number... -
Page 7: Specification
1-2 Specification 1-2 Specification Model MA190 Specification L × W × H (not including crankshaft 425 × 360 × 290 mm output terminal) Dry Weight 11.5 or 14.5 kg Engine Type Single cylinder horizontal, 4-stroke, (OHC) Displacement 189 ml Bore × Stroke 68 mm ×... -
Page 8: Service Limit
1-3 Service limit 1-3 Service limit Unit: mm Parts Item Standard Service limit Maximum speed (No load) 3800±100 rpm — Engine Cylinder compression 1.15 Mpa at 1200 rpm — Cylinder head Sleeve I.D. 68.00–68.02 68.160 Cylinder head War page 0–0.05 0.100 Skirt O.D. -
Page 9: Dimension And Torque
2-1 Engine dimension II. DIMENSION AND TORQUE 2-1 Engine dimension 2-1-1 Appearance dimension... -
Page 10: Installation Hole Position
2-1 Engine dimension 2-1-2 Installation hole position 2-1-3 P.T.O. dimension figure Type : 7/8"-1-1.1 Type : 7/8"-1-1.2 MOUNTING SURFACE MOUNTING SURFACE 44.45 46.3 +0.05 1.25 +0.05 1.25 4.76 4.76 +2.5 +2.5 7.07 7.07... - Page 11 2-1 Engine dimension Type : 7/8"-3 Type : 7/8"-4 MOUNTING SURFACE MOUNTING SURFACE 80.2 61.9 3/8-24UNF 3/8-24UNF +0.05 4.76 +0.05 4.76 +0.03 +0.03 7.07 7.27 10.3 10.3 +2.5 25.4 +2.5 25.4 46.7 Type : 1"-1 Type : 1"-2 MOUNTING SURFACE MOUNTING SURFACE 61.9 46.03...
- Page 12 2-1 Engine dimension Type : 25-3 MOUNTING SURFACE 80.2 7/16-20UNF +0.05 4.76 31 min...
-
Page 13: Torque Value
2-2 Torque value 2-2 Torque value Ser. No Item Specification Performance class Torque value (N·m) Cylinder head M8 × 65 10.9 26±2 Crankcase cover M6 × 30 10±2 Oil drain plug M10 × 15 22±2 Connecting rod M6 × 35 10.9 13±1 Valve locking nut... -
Page 14: Standard Torque Value
2-3 Standard torque value/2-4 Important bolt torque value 2-3 Standard torque value Fasteners Thread dia. (mm) Torque value (N·m) 5 mm bolt, nut 4.5–6 6 mm bolt, nut 8–12 8 mm bolt, nut 18–25 10 mm bolt, nut 29–34 12 mm bolt, nut 49–59 4 mm screw 1.5–2.6... -
Page 15: Maintenance
3-1 Maintenance schedule III. MAINTENANCE 3-1 Maintenance schedule Good maintenance is essential for safe, economical, and trouble-free operation. It will also help reduce air pollution. WARNING Exhaust gas contains poisonous carbon monoxide. Shut off the engine before performing any maintenance. If the engine must be run, make sure the area is well ventilated. Periodic maintenance and adjustment is necessary to keep the generator in good operating condi- tion. -
Page 16: Change Oil
5. Reinstall the dipstick and screw down. 6. Tighten the oil drain plug. MA190 Oil drain plug: 20–24 N·m SAE VISCOSITY CLASS Use 4-stroke engine oil, API service classifica- 10W 30 tion SE class or equivalent. - Page 17 3-2 Change oil WARNING Engine oil is a major factor affecting engine performance and service life. Non- detergent and 2-stroke engine oils will damage the engine. For environment protecting, please properly handle with the used oil. Running with insuffi- cient engine oil may damage the engine severely and it will not be covered the range of the warranty.
-
Page 18: Air Cleaner
3-3 AIR CLEANER 3-3 AIR CLEANER A dirty air cleaner will restrict air flow to the carburetor. To prevent carburetor malfunction, clean the air cleaner each 50 hours (or three month) and service the air cleaner regularly. Service more frequently when operating the generator in extremely dusty areas. WARNING Using gasoline or flammable solvent to clean the filter element can cause a fire or explosion. -
Page 19: Fuel Parts
3-4 Fuel parts 3-4 Fuel parts WARNING Furl tank Bolt M6 × 25 Don’t smoke or use flame fires near the Tank cap flammable solvents. 3-4-1 Strainer clean 1. Put the fuel into the container. 2. Lose the clip, remove oil tube and pull the strainer out. - Page 20 3-4 Fuel parts MA190 fuel tank capacity: 1.0 L Only use unleaded gasoline and recommend gasoline grade 90# over. Unleaded gasoline reduce gasoline engine carbon deposit and prolong the exhaust system service life. Never use contaminated gasoline or mixed gasoline with oil. Don’t allow the dust, foreign matter or water entering into fuel tank.
-
Page 21: Spark Plug Service
Incorrect heat range of the spark plug may damage the engine. MA190 recommended spark plug model: NGK (BPR6HS or BPR7HS) CHAMPION (RL82YC or RL87YC) -
Page 22: Valve Clearance Adjustment
3-6 Valve clearance adjustment 3-6 Valve clearance adjustment Keep the clearance between engine valve rod end and driving parts for avoiding heat expanding and cold shrinking to effect engine performance. If the valve is too big, it can result in exhausting unsmooth, effecting engine performance and increasing engine noise (valve abnormal), if the valve is too small, the valve will close untight to make the engine operating abnormal and drain valve operating face burn. - Page 23 3-6 Valve clearance adjustment 4. If adjustment is necessary, proceed as follows: a. Hold valve adjusting bolt with tongs and loosen the valve lock nut. b. Turn valve adjusting bolt to obtain the specified clearance. c. Fix the valve adjusting bolt with tongs, then fix the valve lock nut with spanner.
-
Page 24: Governor Adjusting
1. Start the engine and allow it to warm up to normal operating temperature. 2. If the maximum speed is not conformed to specified value, adjust throttle control and hole position of the support by adjusting governor spring. MA190 engine maximum speed: 3800±100 rpm WARNING... -
Page 25: Disassembling And Servicing
4-1 Troubleshooting IV. DISASSEMBLING AND SERVICING 4-1 Troubleshooting 4-1-1 Starting difficult TROUBLE CAUSE REMEDY There is no enough fuel in fuel Fill fuel, open fuel cock. tank and fuel cock is closed. Air vent in the fuel filler cap Dredge air vent. Fuel supply is clogged. - Page 26 4-1 Troubleshooting Spark plug testing WARNING 9 Make sure there is no spilled fuel out- side the engine and that the spark plug isn’t dipped with fuel. 9 To prevent fire, keep sparks far away Spark plug from the spark plug mounting hole. 9 When testing the spark plug, never hold High tension line the high tension line of the spark plug...
-
Page 27: Power Lack
4-1 Troubleshooting 4-1-2 Power lack TROUBLE CAUSE REMEDY Air in fuel line or fuel line Exhaust air or dredge fuel line. clogged. Main oil flow hole is not adjust- Readjust. ed properly. In carburetor, needle valve hole Clean and blow to get through. Ignition and main oil flow hole clogged. -
Page 28: Unstable Speed
4-1 Troubleshooting 4-1-3 Unstable speed TROUBLE CAUSE REMEDY Piston, cylinder or piston ring is worn exces- Replace the worn. sively. Piston pin and piston pin hole are worn Replace piston or piston pin. Knocking excessively. sound Tie rod small head is worn excessively. Replace tie rod. -
Page 29: Engine Overheat
4-1 Troubleshooting 4-1-5 Engine overheat TROUBLE CAUSE REMEDY Oil insufficient or wrong oil ratio in the gaso- Refill engine oil. line Exhaust pipe blocked up. Clean exhaust pipe. Shroud leaking Repair damaged part. Cooling fins blocked by foreign matter. Clear cooling fins. Cooling fan is loosen and malfunction. -
Page 30: Exhaust Gas Color Abnormal
4-1 Troubleshooting/4-2 Preparation of servicing 4-1-7 Exhaust gas color abnormal TROUBLE CAUSE REMEDY Piston, cylinder or piston ring is worn exces- Replace the worn. sively. Too much carbon deposit in combustion Clear away. Black smoke chamber or blue thick Too much carbon deposit in combustion smoke Clear away. -
Page 31: Special Tools
4-2 Preparation of servicing 4-2-2 Special tools Serial Tools Operations·notes Retainer assembler Assembling ball bearing Assembler handle Installing handle and bearing Inner retainer assembler Assembling ball bearing and time Diamond lap 45° Rectifying valve seat surface Diamond lap 32° Rectifying valve seat surface Flywheel driver Dismounting flywheel Bearing extractor... -
Page 32: Engine
4-3 Engine 4-3 Engine 4-3-1 Recoil starter/housing Disassembly: Ser. Ser. Ser. Description Description Description Hex. flange nut (M6) Return spring Starter rope Recoil starter Drive cam Starter case Starting rope grip Compression spring Stud (M6 × 80) Rope guide assy. Washer Stud (M6 ×... -
Page 33: Fuel Tank
4-3 Engine 4-3-2 Fuel tank Disassembly/reassembly: The fuel tank does not require general maintenance, but, sometimes the dusts and vapor will trou- ble the fuel system, so that, periodically washing it with lubrication oil and gasoline is required. WARNING Don’t smoke and use fire near the flammable solvent. Clean/installation: 9 Check the fuel tube for damage or leak. -
Page 34: Ignition Coil/Flywheel
4-3 Engine 4-3-3 Ignition coil/flywheel Ser. No. Description Ser. No. Description Hex. flange bolt-big series (B class Flywheel nut M6 × 25) Starting cup Ignition coil Impeller Ignition coil stop wire Flywheel assy. Clip... - Page 35 4-3 Engine Ignition coil Ignition coil Ignition gap Bolt Check high tension line insulator for cracked, 0.4–0.6 mm replace if necessary. Flywheel Assembly: CLEARANCE 0.4±0.2 (mm) 1. Disassemble engine housing, fuel tank and recoil starter in order. 2. Measure the clearance between the igni- tion coil and flywheel with the feeler.
- Page 36 4-3 Engine Flywheel Flywheel brake Disassembly: (commercially available) 1. Holding the flywheel with a commercially available strap wrench, remove the nut (M14). 2. Disassemble the starter cup and impeller. 3. Remove with a commercially available fly- wheel puller. NOTICE 9 Do not hit the flywheel with a hammer. 9 Avoid the magnet section when attach- ing the puller.
-
Page 37: Muffler
4-3 Engine 4-3-4 Muffler Stud M8 × 109 Gasket Hex. flange nut M8 Muffler Muffler housing Disassembly/reassembly: The muffler can produce carbon deposits in the long time operation and seriously trouble the exhaust system. To get the best performance, the muffler must be periodically removed the carbon deposits. -
Page 38: Air Cleaner
4-3 Engine 4-3-5 Air cleaner Rubber tube Air cleaner elbow Connecting bolt Gasket Hex. flange nut M6 Air cleaner element Case Disassembly/assembly: Disassemble the air cleaner as shown on the above figure. Rubber tube 9 Check for damage of the air cleaner gasket before reassembling. -
Page 39: Carburetor
Engine performance can be improved by installing a smaller diameter main fuel jet in the carbure- tor and readjusting the pilot screw. If you always operate the engine at altitudes higher than sea level 1000 meters over, have a Yamaha dealer perform this carburetor modification. If not, should lower load power in operating gasoline engine. - Page 40 4-3 Engine Carburetor Wash the carburetor in the clean place, first, clean the outside surface, and wash the inside the parts with special carburetor detergent or industrial gasoline. Exception for washing impurities, also wash the gasoline colloid on the part surface. Blow the washed parts clean with compression air, and don’t use cloth and paper against recontamination.
- Page 41 4-3 Engine Reassembly: Float valve 1. Check the float valve, float seat and float spring for wear. Float valve seat Worn Normal 2. Clean with compressed air before reas- sembling. Main jet 3. Clean with compressed air before reas- sembling. Main nozzle 4.
-
Page 42: Throttle Control
4-3 Engine 4-3-7 Throttle control Returning spring (hook Governor lever (insert the left end into the the left end into throttle throttle shaft small hole) Choke lever (hook the valve shaft hole) left end into the choke shaft hole) Governor support Lever rubber sleeve Bolt M6 ×... -
Page 43: Timing Chain
4-3 Engine 4-3-8 Timing chain Disassembly/reassembly: 1 Disassemble recoil starter/housing. 2 Disassemble fuel tank. 3 Disassemble ignition coil, flywheel. 4 Disassemble muffler. 5 Disassemble air cleaner. 6 Disassemble carburetor. 7 Disassemble throttle control lever. Chain 8 Disassemble cylinder head cover. 9 Disassemble crankcase cover. - Page 44 4-3 Engine 3. Pull out the tensioner pin and remove the tensioner, spring and pin. Tensioner Spring 4. Remove the bolt and pull out the cam- Bolt shaft spindle. NOTICE When pulling out the camshaft spindle, be careful not to strike the cylinder head and cylinder block by the camshaft falling off.
- Page 45 4-3 Engine 6. Move the timing chain downward and remove it from the crankcase side. Chain Reassembly: 1. Timing chain pass through as shown in Figure 1. Figure 1...
- Page 46 4-3 Engine 2. Rotate the crankshaft to engage the tim- ing chain mark (between two pieces of different colors) and crank mating mark as shown in Figure 2. Crank mating mark Figure 2 Timing chain mark 3. As shown the figure, assemble the cam- Camshaft Timing chain mark shaft by matching the camshaft mating...
- Page 47 4-3 Engine 5. Insert the camshaft spindle and tighten Camshaft spindle Bolt the bolt. 6. Insert the pin while compressing the spring with the finger as shown in the fig- ure and attach the tensioner. Spring 7. Make sure the pin is inserted until the end.
-
Page 48: Cylinder Head/Valve Train
4-3 Engine 4-3-9 Cylinder head/valve train Cylinder head: Before installation, remove any Spark plug: Clean and Exhaust valve: Before Dowel (A type) carbon deposits from adjust spark plug before installation, remove the combustion cham- 10 × 14 installation. carbon deposits and ber, check retainer inspect the valve. - Page 49 4-3 Engine 2. Inspect/service/repair: 1 Valve stem outside diameter Inspect the valve stem outside diameter with the micrometer, if finding out of the standard or service limit, or if visually inspecting the burn and damaged on the valve face, please replace with new one.
- Page 50 4-3 Engine Replacement: a. Chill the replacement valve guides in the freezer section of a refrigerator for about an hour. b. Drive the valve guide out of the combus- tion chamber side using valve guide driv- NOTICE Valve guide driver Be careful to avoid damaging the cylinder head when driving out the valve guides.
- Page 51 4-3 Engine Reamer: For best results, be sure the cylinder head is at room temperature before reaming valve guides. Coat the reamer and valve guide with cutting oil. Rotate the reamer clockwise through the valve guide for the full length of the reamer. Valve guide reamer Continue to rotate the reamer clockwise while...
- Page 52 4-3 Engine 4 Valve seat a. Thoroughly clean the combustion chambers and valve seats to remove carbon deposits. Apply a light coat of red lead powder or erasable color painting to the valve faces. b. Insert the valves, and then press the Valve face valve several times forcefully.
- Page 53 4-3 Engine g. Apply the abradant to the valve seat face, suitable for running in when rotating valve Valve lapping seat with valve seat cutter. tool h. After reassembling, check the valve clear- ance.
-
Page 54: Crankcase Cover/Governor Gear
4-3 Engine 4-3-10 Crankcase cover/governor gear Ser. No. Description Ser. No. Description Gasket Governor gear Dowel (A type) Governor flyweight Oil seal ( 27 × 42 × 7) Flyweight spindle Drain plug Spindle clip Washer ( 10 × 15.8 × 1.5) Spacer Crankcase cover Governor slider... -
Page 55: Crankshaft/Piston/Crankcase
4-3 Engine 4-3-11 Crankshaft/piston/crankcase Ser. Ser. Ser. Description Description Description Crankcase assy. Gasket Piston Oil dipstick Breath piece assy. Clip Seal ring Gasket Oil dipstick Flat washer (A class) Connecting rod Bolt (M6 × 16) Governor arm Connecting rod body Lower cover Oil seal ( 6 ×... - Page 56 4-3 Engine Disassembly/reassembly 120° Maker mark 1 Reassembly a. Piston • Install with the maker mark facing upward as shown. • Do not interchange the top ring and the Top ring second ring (top ring with chrome plat- “ ↓ ” Mark ed).
- Page 57 4-3 Engine d. Bearing • Apply oil to the circumference of a new ball bearing. Driver handle • Drive the ball bearing in the cylinder Retainer assembler barrel using special tool. Bearing 6205 Inner retainer Tools: assembler Driver handle Retainer assembler Inner assembler e.
- Page 58 4-3 Engine 2 Piston check Check the piston and cylinder for contacting, and check the groove for defects, piston top for burn and cracks. If damaged, replace. Clean the carbon deposit Clean the deposit round the piston top and cylinder neck before checking, first soak the carbon deposit with kerosene, and then clean with meter scraper or metal brush.
- Page 59 4-3 Engine This clearance must be checked before and after repairing. d. Piston ring side clearance 9 Check with placing each ring into each- self groove. 9 The piston ring should be freely turned without loosening and sticking. 9 Then measure with inserting feeler into clearance of the ring and upper and lower face.
- Page 60 4-3 Engine 3 Check connecting rod If connecting rod bending, twisting or big end shaft bush and small end outer ring movement or crack on one side, should be rejected and replaced with new one. a. Check small end diameter If out of the standard or exceed service limit, replace the connecting rod.
- Page 61 4-3 Engine 9 Remove connecting rod and measure Plastic feeler with scale Plastic feeler with plastic gauge. 9 If the clearance exceeds the service limit, replace the connecting rod and recheck the clearance. Standard Service limit 0.019–0.049 mm 0.120 mm 4 Camshaft check The camshaft is main driving part of the train valve mechanism, which controls the intake...
- Page 62 4-3 Engine 9 If the camshaft gear face damaged, please replace the camshaft with new one. Camshaft wearing cause analyze and to engine performance influence: Poor lubrication will result in camshaft abnormal wearing, such as, oil viscosity low, impurity too much, and recycling oil little can’t let the camshaft surface forming com- plete oil film to make the camshaft surface seriously worn in the high speed rubbing...
-
Page 63: Electric Diagram
4-4 Electric diagram 4-4 Electric diagram Engine switch Engine switch Black Spark plug Ignition coil... - Page 66 2017.10×1 !
Need help?
Do you have a question about the MA190 and is the answer not in the manual?
Questions and answers
Where can i get a primer for a ma190 yamaha motor
A primer for a Yamaha MA190 motor may be found as part of a compatible carburetor assembly. One option is the C·T·S Carburetor for Yamaha Rato Robin MA190, which is listed under automotive parts, specifically in the fuel system category.
This answer is automatically generated
I replaced the water pump. Should the oil in the pump be replaced
Yes, the oil in the Yamaha MA190 water pump should be replaced after installation.
This answer is automatically generated
On the bottom of the machine there is a fitting that the soap hose is attached to i pulled out the fitting and it blew off forcefully ? now the machine just pours water through it... Pic attached - is there a ball bearing that is supposed to be behind the fitting? it blew of and i have no idea of any possible part that went flying with the fitting? Thanks
location of main and plot jets on carburetor
What is the remote charger for the MA190 starter battery charger part number and where Can I get one and what's the price?
How to use and maintain the starter battery on my Ma190
Battery is dead
My MA190 stopped while pressure washing my house and won’t start back. Any suggestions?
Can you use an automotive battery charger to charge the battery on a MA190 electric start battery charger?