Table of Contents
Advertisement
Quick Links
Advertisement
Chapters
Table of Contents

Related Manuals for Primada PSJ260

Summary of Contents for Primada PSJ260
- Page 1 原 果 慢 磨 原 汁 寶 PSJ260 W H O L E S L O W J U I C E R...
- Page 2 ................說明書 ZH-HK Instruction Manual ............感謝您選購寶康達產品 —— 原果慢磨原汁寶!希望您使⽤愉快,我們相信這款 全新原果慢磨原汁寶幫助您烹調更快速⽅便,讓您重新感受到烹飪的樂趣及擁 有不⼀樣的美食滋味。 使⽤中如果遇到任何問題,請聯絡我們的售後服務中⼼,將有專業⼈員為您解答 問題。 如欲了解更多產品資訊,請瀏覽:www.primada.com.hk 本資料產品以實物為準,本公司保留產品更新的權利,如有變動,恕不另⾏通知。 感謝您的選擇 !...
-
Page 3: Table Of Contents
目錄 ......................2 1. 安全注意事項 ........................3 2. 產品組成 2.1 包裝隨附物件 ....................3 2.2 技術參數 ......................4 ......................4 組件名稱 ........................5 3. 產品使用 ......................5 3.1 安裝前須知 ......................5 3.2 安裝方法 ....................8 3.3 使用前須知 ......................10 3.4 操作說明 .......................15 4. 清洗與保養 ........................19 5. 疑難排解 ZH-HK... -
Page 4: 安全注意事項
1. 安全注意事項 使用電器產品前請仔細閱讀此說明書。 請保管好此說明書。 使⽤產品時,請保持⼀貫的警惕性,遵循以下事項: 1.請核對並確認銘牌上所標註的電源,確保產品是在符合標籤的狀態下使⽤。 2.此產品適合於家庭使⽤,不適合⼯業或商業使⽤。 3.請勿將產品放在靠近煤氣爐或煮食爐等⾼温度環境中使⽤。 4.請勿將產品靠近易燃物品使⽤,如窗簾或窗紗等。 5.請勿將產品放置於不平穩的位置。並需與牆⾯或其他物品保持⼀定的距離,以保持機器外圍 通風良好,確保機器的使⽤壽命。 6.請勿使⽤非本產品製造商提供的零部件及配件。 7.請勿在無⼈看管的情況下使⽤本產品。 8.產品不能由8歲以下兒童或精神上有障礙的⼈使⽤。若需要使⽤,請在監護⼈的監護指導下進 ⾏。請不要讓兒童將產品作玩具玩耍。 9.請勿將產品主機,電源線及插頭等浸入⽔中清洗,以免導致故障或引發不可預期的意外。 10.請勿使⽤已有損傷或破裂的電源線或插座。 11.請勿讓電源線接觸熱的物體表⾯。 12.若不使⽤,請將電源關閉,再拔掉插頭。 13.拔除插頭時,請勿直接拉扯電源,以免觸電。 14.使⽤的電源線必須可靠接地,且拿出或放上攪拌杯部分前請先切斷電源。 15.請勿⽤濕的⼿接觸電源線及電器,以免觸電。 16.若電源線或插頭出現破損或產品故障時,請將產品送到指定的維修中⼼修理,切勿⾃⾏維 修。 17.請勿⾃⾏拆卸或改裝本產品,以免造成組裝不良⽽引起不可預測的故障及意外。 18.接通電源前,請確保原汁提取容器、容器蓋及填料⼝蓋正確安裝。 19.產品通電時,嚴禁將⼿或尖銳硬物等伸入杯體內,以免受傷或使產品受損。 20. 本產品連續使⽤時間控制在30分鐘以內。 21. 各配件禁⽌放進洗碗機或⽤熱⽔(40℃以上)清洗。 22. 沒有放入果汁材料時請不要空轉機器,這是造成螺旋軸損壞的原因。 ZH-HK... -
Page 5: 產品組成
2. 產品組成 2.1 包裝隨附物件 隨機配件 果汁杯 PSJ260 果渣杯 旋轉刮壁器 過濾網(果汁) 螺旋軸 推料杆 過濾網(雪糕杯) 清洗刷 電源線 說明書 產品保用證 ZH-HK... -
Page 6: 技術參數
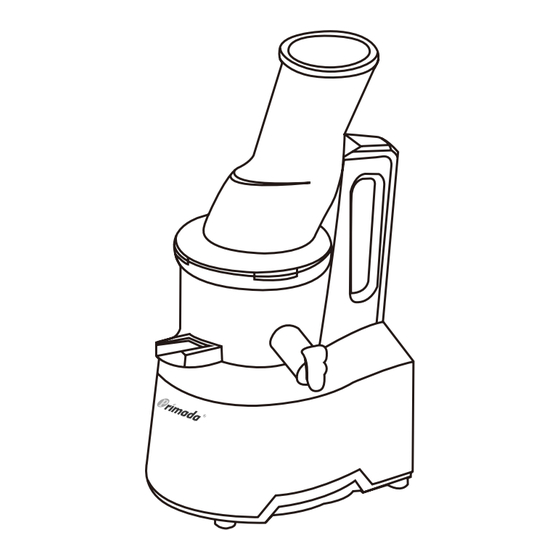
2. 產品組成 2.2 技術參數 產 品 名 稱 原果慢磨原汁寶 型 號 電 源 220-240V~50/60Hz 功 率 240W 連 續 運 作 時 間 約30Mins 重 量 7.5kg 尺 ⼨ 25x16x47cm * 因產品持續改善,原廠保留產品更新的權利,如有變動,恕不另行通知。 2.3 組件名稱 ZH-HK... -
Page 7: 產品使用
3. 產品使用 3.1 安裝前須知 請在使⽤原汁提取容器套件前進⾏充分的清洗 請確認矽膠塞和矽膠環是否塞好 3.2 安裝方法 原汁提取容器套件和主機安裝⽅法 請將容器底部的矽膠塞如圖所⽰⽅向 完全塞入 注意 : 矽膠塞沒有完全塞好的話容易造 成提取的原汁量較少或是漏出 請將旋轉刮壁器裝上過濾網後將過濾 網和原汁提取容器上的 標⽰點對⿑ 安裝 ZH-HK... - Page 8 3. 產品使用 將螺旋軸邊旋轉邊放入過濾網中央 注意 : 如果螺旋軸沒有完全裝好, 容器的蓋⼦將無法蓋上 請將原汁提取容器和容器蓋上的各個 標 ⽰點對準後,壓緊即可 注意 : 請按照圖⽰⽅法⽤單⼿或雙⼿ 握住蓋⼦向順時針⽅向旋轉 ZH-HK...
- Page 9 3. 產品使用 把提取容器套件放在主機上⾯,將原汁 提取容器套件的 標⽰點和主機的 對 準後壓緊,將容器蓋以順時針⽅向旋轉 到“關”位置就安裝好了 此為原汁提取容器套件的開/關狀態的 標⽰ 注意 : 如果沒有安裝到位的話不能運轉 開 關 開 關 ZH-HK...
-
Page 10: 使用前須知
3. 產品使用 3.3 使用前須知 沒有放入榨汁料時請不要空轉機器,這是造成螺旋軸損壞的原因。 請不要連續使⽤30分鐘以上,會導致電機過熱,容易發⽣故障。如果需要連續 使⽤,請使⽤30分鐘後停⽌30分鐘,然後再使⽤。 機器運轉時請勿把勺⼦或筷⼦等放進出汁⼝。運轉中若將勺⼦、筷⼦等⽤具伸 進出汁⼝會卡到刮壁器,使配件被破壞。 請絕對不要⽤推料桿以外,如⼿、勺⼦、筷⼦、夾⼦等往填料⼝放入。 請不要放入乾的殼物或有堅硬的核的果實及冰塊。會導致容器、螺旋軸、過濾 網等配件的破損和產⽣故障。泡過⽔的豆⼦、米等殼可以使⽤,柿⼦、梅、桃 等有核的果類必須先把核去掉後再使⽤。冷凍的材料,即使核⼩也要完全解凍 後才可使⽤。冰塊最好不要使⽤,會使原汁機的使⽤壽命縮短。 請不要使⽤原果慢磨原汁寶榨植物油(芝⿇,野芝⿇等)或動物油(食⽤油、 動物脂肪等)含量⼤的材料。植物/動物油會損傷螺旋軸及降低其性能。 如果將原果慢磨原汁寶排出的果渣再次投入榨汁,會出現停機或容器蓋打不開 的現象,所以禁⽌重複榨汁。 使⽤有籽的材料(覆盆⼦、葡萄等)後,請將螺旋軸底部的凹槽清洗乾淨。 ZH-HK... - Page 11 3. 產品使用 禁⽌放入原果慢磨原汁寶 。 *注:如果由顧客的不當使⽤⽽導致機器發⽣故障和破損,則不能享受免費維修 柿⼦、棗、⼭⽵、荔枝、⽜油果、芒果、 硬核 ⽔蜜桃、杏李⼦、⽊瓜等。 請⼀定去掉核。 菠蘿、哈密瓜、⻄瓜、荔枝、⼭⽵、榴蓮、 厚的或硬的⽪ 橙⼦、檸檬、橘⼦等。 請⼀定去掉果⽪。 冷凍⽔果、冰塊 冷凍的紅莓、藍莓、草莓、 桑⼦等。 冷凍⽔果、冰塊 要完全解凍後才能少量慢慢放入進⾏榨汁, 禁⽌使⽤冰塊。 芝⿇、野芝⿇、食⽤油、動物脂肪等。 動物/植物油 植物/動物油含量多的材料禁⽌⽤來榨汁, 會使螺旋軸的性能降低和被損壞。 椰⼦、野葛、⽢蔗或沒有被⽔泡過的殼類 不能榨汁 (豆、⼤米)等。 絕對不可以放入。 充分理解原果慢磨原汁寶的榨汁原理,特性,根據榨汁材料的不同掌握榨汁要 領並活⽤,則可以體驗更加健康的原汁果汁。 原果慢磨原汁寶是利⽤螺旋軸低速擠壓榨汁的⽅法,採⽤了果汁和果渣⾃動分 離的新專利技術,適合榨汁纖維均勻分佈,⽔分多的材料。 冷凍的材料、有核的材料、⾁質硬的材料、纖維多的材料等,因材料的性質不 同其榨汁⽅法都不⼀樣。所以要根據不同材料的榨汁要領去榨汁,才能達到最 佳的榨汁效果。 ZH-HK...
-
Page 12: 操作說明
3. 產品使用 3.4 操作說明 1.準備好材料後,將電源線插在插座上,並打開電源 禁⽌⽤濕⼿接觸電源插頭,這是造成觸電、漏電或火災的原因。 請確認好插座的狀態是否正常 2.請按開關的“正轉”開始啟動 正轉:將材料往下推進 反轉:將材料往上退回 使⽤中產品突然停⽌的情況 如果使⽤中的產品突然停⽌,請按開關的“停⽌”後再按“反轉”,使堵在螺 旋軸的材料往上(反向)退回後,再按下“正轉”開關。 反轉 停⽌ 正轉反覆進⾏2-3次操作 ← → ← → 正轉 停⽌ 翻轉 停⽌ 反轉 停⽌ 正轉 反轉:使材料向上退回(反轉開關只在⽤⼿按住的狀態下才能啟動) 在“正轉”進⾏中要換成“反轉”操作時,請先按下“停⽌”開關,等機器 停⽌後,再按下“反轉”開關。(“正轉”進⾏中直接按下“反轉”開關的 話容易產⽣故障) 如果還是不能啟動的話,請將容器拆下清洗後再使⽤。 ZH-HK... - Page 13 3. 產品使用 3.請將洗乾淨的材料依次放入填料⼝ 根據各種材料的特性,分別準備好材料 纖維質硬的材料: 切成⻑度3-5cm以內,厚度1.5-2cm以內 葉菜類和纖維質⻑⽽硬的材料(如芹菜,⽔芹菜,神仙草,⽻衣⽢藍等) 莖部切成3-5cm以內(神仙草1cm以內),葉部卷好後投入 有硬核的果類,要先去掉核,冷凍的材料,要先解凍后使⽤ ⼀次投料過多,會造成停⽌運轉,請⼀個⼀個慢慢地進⾏投料 4.原果慢磨原汁寶使⽤原汁蓋能夠製作混合果汁,防⽌流出,也可進⾏簡易清洗 關上原汁蓋榨汁,可以將⽔果蔬菜包括⽜奶等液體和豆,香蕉等放入製作混合 果汁 榨汁後,關上原汁蓋可以防⽌殘餘的果汁流出,使容器的移動起來更⽅便 原汁蓋關上的狀態下加⽔可以進⾏簡易清洗,從⽽可以更換材料連續榨汁,更 便利 蘋果、芹菜等榨汁時會產⽣較多泡沫的榨汁材料榨汁時把原汁蓋打開可以有效 減少泡沫的產⽣ 原汁蓋關上的狀態下,請注意榨汁榨得較多的時候可能會向上溢出 5.原汁和果渣全部排出後請按停⽌開關 如果果渣還沒有全部排出的情況下停機,蓋⼦會打不開 榨完汁後繼續空轉30秒左右,使機器裡⾯的渣滓全部排出 如果蓋⼦打不開,請做反轉 停⽌ 正轉操作反覆2-3次後,按住蓋⼦上部的 ← → ← → 狀態下,⼀邊旋轉⼀邊打開 榨完後往填料注⽔,簡單清洗後打開蓋⼦會更順利 ZH-HK...
- Page 14 3. 產品使用 過濾網(雪糕杯)操作指⽰ *使⽤前請確認矽膠塞及矽膠環已安裝好 * 注:過濾網(雪糕杯)以下簡稱為雪糕杯 容器蓋 雪糕杯容器套件安裝⽅法 將雪糕杯和原汁提取容器上的 點對⿑安裝 將螺旋軸放入雪糕杯中央 螺旋軸 將容器蓋與原汁提取容器上的 點對⿑後壓 緊即可 *當使⽤雪糕杯時,請保持原汁蓋開啟狀態 過濾網(雪糕杯) 原汁提取容器 雪糕杯容器套件和主機的安裝⽅法 將容器套件上的 和主機上的 對⿑壓緊 將容器蓋以順時針⽅向旋轉到“關”位置 ⽤法:只要將新鮮⽔果冰凍6⼩時以上, 然後放入原果慢磨原汁機中即可製作出天然美味的⽔果雪糕 注意:製作⽔果雪糕的食材以軟質型較佳 並須將⽔果的⽪及籽去掉,否則不適⽤。 冰凍過硬的食材請先解凍5-20分鐘,過⻑ 或過⼤的食材請切成⼩塊才冰凍。 ZH-HK...
- Page 15 3. 產品使用 榨汁操作參考 ⼀般果⾁的材料 | 蘋果、橙⼦等 請將蘋果整個投入到填料⼝榨汁,如正⾯投放時,蘋果尺⼨太⼤,可將蘋果側 ⾯或切半投入。 投入材料後請⽤推料杆緩緩地按壓幫助榨汁(推料杆是為了防⽌榨出的原汁濺 出和蘋果尺⼨太⼤投入不到填料⼝做輔助之⽤)。 蘋果等榨汁時會產⽣很多泡沫的榨汁材料請將原汁蓋打開使⽤(原汁蓋關上使 ⽤時會產⽣很多泡沫)。 榨汁後,因為氧化作⽤,會產⽣分層/泡沫/變⾊等現象,請盡快飲⽤為最佳。 蘋果原汁榨取時產⽣的泡沫使⽤濾網的話能喝到更清新的原汁。 果⾁較硬的材料 | ⽢筍、雪蓮果、葉菜類等 ⽢筍屬於果⾁比較硬的材料,榨汁前將其整個放涼⽔中浸泡3個⼩時,效果更好。 將整個⽢筍投入填料⼝,如尺⼨⼤於填料⼝,請切半投入。 請通過透明容器確認過濾網內部剩餘材料後再投入。 確認正常榨汁後慢慢的投入材料。 與果汁比較多的材料⼀起進⾏榨汁榨汁率比較好。 ZH-HK...
- Page 16 3. 產品使用 纖維質較多的材料 | 芹菜,⽔芹菜, 神仙草等 芹菜、⽔芹菜、神仙草等纖維質比較多的榨汁材料對螺旋軸的榨汁會產⽣影響。 每次的榨汁量控制在500ml以下為好,超過時請將容器清洗後再使⽤。 神仙草榨汁是將其切成1cm以下的⼩段再投入使⽤。如果超過1cm的⼤⼩, 螺旋軸將無法榨汁。 禁⽌放入的材料 | 植物油、動物油等 原果慢磨原汁寶最適合⽤於⽔果和蔬菜的原汁榨取。 請不要⽤原果慢磨原汁寶來榨食⽤油(芝⿇等)。 請不要使⽤含有⼤量植物、動物油的材料進⾏榨汁。 放入植物、動物油會使螺旋軸的性能下降或被損傷,如有此情況會作為故意損 壞處理。 ZH-HK...
-
Page 17: 清洗與保養
4. 清洗與保養 拆卸和清洗⽅法 請把開關置於“停⽌”後,拔掉電源插頭 等原汁提取容器裡⾯的纖维全部排出後,按“停⽌”開關 為了拆洗⽅便,纖維排完後持續空轉30 秒左右 ← → ← → 注意 : 蓋⼦不好拆洗時,請按反轉 停⽌ 正轉反覆操作連續2- 3 次。 然後按住蓋⼦上部的同時,⼀邊旋轉蓋⼦⼀邊打開。 榨完後,往填料⼝注⽔,簡單清洗後拆下蓋⼦會更順利。 將容器蓋⼦按照逆時針⽅向旋轉後 再將蓋⼦拿下 注意 :請不要握住蓋⼦來移動主機,請⼀定 要握著住主機(把⼿部位) 來移動機器 請將原汁提取容器套件向上提起,再 將容器整個取下 ZH-HK... - Page 18 4. 清洗與保養 從容器中分解刮壁器,過濾網,螺旋軸。 按照安裝⽅向的反⽅向將各配件分解後, 再⽤刷⼦進⾏清洗 使⽤後,如果不⾺上清洗,残留物會變乾 附著不僅使拆卸和清洗變得困難,⽽且還 會使性能降低,請注意。 原汁提取容器套件的拆法很簡單,放在洗 碗池内,冲⼀下⾃來⽔就⾃然分離。 請擦乾螺旋軸軸⼼裡⾯的積⽔。 請在⾃來⽔下將容器底的矽膠塞打開清洗 參考 : ⼩蘇打或者廚房⽤天然去污劑放⼀兩 滴在⽔中,浸泡30分鐘左右可以洗得 更乾淨。 ZH-HK...
- Page 19 4. 清洗與保養 ⽤洗碗海綿在⾃來⽔下沖洗後再拿清洗刷除 去螺旋軸的根部塞入的異物。(籽的殘渣) 參考 : 螺旋軸在⾃來⽔下⽤清洗刷即可沖洗乾淨。 清洗之後請保持乾燥使⽤。原汁提取容器 套件安裝前,請確認螺旋軸內沒有異物。 注意 : 注意使⽤了內有⼩籽的材料(覆盆⼦、葡 萄等)後,請⼀定將螺旋軸底部的槽內清 洗乾淨,若有殘留榨汁時螺旋軸和過濾網 之間會產⽣不規律運轉,從⽽出現螺旋軸 被卡現象。 主機可以⽤含有少量⽔份的抹布擦拭 注意 : ⽔份太多或太濕的抹布⼀定擰乾後再擦拭。 ZH-HK...
- Page 20 4. 清洗與保養 矽膠配件的清洗⽅法 參考 : 刮壁器⽤⾃來⽔沖洗 請乾燥後使⽤,安裝原汁提取容器元件之前,請先確認好膠塞⼦與矽膠環是否安裝正確。 注意 : 如果沒有正確的安裝好矽膠塞⼦和矽膠環,原汁量會減少或漏汁。 矽膠刷清洗後組裝 矽膠刷 可以拆卸清洗 清洗後,矽膠刷的尾部要朝下,如圖所⽰ 按順序從下往上的順序安裝。 矽膠塞清洗後的組裝 矽膠塞 可以打開清洗 清洗後,按照圖⽰標出的⽅向 完全塞緊。 矽膠環清洗後的組裝 矽膠環 可以拆卸清洗 清洗後將矽膠環對準槽,寬的⼀邊 朝上往下如圖⽰安裝使⽤。 ZH-HK...
-
Page 21: 疑難排解
5. 疑難排解 產品使⽤過程中,若遇以下情況可對照查詢,⾃主解決。 序號 故障情況 解決辦法 請確認插頭是否插好 不通電時 請確認容器和蓋子是否正確地組裝好 原汁提取容器整個和主機是否正確組裝好 根據材料中水份含量的不同,出汁量會有差異 材料不新鮮也是出汁量少的原因之一 請確認矽膠塞是否塞好 出汁少 使用少水份的材料榨的汁少的時候,可以將材料洗凈, 放在水裡泡一會兒,可以增加汁量 小的或是有籽的材料進行大量榨汁時, 請中途拆卸容器 套件進行清洗再使用,可使榨汁更順暢 根據材料的不同,原汁含的細纖維含量會有所不同 原汁內有很多細纖維 如果螺旋軸和過濾網影響榨汁效果時請更換(有償)配 件使用 蓋不上蓋子 螺旋軸要在過濾網中完全旋轉安裝好後蓋子才能蓋上 請確認組裝狀態後使用 不放材料和水空轉旋轉刮壁器會發出噪音,沒有放入榨 汁材料時請不要空轉機器,機器易發生故障 機子在使用中有噪音 投入材料後,螺旋軸和過濾網的摩擦的噪音會消失 如果投入材料後還有噪音,請確認投入量是否過多 產品放在傾斜的地方使用也會發出噪音,請置於水平面 上使用 請確認插頭是否插好 請確認各配件的組織狀態是否正確 材料的投入量過多也會造成停機 ← → 如果是材料過多的原因導致停機,請按照反轉 停止 使用中突然停機... - Page 22 5. 疑難排解 序號 故障情況 解決辦法 剛開機時渣滓水份會多一些 排出的果渣中 根據材料的狀態不同排出量也會不同。特別是材料不新 水份含量多 鮮的時候,原汁會和渣滓一起被排出 容器稍微搖晃屬於正常現象,是結構上這樣設計的 機器運行時容器搖晃 材料纖維質越硬,搖晃的可能更大 根據材料的密度不同,會有分層現象。這與高速度榨汁 原汁有分層現象 機的分層現象完全不同,是材料本身的特性 榨完後,繼續運轉30秒左右使裡面的渣滓全部排出 如果容器裡面的果渣沒有全部排出,容器的蓋子不容易 容器蓋子打不開 ← → ← → 打開。這時注入水的同時按反轉 停止 正轉的方法 反覆操作2-3次,然後按住蓋子上部的同時向開的方向 旋轉蓋子 如果沒有正確塞好矽膠塞子和矽膠環,原汁會從主機上 原汁從主機上部流出來 部流出來。所以使用前請確認好矽膠塞與矽膠環的安裝 狀態 使用後請及時清洗,不然乾的渣滓會黏附在容器上,不 好清洗又不好拆,有時會導致性能下降 使用含類胡蘿蔔系列色素的胡蘿蔔(甘筍)、菠菜等材料 榨汁後容器和配件 被著色 後,螺旋軸會變綠,刮璧器和容器會變橙色。此時先用 食用油擦拭後再用洗滌劑清洗就可以了 原汁提取容器中的矽膠配件可以拆洗,以免著色 ZH-HK...
- Page 23 Congratulations on the purchase of your Primada Whole Slow Juicer! We hope it brings you many years of satisfaction. We trust the purchase of your new Whole Slow Juicer will help you for fast/convenient cooking. Let you enjoy cooking and delicious foods.
- Page 24 Contents ................23 1. Important Safety Instructions ..........24 2. Package Contents and Technical Specifications ..................24 Package Contents ................25 Technical Specifications ..................25 Product Diagram ........................26 3. Operating .....................26 Before Using ....................26 Operation ....................29 Reminder ................31 Functions Explaination ..................36 4. Cleaning and Maintence ......................40 5.
-
Page 25: Important Safety Instructions
1. Important Safety Instructions READ ALL INSTRUCTIONS BEFORE USING THIS APPLIANCE. PLEASE KEEP THE INSTRUCTION MANUAL NEARBY. When using our product, basic precautions should always be followed, including the following: 1. Please make sure your power supply voltage matches the power voltage marked on rating label. -
Page 26: Package Contents And Technical Specifications
2. Package Contents and Technical Specifications 2.1 Package Contents Items included Juice Cup PSJ260 Pulp Cup Rotation Wiper Strainer (Juice) Juicing Screw Pusher Strainer (Ice Cream) Cleaning Brush Power Cable Instruction Manual Warranty... -
Page 27: Technical Specifications
2. Package Contents and Technical Specifications 2.2 Technical Specifications Product Name Whole Slow Juicer Model PSJ260 Voltage 220-240V 50/60 Hz Power Consumption 240W Maximum Use Around 30 min Weight 7.5kg 25x16x47cm Dimension Package Contents and Technical and design specifications may be changed in the course of continuous product improvement. -
Page 28: Operating
3. Operating 3.1 Before Using Wash the parts before first use Ensure that compression silicone and silicone ring are assembled properly 3.2 Operation Top-set Assembly Firmly insert the silicone lip into the slot below the pulp spout. The juicer may leak if not assembled properly. Assemble the strainer into the rotation wiper then place this assembly into the juicing bowl ensuring the red dot... - Page 29 3. Operating Place the juicing screw into the strainer. Turn and press down on it until it clicks into place. The juicing screw needs to be locked in place in order to close the drum lid. Place the drum lid on to the juicing bowl aligning the red dot on the drum lid with the red dot on the juicing bowl.
- Page 30 3. Operating Place the bowl on the base so that its red arrow lines up with the white arrow on the base. Once assembled, turn the drum lid clock wise to close. Open/Close mark on the top-set. Juicer will not operate if parts are not assembled properly.
-
Page 31: Reminder
3. Operating 3.3 Reminder Operating the juicer without ingredients can cause damage to the screw. Do not continuously operate the juicer for more than 30 minutes. This can damage the motor from overheating. After continuous use, let the juicer rest for 30 minutes to cool down before starting another session. - Page 32 3. Operating DO NOT put the following ingredients into the Whole Slow Juicer: *Juicer damage due to owner negligence or from not following the instructions in the owner’s manual will void the warranty service. Peach, nectarines, apricot, plum, mango, etc. Hard seeds Remove hard seeds before juicing.
-
Page 33: Functions Explaination
3. Operating 3.4 Functions Explaination 1.After preparing the ingredients, plug the power cord into a wall outlet Do not touch the power cord with wet hands. (It may cause electrical shock, short-circuit, or fire) Check the safety of the wall outlet. 2.Press the FORWARD button to operate Forward: Pulls down and slowly masticates the ingredients. - Page 34 3. Operating 3.Insert the prepared ingredients one piece at a time Each ingredient should be prepared and extracted depending on its characteristics and properties. Fibrous leafy vegetables (celery, kale, etc.): Separate each stem. Cut the outer stems that are thick and tough to 4 inches long or less. Bundle up the leafy vegetables as inserting into the juicer.
- Page 35 3. Operating HOW TO USE THE STRAINER(ICE CREAM) * Note: Strainer(Ice Cream) will be referred as ice cream strainer below * before use, make sure the silicone cover is correctly in place To assemble the top-set, place the juicing screw and the ice cream strainer in the juicing bowl and close the lid.
- Page 36 3. Operating TIPS ON INGREDIENTS Soft fruits and vegetables 丨 e.g. oranges, tomatoes Slowly insert the ingredients one piece at a time. Use the pusher to push the ingredients down the feeding tube. (The pusher also helps prevent juice from spraying out of the feeding tube when extracting ingredients with high water content) Leave the Anti-Drip Cap open when juicing ingredients that create excessive foam during extraction.
- Page 37 3. Operating High fiber content juicing ingredients 丨 e.g. celery, ginger Ingredients like celery or ginger contain long fibers that may wrap around the juicing screw and affect the juicer’s performance. Juicing fibrous ingredients should not exceed 500ml of juice at once. After collecting this quantity, clean the top-set completely before juicing again.
-
Page 38: Cleaning And Maintence
4. Cleaning and Maintenance Cleaning and Maintenance Switch OFF and unplug the power cord from the wall outlet. Extract all the remaining pulp in the juicing bowl before stopping the juicer. For easier clean up, operate the juicer for an additional 30 seconds after the juice is extracted. - Page 39 4. Cleaning and Maintenance Remove the juicing screw, strainer, and rotation wiper unit from the juicing bowl. Clean with provided brush. For easier disassembly, place the top-set in the sink and run the water through from the top of the top-set. Thoroughly clean all the crevices on the bottom of the juicing screw after each use.
- Page 40 4. Cleaning and Maintenance Clear all crevices on the bottom of the juicing screw. For example: Seeds Note : Any residue under the juicing screw will result in juicing screw being jammed when operating. Clean the juicing screw with running water. Thoroughly dry the bottom of the juicing screw where it connects to the metal cylinder shaft on the base.
- Page 41 4. Cleaning and Maintenance How to clean silicone components Clean the rotation wiper with running water. Please dry the components before using and ensure that the compression silicone and the silicone ring are assembled properly. Note : If the compression silicone and silicone ring are not assembled properly, the juicing yield would decrease or leak.
-
Page 42: Troubleshooting
5. Troubleshooting Please use this chart to troubleshoot common problems occurring while using the product. Problem Solution Check if the power cord is properly plugged in. When there is no Check if the drum lid and the juicing bowl are properly power to the juicer assembled. - Page 43 5. Troubleshooting Problem Solution Check if the parts are assembled correctly. Try reassembling the parts and listen for the odd noise. Do not start the juicer unless there are ingredients and/or liquid in it. If the juicer is operated without ingredients or liquid, the Odd noise from noise level can increase and also lead to damage.
- Page 44 5. Troubleshooting Problem Solution The juicing screw and the strainer are set up to crush and squeeze the ingredients. It is normal for the juicing screw and the strainer to vibrate. During operation, the juicing bowl shakes If the ingredient contains strong fiber, the vibration from the top-set may be stronger.
- Page 45 Tel: (852) 2365 0655 iPlus Home Limited...
Need help?
Do you have a question about the PSJ260 and is the answer not in the manual?
Questions and answers