
Related Manuals for Mobility scooters IGO Out Rider GR575

Summary of Contents for Mobility scooters IGO Out Rider GR575
- Page 1 Owner’s Manual Model GR575 Tel: 0861467772; Website: www.mobilityscooters.co.za - www.igomobility.co.za ...
- Page 2 We ask that you read this manual completely before operating your new IGO Out Rider. Mobility Scooters is not and cannot be held responsible for any damage or injury incurred due to improper or unsafe use of the IGO Out Rider scooter.
-
Page 3: Table Of Contents
CONTENTS I. INTRODUCTION.…………………………………………………………………………... 4-6 Features and Benefits………………………………………………………………………….. 5 Accessories for the IGO Out Rider Scooter..……………………………………….. 6 II. SAFETY.……………………………………………………………………………………. 7-11 III. EMI/RFI..…………………………………………………………………………………..12 IV. YOUR IGO Out Rider..……………………………………………………....13 Specifications..…………………………………………………………………………….. 14-15 V. OPERATION..……………………………………………………………………………… 16 Control Panel……………………………………………………………………………….. 16-17 Control Options..………………………………………………………………………..17 Seating……………………………………………………………………………………….. 18-19 Freewheel Mode.……………………………………………………………………………….. -
Page 4: Introduction
Rider combines cutting edge technology with attractive designs that are also highly functional in today’s world. We at Mobility Scooters know that you have chosen a scooter that will give you years of dependable operation and also will enhance the quality of your life by providing you with the mobility to experience an active daily lifestyle. -
Page 5: Features And Benefits
I. INTRODUCTION FEATURES AND BENEFITS Your IGO Out Rider scooter has been designed with your comfort in mind. It has also been designed to be a safe method of transportation when safety and operating instructions are followed. Please review the features and benefits of certain components of the IGO Out Rider scooter below. -
Page 6: Accessories For The Igo Out Rider Scooter
I. INTRODUCTION ACCESSORIES FOR THE iGO OUT RIDER SCOOTER: A variety of accessories are available for your IGO Out Rider Scooter. Please contact your Authorized Mobility Scooters Provider for more information or to order. • Cane Holder Tube • Cup Holder •... -
Page 7: Safety
Mobility Scooters provider determine if it is advisable for you to practice getting on and off your IGO Out Rider and operating it in the presence of an attendant. BEFORE GETTING ON YOUR IGO Out Rider • Check to be certain that the power is turned off. See section V. "Operation" in this manual. - Page 8 • Whenever it is safely possible, drive forward down any ramp, low rise, or incline. Mobility Scooters does not recommend that you drive your scooter in reverse down any incline, ramp, curb, or low rise. Backing down any slope may create a very hazardous situation.
- Page 9 II. SAFETY When using either of the following procedures to back down a slope, Mobility Scooters strongly advises that you have the assistance of another person. Procedure 1 - Under Power 1. Set the key switch to the “Off” position. See section V. “Operation.”...
- Page 10 The more mobility your IGO Out Rider brings to you, the happier you will be, and the more satisfied we at Mobility Scooters will be! But as with all things, especially motor operated vehicles, observing a few rules and safety considerations will help ensure safe scooter operation.
- Page 11 II. SAFETY RULES FOR USE AND OTHER SAFETY CONSIDERATIONS – continued • Always use caution when driving on soft or uneven surfaces such as grass or gravel. Also use caution on decks where there is no railing. • Never drive on the roadway, except when you must cross the street. •...
-
Page 12: Emi/Rfi
• If unintended movement or park brake release occurs, turn your scooter off as soon as it is safe to do so. • Report all incidents of unintended movement or park brake failure to Mobility Scooters Technical Service at 0861467772. -
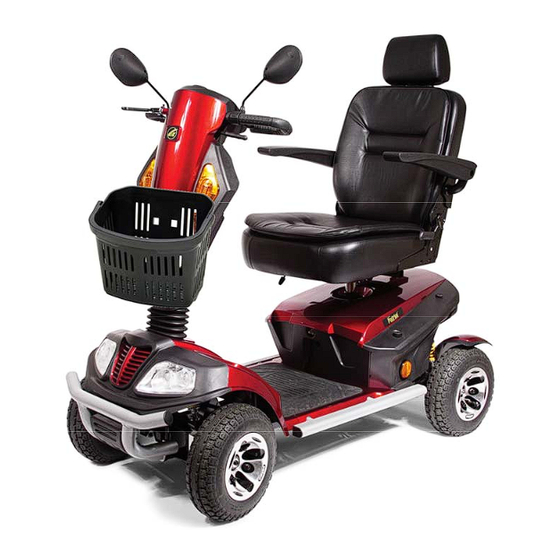
Page 13: Your Igo Out Rider
Figure 4. Your IGO Out Rider (Model GR575) FOR YOUR RECORDS Please fill in your soocter's information below. This information will be useful in the event that you ever need to contact Mobility Scooters concerning your scooter. Model ________________ Serial Number__________________________________________ Date of Purchase __________________ Body Color_______________... -
Page 14: Specifications
IV. YOUR IGO Out Rider Specification GR575 Medicare Code Not Coded Weight capacity 400 lbs. Drive Wheels Rear Maximum speed 8 mph Operating Range 24 miles Ground Clearance to Center Deck 6.75”... - Page 15 2. Electronics warranty excludes batteries. 3. Inflate tires to the maximum tire pressure recommended by the tire manufacturer. Literature is current at the time of printing. Mobility Scooters reserves the right to make changes to the product or literature at any time.
-
Page 16: Operation
V. OPERATION LED Battery Meter Speed Adjustment Mirror Emergency Light Button Head Light Locking Hand Button Brake Left Turn Right Turn Signal Button Signal Button Throttle Throttle Control Lever Control Lever Horn Button Key Switch Horn Button Figure 5. IGO Out Rider Delta Tiller Control Panel CONTROL PANEL Speed Adjustment Dial •... -
Page 17: Control Options
You will hear a “click” when the park brake engages. Control Options Mobility Scooters has made provision for the individual needs and abilities of the operators of the IGO Out Rider. Your authorized Mobility Scooters provider can reverse the throttle control lever... -
Page 18: Seating
V. OPERATION High/Low Speed Switch Flip the switch to the “H” position for a quick burst of speed when needed, or to the “L” position to conserve your battery charge. See figure 17 on page 31. SEATING Flip-up Armrests Pull up on the end of either armrest to flip it up for easy transfer on or off your IGO Out Rider. - Page 19 V. OPERATION Seat Rotation Lever Figure 7: Seat Rotation Adjustment Seat Rotation Lever The seat can be rotated through 360° and locked at any 45° position. 1. Push down on the seat rotation lever and rotate the seat to the desired position. See figure 7.
-
Page 20: Freewheel Mode
V. OPERATION Never sit on your IGO Out Rider in freewheel mode. Never disengage the park brake while you are operating your IGO Out Rider. Always make certain that your scooter park brake is engaged before inserting the key into the key switch and turning it to the on position. FREEWHEEL MODE Your IGO Out Rider is equipped with a freewheel lever that can set your scooter in or out of freewheel mode. -
Page 21: Riding Your Igo Out Rider Scooter
VI. RIDING YOUR IGO Out Rider MOUNTING For your first driving session, make certain that your IGO Out Rider starts out on a level surface and that you will continue driving on a level surface. BEFORE GETTING ON YOUR IGO Out Rider 1. -
Page 22: Basic Driving
VI. RIDING YOUR IGO Out Rider BASIC DRIVING 1. Make certain that you are seated safely and properly on your IGO Out Rider. 2. Turn the speed control dial fully counterclockwise to its slowest setting. 3. Insert the key into the key switch—if you have not already done so. 4. -
Page 23: Steering In Tight Spots
VI. RIDING YOUR IGO Out Rider Steering in a Tight Spot If you must steer in a tight spot, such as entering a doorway or when turning around: 1. Bring your IGO Out Rider to a full stop. 2. Set speed at the lowest setting. 3. - Page 24 VI. RIDING YOUR IGO Out Rider CONTROL THROUGH TIGHT SPOTS As you use your IGO Out Rider to greatly increase your mobility, you will undoubtedly encounter some obstacles that will require practice to negotiate smoothly and safely. Below are some common obstacles that you may meet during the daily use of your scoot-er. Listed with those obstacles are some driving tips that should help you conquer those obstacles.
-
Page 25: Disassembly
VII. DISASSEMBLY DISASSEMBLY When disassembling your scooter, please be sure to follow these simple instructions. Remove the Seat 1. Place your scooter on a level surface. Remove the key from the key switch before you begin to disassemble your IGO Out Rider. 2. - Page 26 VII. DISASSEMBLY Remove the Tiller Basket 7. Remove the tiller basket by pulling up. Fold Down and Lock the Tiller 8. Use one hand to grasp and squeeze the tiller handle. While squeezing the handle, fold the tiller down and release the handle to lock the tiller in place. This will create a lower profile, which will make carrying or transporting the scooter easier.
-
Page 27: Assembly
VIII. ASSEMBLY WARNING! Be aware of any possible pinch-points! Please note warning labels at pinch-points during assembly. WARNING! Pinching and crushing hazard! Increased hazards due to pinching or crushing result due to the component weight (such as batteries) during preparation for transport and maintenance work. Always carry out any work to be done with great care. - Page 28 VIII. ASSEMBLY Install the Batteries 1. Gently lower the batteries (2) into the battery compartment, and secure each battery down with a Velcro strap. See figure 15. 2. Plug the battery cables (2) into their matching color coded connectors on the scooter. Install the Battery Cover 3.
-
Page 29: Transporting Your Igo Out Rider
IX. TRANSPORTING YOUR IGO Out Rider The iGo Out Rider can be equipped with a docking device for loading onto a vehicle by means of a mechanical lift or hoist. Contact your Mobility Scooters provider for more information concerning docking devices and scooter lift devices. -
Page 30: Care And Maintenance
X. CARE AND MAINTENANCE ROUTINE MAINTENANCE Your scooter requires a minimal amount of care and maintenance. If you do not feel confident in your ability to perform the maintenance listed below, you can schedule an inspection and maintenance with your provider. ... -
Page 31: Batteries And Charging
X. CARE AND MAINTENANCE IMPORTANT! New batteries MUST be fully charged prior to the initial use of your scoot- er. Charge new batteries for 12 hours even if the battery gauge already shows a full charge. This is to condition your new batteries for maximum performance. WARNING! Corrosive chemicals contained inside the battery. -
Page 32: If Your Igo Out Rider Does Not Operate
Remedy: • Recharge your Patriot’s batteries. See “Batteries and Charging” on page 31. • If the problem continues, have your authorized Mobility Scooters provider load test the batteries. • If the batteries are good, the charger may be the problem. Consult your authorized Mobility Scooters provider. -
Page 33: Proper Tire Inflation
X. CARE AND MAINTENANCE PROPER TIRE INFLATION Mobility Scooters does not recommend that you disassemble the tire from the split rim wheels. Consult your authorized Mobility Scooters provider for assistance with this matter. If you must disassemble a pneumatic tire from the split rim, the tire must be completely deflated. If the tire is not completely deflated, serious injury may occur. - Page 34 WITH THE SERIAL NUMBER OF YOUR SCOOTER CAN BE FOUND UNDER THE FLOOR MAT. THIS WILL ALLOW YOU TO ACCESS THIS IMPORTANT SERVICE INFORMATION AT ANY TIME. IF POSSIBLE, PLEASE REFER TO THIS INFORMATION BEFORE CONTACTING YOUR AUTHORIZED Mobility Scooters PROVIDER. 34 ...
Need help?
Do you have a question about the IGO Out Rider GR575 and is the answer not in the manual?
Questions and answers