Table of Contents
Advertisement
Advertisement
Table of Contents

Related Manuals for Avady ChloriProtect Rx

Summary of Contents for Avady ChloriProtect Rx
- Page 1 INSTRUCTIONS AND USER MANUAL ChloriProtect Rx www.avadypool.com...
-
Page 2: Table Of Contents
Instructions and user manual ChloriProtect NOT004ENV05 SUMMARY - WARNINGS AND TIPS ........................ 1 1.1 - GUARANTEE AND WARNING ..................1 1.2 - SHIPPING AND TRANSPORTING ................... 1 1.3 - PROPER USE OF THE DEVICE ..................1 1.4 - RISKS ........................... 1 1.5 - TOXIC AND/OR DANGEROUS LIQUID DOSAGE .............. - Page 3 Instructions and user manual ChloriProtect NOT004ENV05 4.5 Adjustment of the set point ....................7 5.0 ALARMS « ALR » ..........................7 6.0 MAINTENANCE ..........................8 6.1 Maintenance of the electrode ....................8 6.2 Electrode wintering ......................8 6.3 Calibration procedure ......................8 7.0 AFTER SALES SERVICE ........................
-
Page 4: Warnings And Tips
The shipping costs to OSNY are charged of the customer. If the repair is carried out as part of the warranty, return is supported by AVADY POOL. The wear parts excluded of the warranty are: pH or redox probe, injection valve, foot filter and peristaltic hose. -
Page 5: Toxic And/Or Dangerous Liquid Dosage
Instructions and user manual ChloriProtect NOT004ENV05 The electrical installation to which the device is connected must comply with the standards and good practice rule in force in the country under consideration. Use of electrical equipment always implies observance of some basic rules. In particular: - Do not touch with wet or damp hands or feet. -
Page 6: Description Of The Device
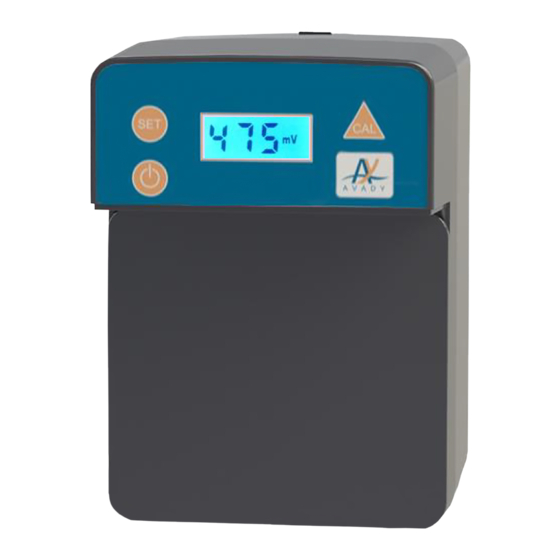
Instructions and user manual ChloriProtect NOT004ENV05 2.0 DESCRIPTION OF THE DEVICE ChloriProtect allows to eliminate the excesses of chlorine in the water of the swimming pool. A redox probe sends a signal giving the quantity of disinfectant in the water (display mV). When the rate of disinfectant is sufficient (defined by default in 640 mV), ChloriProtect stops a salt chlorinator. -
Page 7: Installation And Recommendation
Instructions and user manual ChloriProtect NOT004ENV05 3.0 INSTALLATION AND RECOMMENDATION Install the device in a dry place and well away from sources of heat, and at environmental temperature not exceeding 40°C. The device is to be located where flooding cannot occur. ... -
Page 8: Mounting Of The Probe On The Probe Holder
Instructions and user manual ChloriProtect NOT004ENV05 3.3 Mounting of the probe on the probe holder After removing the protective cap from the electrode and calibrate the probe (Cf 6.3), you need to insert all the parts as shown in the fig.7. When all parts are engaged, tighten the nut without blocking it then push slowly the electrode to the bottom of the hose and lift it about 2 cm so that the electrode tip is at the middle of the hose. -
Page 9: Connection Of The Cordon Of Supply Of The Electrolyser On The Connector
Instructions and user manual ChloriProtect NOT004ENV05 3.4.2 Connection of the cordon of supply of the electrolyser on the connector The cordon of food of a salt chlorinator is connected to ChloriProtect thanks to the connector E supplied in the kit. - Remove the sheath from the cable on 30 mm - Strip the 3 wires to obtain 7 mm of copper - Insert the wires like on the left picture:... -
Page 10: Operating Principle
Instructions and user manual ChloriProtect NOT004ENV05 4.3 Operating principle When the rate of disinfectant is insufficient: redox value < Value records (30 mV of mini gap) then: - The electrolyser with salt is fed - The device shows the redox value there mV When the rate of disinfectant is sufficient : redox value ≥... -
Page 11: Maintenance
Instructions and user manual ChloriProtect NOT004ENV05 6.0 MAINTENANCE We recommend you to change the electrode, if the measures aren’t good and to change the solution standard if you have a doubt on its quality after several uses or after the expiry date. Note that the average life cycle of an electrode varies from 6 to 18 months, according to the use. -
Page 12: After Sales Service
Instructions and user manual ChloriProtect NOT004ENV05 1) Remove the protective 2) During 20 minutes, let soak the cap of the probe and keep it probe to rinse it. We suggest you for reuse at the time of to start with this step. wintering. -
Page 13: Spare Parts List
Cleaning solution for probe pH-RX 250mL AVADY POOL - 9, Chaussée Jules César, Bâtiment 4 Hall 406 - 95520 OSNY - France Tél : +33 (0)1 34 48 16 03 Fax : +33 (0)1 78 76 73 95 Mail : contact@avadypool.com... - Page 14 Instructions and user manual ChloriProtect NOT004ENV05 NOTES AVADY POOL - 9, Chaussée Jules César, Bâtiment 4 Hall 406 - 95520 OSNY - France Tél : +33 (0)1 34 48 16 03 Fax : +33 (0)1 78 76 73 95 Mail : contact@avadypool.com Site : www.avadypool.com...
- Page 15 Instructions and user manual ChloriProtect NOT004ENV05 NOTES AVADY POOL - 9, Chaussée Jules César, Bâtiment 4 Hall 406 - 95520 OSNY - France Tél : +33 (0)1 34 48 16 03 Fax : +33 (0)1 78 76 73 95 Mail : contact@avadypool.com Site : www.avadypool.com...
- Page 16 Instructions and user manual ChloriProtect NOT004ENV05 NOTES AVADY POOL - 9, Chaussée Jules César, Bâtiment 4 Hall 406 - 95520 OSNY - France Tél : +33 (0)1 34 48 16 03 Fax : +33 (0)1 78 76 73 95 Mail : contact@avadypool.com Site : www.avadypool.com...
Need help?
Do you have a question about the ChloriProtect Rx and is the answer not in the manual?
Questions and answers