Advertisement
Quick Links
Wiring Diagram for
Pickup Models:
STL-1b, STR-1, STL-1, APTL-1,
APTR-1, STL52-1, STR52-1, STL-2,
STR-2, STL-3, STR-3, APTL-3JD
5427 hollister avenue, santa barbara, ca 93111
tel 805.964.9610 fax 805.964.9749
www.seymourduncan.com
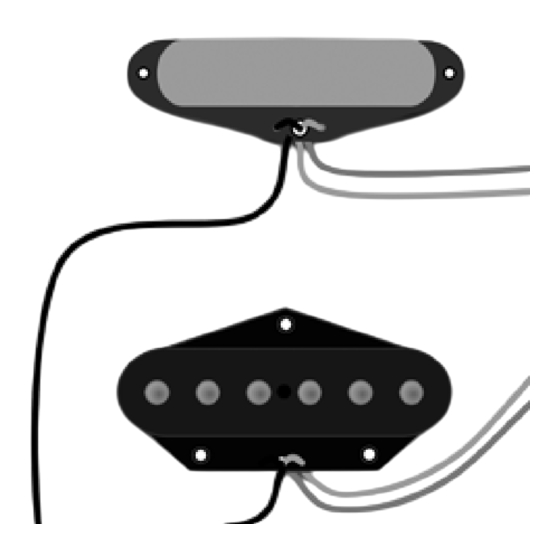
Fig. 1
Congratulations on your purchase of a fine, hand-built, Seymour Duncan electric guitar pickup! Installing
this pickup in your guitar isn't rocket science. And, if you're already handy with tools, it'll be a snap for
you–and fun too! But if you have no experience handling red-hot soldering irons, you'd be well advised
to take your new pickup and your trusty guitar to a qualified guitar tech.
The basic steps for Lead Pickups include:
1. Remove the strings from your guitar.
2. Remove the control plate and flip it over.
3. De-solder the original pickup's wires from the controls and make sure to
remember where they were connected.
4. Remove the original pickup from the bridge.
5. Put the Seymour Duncan pickup into the bridge.
6. Tin the wires from the Seymour Duncan pickup, and then solder them into place
(see Fig. 1. For tapped wiring options, see Fig. 2 and 3).
7. Re-attach the bridge to the top of the guitar.
8. Re-string your guitar and adjust the pickup height so that your new pickup is
set between 1/8" and 1/16" from the strings (when they are pressed down at
the highest fret on the neck). Then adjust the height of the rhythm pickup so that it
balances properly with the output of the lead pickup that you just installed.
For Rhythm Pickups see reverse side
Tele and Fender are registered trademarks of FMIC, with which Seymour Duncan is not affiliated.
250k
Volume
250k
Tone
If two pickups sound thin and wimpy when
used together, chances are, they're out of
phase with each other. If you're combining
your Seymour Duncan pickup(s) with Fender
pickup(s) in the same guitar, you'll probably
need to reverse the black and white wires on
the Seymour Duncan.
To Change the Phase of a
Lead Pickup
(Bottom View of Tele Lead Pickup)
1. Cut the small jumper-wire that is
soldered to the bottom plate (make sure the
connection is broken)
2. Connect the black wire to the 3-way switch,
and connect the white wire to ground.
3. Make sure the bridge is grounded with a
separate wire---to do this:
- Take a piece of wire and solder one end of it
to the bottom of the volume pot. Run the other
end of that wire into the lead pickup cavity.
- Strip about one inch of insulation from the
end of the wire.
- Place the exposed end of that wire on top of
the guitar's body, and screw the bridge down
on top of it. (some guitars will already have this
wire in place). The metal bridge will contact
the wire and create a ground connection for
the bridge and strings.
®
Advertisement

Subscribe to Our Youtube Channel
Summary of Contents for Duncan STL-1b
- Page 1 Congratulations on your purchase of a fine, hand-built, Seymour Duncan electric guitar pickup! Installing this pickup in your guitar isn’t rocket science. And, if you’re already handy with tools, it’ll be a snap for you–and fun too! But if you have no experience handling red-hot soldering irons, you’d be well advised to take your new pickup and your trusty guitar to a qualified guitar tech.
- Page 2 Vintage Tele Guitars: Modern Tele Guitars: ® ® 1. Remove the strings from your guitar. 1. Remove the strings from your guitar. 2. Remove the control plate and flip it over. 2. Remove the control plate and flip it over. 3. Remove the pickguard and set it aside. 3. Remove the pickguard and flip it over, taking care not to 4. De-solder the original pickup’s wires from the controls, and scratch your guitar’s finish. make sure to remember where they were connected. 4. De-solder the original pickup’s wires from the controls and 5. Remove the original pickup from the body of the guitar. make sure to remember where they were connected. 6. Install your new Seymour Duncan pickup using the provided 5. Remove the original pickup from the pickguard. wood screws and rubber spacers. 6. Put the Seymour Duncan pickup into the pickguard using the 7. Tin the wires of your new pickup and solder them into place original mounting screws and spacers. (see Fig. 1 or 2). 7. Tin the wires from your new pickup, and then solder them 8. Replace the pickguard and control plate. into place (see Fig. 1 or 2). 9. Re-string your guitar and adjust the height of your new 8. Replace the pickguard and control plate. rhythm pickup so that its output balances with the output of 9. Re-string your guitar and adjust the height of your new your guitar’s lead pickup. rhythm pickup so that its output balances with the output of your guitar’s lead pickup. Fig. 2 250k Volume Fig.


Need help?
Do you have a question about the STL-1b and is the answer not in the manual?
Questions and answers