Table of Contents
Advertisement
Steam Toaster Oven (For Household Use)
K01M Series
Instruction Manual
Thank you for purchasing BALMUDA The Toaster.
Important
Be sure to read this manual before use.
Keep in a safe place for future reference.
For information on warranty policy, please refer to
the BALMUDA website (https://us.balmuda.com).
FOR USE IN U.S. ONLY
WARRANTY VOID IF USED OUTSIDE U.S.
Limited Warranty
Contents
IMPORTANT SAFEGUARDS .........................1
SHORT
C ORD
INSTRUCTIONS....................2
Safety Precautions....................................3-7
Contents of the Package ............................8
Names of Parts ..............................................8
When Using for the First Time ............9,10
Control Panel/Display .............................. 11
Cooking.................................................. 12-14
Cooking Guidelines .................................. 14
Cleaning................................................. 15,16
Troubleshooting........................................ 16
Frequently Asked Questions ............ 17-18
Warranty Policy and Privacy Policy ....... 19
Support Center........................................... 19
Advertisement
Table of Contents

Subscribe to Our Youtube Channel
Related Manuals for BALMUDA K01M Series

Summary of Contents for BALMUDA K01M Series
-
Page 1: Table Of Contents
Contents Steam Toaster Oven (For Household Use) K01M Series IMPORTANT SAFEGUARDS ......1 SHORT C ORD INSTRUCTIONS....2 Instruction Manual Limited Warranty Safety Precautions........3-7 Contents of the Package ......8 Thank you for purchasing BALMUDA The Toaster. Names of Parts ..........8 When Using for the First Time ....9,10 Control Panel/Display ......11 Important Cooking..........12-14 Cooking Guidelines ........14 Be sure to read this manual before use. Cleaning..........15,16 Keep in a safe place for future reference. Troubleshooting........16 For information on warranty policy, please refer to Frequently Asked Questions .... 17-18 the BALMUDA website (https://us.balmuda.com). -
Page 2: Important Safeguards
12. To disconnect, turn the appliance off, then remove plug from outlet. 13. Do not use the appliance for other than intended purposes. 14. Do not put oversized foods or metal utensils in the appliance. Doing so may cause fire or electric shock. 15. Do not cover the appliance or allow it to touch flammable materials such as curtains, draperies, walls, etc. 16. Do not store any item on top of the appliance when in operation. 17. Do not clean with metal scouring pads. Pieces of the pad can break off and touch electrical parts, creating a risk of electric shock. 18. Use caution when using containers made of materials other than heatproof metal or glass. 19. Do not store any materials other than BALMUDA recommended accessories in the appliance when not in use. 20. Do not place any of the following materials in the appliance: flammable items (paper, cardboard, plastic, wood, etc.) or any items other than food or BALMUDA recommended accessories. 21. Do not cover the crumb catcher or any part of the appliance with metal foil. Doing so may cause overheating. 22. After use, press the power button to turn off the power and remove the plug from the outlet. 23. The appliance is for household use only. SAVE THESE INSTRUCTIONS. -
Page 3: Short C Ord Instructions
SHORT C ORD INSTRUCTIONS • A short power-supply cord is provided to reduce risks resulting from becoming entangled in or tripping over a longer cord. • Extension cords are available and may be used if care is exercised in their use. • If an extension cord is used: 1) The marked electrical rating of the extension cord should be at least as high as the electrical rating of the appliance. 2) This appliance is equipped with a grounded plug. The extension cord should be a grounding type 3-wire cord. 3) The extension cord should be arranged so that it does not drape over the counter top or table top where it can be pulled on by children or tripped over. About the plug This appliance has a grounded type plug for safety purposes. This plug is only compatible with 3-pin outlets. In order to avoid disabling this safety function, connect it to correctly grounded outlets only. Do not remove the grounding prong. Failing to connect the grounding conductor correctly may cause electric shock. If it is unclear whether the outlet is correctly grounded, consult a qualified electrician. Grounding prong ー2ー... -
Page 4: Safety Precautions
Read the Safety Precautions carefully before use to ensure correct operation. The precautions described in this manual must be followed to ensure safe use of this appliance and prevent hazards to you and other people, as well as damage to the appliance and your home or property. ● These symbols indicate the degree of harm or damage that may be caused by improper use. WARNING Indicates actions that may cause death or serious injury. CAUTION Indicates actions that may cause minor injury. NOTICE Indicates a property damage. ● These symbols indicate requirements during use of this appliance. Indicates prohibited actions that must not be performed. Indicates required actions that must be performed. Indicates risk of electric shock. Indicates risk of scalding or burns. Indicates general risk. WARNING This appliance is not intended for use by persons (including children) with reduced physical, sensory or mental capabilities, or lack of experience and knowledge, unless they have been given supervision or instruction concerning use of the appliance by a person responsible for their safety. Children should be supervised to ensure that they do not play with the appliance. Doing so may cause scalding (or burns), injury, or electric shock. Do not disassemble, repair, or modify this appliance. Doing so may cause malfunction or fire. For repair, please contact BALMUDA Support Center (p. 19). Do not use the appliance near flammable materials such as curtains. Doing so may cause fire. Do not place the appliance on flammable surfaces such as wooden counters, wood flooring or carpet. Doing so may cause fire. Do not submerge the appliance in water. Do not splash water on the appliance. Doing so may cause a short circuit or electric shock. ー3ー... - Page 5 Do not put anything other than tap water in the water inlet or boiler tray. Adding oil, seasonings, or food may cause electric shock or fire. Do not add more than one 5 cc cup of water to the water inlet at one time. Do not top up the water. Do not pour water anywhere other than into the water inlet. Do not use any container other than the 5 cc cup. Doing so may cause water to spill, causing malfunction, scalding, or electric shock (also see “Cooking” on p. 12). Do not insert or remove the power plug with wet hands. Doing so may cause electric shock. Do not use the appliance in any countries other than the U.S. Doing so may cause fire or malfunction. Do not apply pressure on the power cord. Do not do any of the following, as this may cause the power cord to overheat and catch fire: Scratch, modify, bend, pull, step on, twist or place the cord near heating devices. Do not place heavy items on the cord, or use while it is bundled. Do not use the appliance for any purpose other than those recommended in this instruction manual and by BALMUDA. Doing so may cause accidents such as fire or electric shock. BALMUDA accepts no responsibility in case of improper use or failure to follow these instructions. If smoke or fire appears during cooking, do not open the door until the flames go out and do not attempt to extinguish with water. Turn the power off and then unplug the power cord. Doing so may cause the glass to shatter or the fire to spread. Do not block the air inlets (the sides and underneath the door, and the bottom back side of the main unit) or cover the appliance. Doing so may cause burns, fire, or malfunction. Do not put any metal objects or foreign objects into the air inlet. Doing so may cause electric shock or malfunction. Do not insert food that is more than 2.2 inches high. To avoid excessive heating to the top, do not insert food that exceeds 2.2 inches in height. Doing so may cause fire. Do not use parchment paper, baking paper, or paper baking cups. Doing so may cause fire. Do not connect the appliance to an external timer or separate remote-control system. The appliance is not intended to be used with an external timer or separate remote-control system. Do not carry or tilt the appliance with water in the boiler. To check if there is water in the boiler wait until the unit is cool and remove the boiler cover. The water may spill, causing scalding or electric shock. ...
- Page 6 In the event of an abnormality or malfunction, stop using the appliance immediately. Failure to do so may cause fire, electric shock, or injury. In the event of an abnormality or malfunction, contact BALMUDA Support Center (p. 19). [Examples of abnormalities and malfunctions] · The power does not turn off. · The power cord and power plug are unusually hot. · The appliance is deformed or unusually hot. · The appliance falls or tips over. · The power cord is broken or stops powering the appliance when touched. · The appliance is hot when it is not in use. · Water is leaking from the appliance or boiler tray. · The heater tube is cracked. Unplug the appliance, allow it to cool, and wipe away any water from the boiler tray before cleaning or moving it. Failure to do so may cause scalding, burns, injury, or electric shock. Use an outlet that meets the appliance rating (10.9 A / 1300 W). Do not plug other electrical devices into the outlet when using the appliance. Using the appliance with an outlet that does not meet the appliance rating, or on a shared outlet with other devices, may cause overheating, resulting in fire. Be sure to use a grounded outlet. This appliance uses a grounded 3-pin plug for safety. If the ground is not connected, it may cause electric shock. Insert the power plug fully into the outlet. Do not use a damaged power plug or a power plug that cannot be plugged fully into the outlet. If the plug is not inserted properly, it may cause fire due to electric shock or heat. Clean the power plug regularly. Dust accumulated on the power plug may cause condensation, which can damage the cable and cause fire. Remove the power plug and wipe it with a dry cloth. Be sure to clean the appliance after use. Failure to do so may cause food residue left inside the appliance to carbonize, causing fire and smoke. When unplugging the cord, pull on the plug rather than the cord. Failure to do so may cause fire due to electric shock or short circuit. Keep accessories such as the 5 cc cup out of the reach of children. If the 5 cc cup is accidentally swallowed by infants or children, it may cause choking. If the appliance falls, it may cause injury or burns. CAUTION Stay near the appliance while operating. Failure to do so may cause fire. Be sure to turn the power off before leaving the appliance. It ...
- Page 7 Do not cook for longer than necessary. Failure to do so may cause fire. In modes other than Oven Mode, heat according to the time provided in the Instruction Manual or on the appliance. In Oven Mode, cook according to the standard time, and keep an eye on the progress of the cooking. Do not apply excessive force to the glass window or allow it to become wet. The glass may break, causing injury. Do not cook with the door open. Steam from the boiler may cause scalding or injury. Do not heat canned or bottled food directly. The can or bottle may break or be deformed, causing burns or injury. Do not add water to the boiler during heating. Doing so may cause scalding. Do not stare at the heater tube for extended periods of time. Doing so may damage your eyes. When taking out food or containers, use tongs or pot holders. Failure to do so may cause burns. Wear thick gloves when cleaning. Failure to do so may cause injury to the hands or fingers. Be sure to turn the power off when removing food from the appliance. Failure to do so may cause burns. Be sure to attach the toasting rack frame. If it is not attached the door may open unexpectedly, resulting in injury or malfunction. Use the included baking pan. Caution should be exercised when using other pans or dishes and may lead to injuries or accidents. After cooking or when the appliance is not in use, unplug the power cord from the outlet. Failure to do so may cause fire or electric shock due to deterioration of the insulation. Be sure to unplug the appliance from the outlet and allow the appliance to cool completely before cleaning. Failure to do so may cause injury or burns. NOTICE • Do not allow the water supply cover to become jammed between the door and the main unit. Doing so may cause malfunction. • When not in use, do not place anything other than the toasting rack or boiler cover in the appliance. Doing so may cause malfunction. • Be sure to attach the crumb catcher, toasting rack, and boiler cover when toasting. Doing so may cause malfunction.
- Page 8 Installation Precautions WARNING Do not place objects or accessories such as the 5 cc cup on top of, underneath, next to, inside, or in gaps around the appliance. Doing so may cause smoke, fire, or burns. Do not install the appliance in a location which may be affected by heat. Doing so may cause fire. Place the appliance on a flat, stable surface. Otherwise, the door may open during operation. This may cause water to spill, causing electric shock. It may also cause the appliance to tip over. Install the appliance with clearances to the top, left, right, and rear as illustrated below. If the wall is made of heat-sensitive material such as plastic, leave more space around the appliance. Heat and steam may build up, causing malfunction, fire, or discoloration/deformation of the surrounding walls. Be sure to use a heatproof dish when heating pizza and other foods that may drip oil on the heater tube. Food or oil may fall onto the heater tube and catch fire. At least At least 4 inches 6 inches above on each side At least 4 inches behind NOTICE • Do not place the appliance on top of other equipment, such as a microwave oven, or place other equipment on top. Heat from the other equipment may cause malfunction, or the heat and steam from the appliance may cause the other equipment to malfunction. ー7ー...
-
Page 9: Contents Of The Package
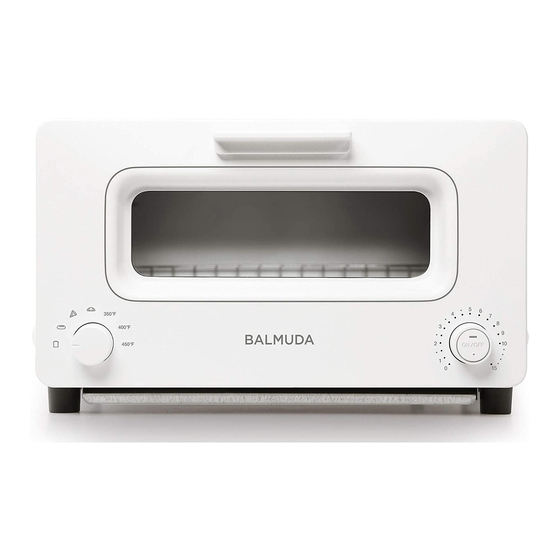
Contents of the Package Instruction manual 5 cc cup Guidebook (located in the styrofoam at the top) Main unit Preinstalled accessories Boiler cover Crumb catcher Toasting rack Baking pan · Do not block the holes of the crumb catcher. Doing so may cause malfunction. Names of Parts Water inlet Power button/Power indicator/ Glass Toasting rack frame Timer dial/Timer indicator Power plug Toasting Heater tube rack (top/bottom) Water supply cover Boiler cover Boiler cover (retractable) Handle Power cord Crumb catcher Door Mode selection dial Boiler tray Boiler tray ー8ー... -
Page 10: When Using For The First Time
When Using for the First Time When using the appliance for the first time, remove the tapes and attach the parts by following the steps below. Remove the tapes from locations ① to Attach the toasting rack. ④. Open the door and place the toasting rack ③ ② ④ on the toasting rack frame inside the ① appliance. When attaching the rack, make sure the four “feet” match the corresponding locations on the frame. Make sure the boiler cover is attached properly. · Open the door and make sure that the boiler cover is in place. · If it is out of place, place it on the boiler tray with “Front ▽” facing the front. · Place the boiler cover between the guides at both ends. Boiler cover Boiler cover Make sure the crumb catcher is properly attached. Guide Guide The crumb catcher is attached before the appliance is shipped from the factory. Attached correctly Crumb catcher If the crumb catcher is out of position, insert it correctly as illustrated below. ー9ー... - Page 11 Install. At least At least 4 inches 6 inches above on each side At least 4 inches behind · Do not place any objects including the 5 cc cup on top of, underneath, next to, inside, or in gaps around the appliance. · Do not install the appliance in a location which may be affected by heat. · Place the appliance on a flat, stable surface. · Install the appliance with clearances to the top, left, right, and rear as illustrated above. If the wall is made of heat-sensitive material such as plastic, leave more space around the appliance. · Do not place the appliance on top of other equipment such as a microwave oven, or place other equipment on top of the appliance. Insert the power plug into the outlet. ー10ー...
-
Page 12: Control Panel/Display
Control Panel/Display ❹ ❸ Mode selection dial ❺ ❷ The mode selection dial is used to select the heating mode. ❶ Steam function Mode Examples Estimated time Heater function ❶Sandwich Sandwich bread, English 2.5 to 3.5 Heats at a moderate temperature Bread Mode muffin minutes and reaches browning temperature at the end of the sequence (good for thin sliced bread). ❷Artisan Bread Sourdough bread, Rye 3 to 4 Heats at a moderate-high ○ Mode bread minutes temperature and maintains browning temperature through the latter part of the sequence (good for thick slices or fresh bread with high moisture content). Pizza, Bagel, Toast with Heats at a high temperature, ❸Pizza Mode 3 to 5 ... -
Page 13: Cooking
Cooking Pour water into the 5 cc cup. Insert the power plug into the outlet. · The water turns into steam to assist the heating. Open the door and place the food in · The amount of water required depends the center of the toasting rack. on the cooking mode and cooking time. Refer to the following table. 5 cc 3 cc Cooking Amount Cooking mode time of water Oven Mode None * 1 to 2.5 3 cc minutes Other modes 3 minutes 5 cc or more * When cooking in Oven Mode, do not · This appliance does not require add water as the boiler does not preheating. operate. If you add water, let the main · When placing food or containers, use unit cool before removing the toasting tongs or pot holders. rack and boiler cover and wiping with a · ... - Page 14 Cooking Turn the timer dial to set the cooking Close the door gently. time. Cooking starts. · Do not allow the water supply cover to become jammed between the door and · The appropriate toasting time varies the main unit. depending on the type, size, thickness, and number of slices of bread. Press the power button to turn on the · Bread with high sugar content may power. brown quickly. · Frozen bread takes longer to toast. The power indicator lights up with a beep Monitor the bread and adjust cooking sound. time as necessary. · The heating element automatically turns on and off during operation to control the temperature. This is not a malfunction. · Do not open the door while heating. The temperature inside the appliance will change, which will affect the toasting results. Turn the mode selection dial to select the cooking mode. When the beep sounds that cooking is complete, open the door gently and take out the food. · ...
-
Page 15: Cooking Guidelines
Press the power button to turn the Remove the power plug from the power off. outlet. The power indicator light will go out. · If the appliance is not operated within 30 seconds of being turned on, it will automatically turn off. Cooking Guidelines The appliance reaches more than 400 F degrees using a heater element. Keep the following points in mind during use. Do not leave the appliance unattended while cooking. Be sure to turn off the power by pressing the power button when you leave the appliance unattended. Especially when cooking foods that are rich in oil or sugar such as butter, jam, or cheese, keep an eye on the progress of the cooking. Do not use parchment paper, baking paper, or paper baking cups in the appliance. Doing so may cause fire. Do not use plastic or silicone containers. Doing so may cause fire. Do not cook for longer than necessary. Adjust the cooking time while keeping an eye on the progress of the cooking. Set the timer dial correctly. Do not heat canned or bottled foods directly. Doing so may cause scalding, burns or injury due to bursting or deformation. Do not use the appliance with food residue in the crumb catcher. It may carbonize and catch fire. Choose the correct mode for the food you are heating. Refer to “Mode selection dial” (p. 11) or Guidebook (separate booklet) to select the correct mode. Do not insert food that is higher than 2.2 inches. To avoid excessive heating on the top, do not insert food that exceeds 2.2 inches in height. Always use a heatproof dish when cooking meat, fish and fried foods. These foods may produce oil and other residue that can fall and accumulate on the toasting rack. Be sure to place the food on a heatproof dish or a sheet of aluminum foil to prevent food or oil from falling onto the heater tube and causing fire. When using aluminum foil, make sure that it does not touch the heater tube. -
Page 16: Cleaning
Cleaning Clean the appliance after every use. Before cleaning, unplug the power cord and allow the main unit to cool sufficiently. • Use thick gloves to protect your hands. ■Cleaning the toasting rack ① Remove the toasting ② Wash with diluted mild dish rack from the toasting soap and dry thoroughly. rack frame. ■Cleaning the boiler parts ① Remove the boiler cover in ② Wipe the boiler tray ③ Wash the boiler cover the direction of the arrow. with a soft cloth. with diluted mild dish soap and dry thoroughly. Boiler tray Boiler tray Boiler cover ■Cleaning the crumb catcher ① Remove the crumb ② Wash with diluted mild catcher in the dish soap and dry direction of the arrow. thoroughly. · Be sure to clean the crumb catcher after each use. ー15ー... -
Page 17: Troubleshooting
■Cleaning the inside and outside of the appliance Soak a soft cloth in diluted mild dish soap and wring it out well. Wipe the appliance and dry it thoroughly. · Be careful not to touch the heater tube. Doing so may cause it to break. If the heater tube is dirty, do not wipe it. Contact the BALMUDA Support Center (p. 19). · Food residue inside the appliance may cause uneven cooking. · Do not pour water directly on the appliance, as doing so may cause electric shock. Clean it only with a well wrung-out cloth. · To prevent damage to the product, use a soft cloth to clean. · Using other substances besides mild dish soap may cause malfunction. Troubleshooting If the timer indicator begins to flash and the buzzer sounds continuously, operation will stop for safety reasons. The blinking of the timer indicator and the buzzer sound will stop after 30 seconds. Unplug the power cord from the outlet and contact the BALMUDA Support Center (p. 19). Reasons why operation may stop Unusual high temperature before cooking · The temperature inside the appliance exceeds safety standards, such as when food inside is exceptionally hot. Unusual high temperature during and after cooking · The temperature inside the appliance does not fall due to heat generated by the food, etc. Malfunction of internal parts · The appliance's self-diagnosis function detects a malfunction of internal parts. ー16ー... -
Page 18: Frequently Asked Questions
▶ The appliance can be used as-is. ● Is the power turned off? No sound occurs when the mode selection dial is ▶ Press the power button to turn on the power. ● Is the power plug disconnected from the outlet? turned. The timer indicator does not ▶ Insert the power plug securely into the outlet. ● Has the breaker tripped? light up when the timer dial ▶ Reset the tripped breaker. is activated. The power does not turn off ● Possible malfunction. Contact the BALMUDA Support Center after about 30 seconds (p. 19). without operation. The door will not close. ● Are the toasting rack, toasting rack frame, boiler cover and crumb catcher properly attached? ▶ Refer to “When Using for the First Time” (p. 9) and attach the accessories correctly. ● Is anything caught between the main unit and the door, such as the water supply cover? ▶ Remove any such items. When water is added, it ▶ This happens if the boiler tray is hot (such as after continuous makes a sizzling sound. cooking). When water is added, it will make a sound as it evaporates inside the tray, but this does not affect the cooking. The amount of water that evaporates is limited so there is no need to add water even after the sizzling sound. There is water on the ... - Page 19 ● Points to check / ▶Solutions Issue The bread is not browned. ● Was the timer stopped during heating? ▶ In Sandwich Bread Mode, Artisan Bread Mode, and Pizza Mode, the bread needs to be heated until the timer reaches the end in order to be browned. If the timer is stopped during heating, the bread may not be browned. ● Browning may differ depending on the voltage supplied by the outlet, the temperature and humidity of the room, or the type of bread. ▶ The bread can be browned further by reheating at 450 ºF (Oven Mode) for the desired length of time. ● Is the bread too far from the heater tube? ▶ Place the bread in the center of the toasting rack. (p. 12) No steam is generated. ● Is the inside of the appliance hot? ▶ If the appliance is hot due to consecutive use, condensation will not occur and the steam will be invisible to the eye. This is not a malfunction. ● Was water poured in correctly before cooking? ▶ Refer to “Cooking” (p. 12) and cook with the correct amount of water. ● Is the Oven Mode operating? ▶ Steam does not generated when using the Oven Mode. Water remains in the boiler ● Was more than 5 cc of water been poured in? Was the heating after use. time set too short? ▶ If there is excess water in the boiler it may not boil away completely. When heating for 1 to 2.5 min do not add more than 3 cc (the inner line of the 5 cc cup), and for a longer heating cycle do not add more than 5 cc. ● Is the Oven Mode operating? ▶ Steam is not generated in the Oven Mode and water will remain in the boiler. The center of the heater ▶ Due to the structure of the heater tube, the center remains dark. tube does not glow red. This is not a malfunction. ー18ー...
-
Page 20: Warranty Policy And Privacy Policy
Warranty Policy and Privacy Policy For information on warranty and privacy policies, please refer to the BALMUDA website (https://us.balmuda.com). Product Specifications Model K01M Series Power supply 120 V 〜 60 Hz Rated power consumption 1300 W Timer 1 to 10/15 minutes Unit weight Approx. 10.2 lbs. Unit dimensions W 14.1 in. × D 12.6 in. × H 8.2 in. Length of power cord Approx. 3.3 ft. Purpose Household use, indoor use 833-333-1033 https://us.balmuda.com ELB-P038 ー19ー...
Need help?
Do you have a question about the K01M Series and is the answer not in the manual?
Questions and answers