Advertisement
Quick Links
Advertisement

Related Manuals for Radix GEN-600

Summary of Contents for Radix GEN-600
- Page 1 MODEL: GEN-600 INSTALLATION USER GUIDE...
- Page 2 1 Instruction 1.1 General Description This is a powerful and reliable digital scouting and infrared surveillance camera with a wide-angle lens, triggered by any movement of humans or animals monitored by a high sensitive Passive Infrared (PIR) motion sensor, and automatically captures high quality pictures (32MP) or records video clips (1920x1080P) according to default settings or preset settings.
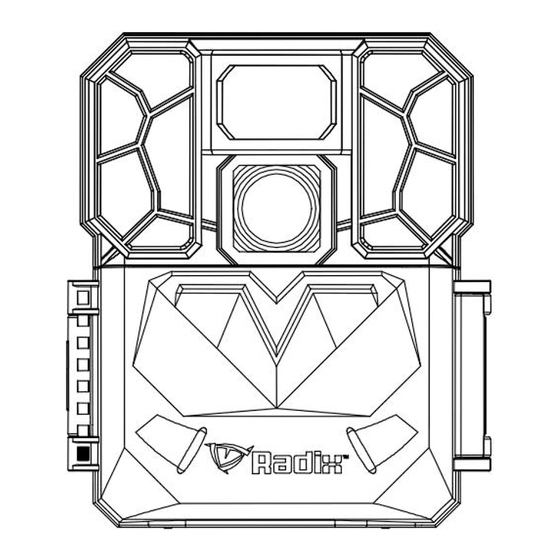
- Page 3 1.3 Diagram of camera functional indicators Motion Sensor Camera Lens IR Leds Motion/Low Battery Light Sensor Indicator LCD Screen Power/Mode Switch Menu Button OK Button Battery Box Button Programming Buttons Microphone Figure 2 Diagram of Camera Functional Indicators 1.4 Shooting Information Display When the camera is turned on (the power switch is slid to TEST position), the current settings will be displayed on LCD.
- Page 4 1.5 Supported Format Item Format Photo Video File FAT32 Note: The file system format is not a concern of the camera unless you have problems with reading the SD card with other devices. If this happens, please format the SD card in the camera or in a computer and then reinsert the card into your camera.
- Page 5 3 Quick Start Guide 3.1 Power Supply To supply power for the camera, 6 AA batteries are needed. Confirm that the power switch is in OFF position and pull out the battery pack by pressing Battery Button. Load the fully charged batteries into the pack according to the polarities signs.
- Page 6 Note: If the switch of SD card is turned to LOCK, the SD card will not store files. Please unlock the write-protection before inserting the SD card. Warning: Inserting the SD card upside down or backwards could damage the camera or the card. Damage resulting from inserting the card incorrectly is not covered under warranty.
- Page 7 Most poor pictures are due to user error. If you need further instruction on setup, please contact Radix Trail Cameras directly. Before switching ON, please pay attention to the following: Avoid temperature and motion disturbances in front of the camera such as a big leaf, curtain, air-conditioner, air outlet of the chimney and other heat sources to prevent from false triggering.
- Page 8 4 Enter into the TEST Mode and Custom Settings Slide the power switch to TEST position and enter into TEST mode. There are some functions in TEST mode: custom settings, manual capture, preview manually. 4.1 Custom Settings Press MENU to enter into the menu setting. The camera can be adjusted to manually customize the camera settings which display on LCD screen.
- Page 9 ▼ to select the mode you want. Press OK to highlight and save your setting. << MODE >> MODE << >> Camera √ Camera Video Video √ Hybrid Hybrid 4.2 Manual Capturing Capture photos or video clips manually in TEST mode. Manual Capturing a Picture If the camera is set in Camera or Camera+Video Mode, press ►...
- Page 10 4.4 Delete Photo or Video View the image (or video), select the one you want to delete. Press MENU to enter the Delete Interface. Press▲ or ▼ to select Delete All or Delete Current, then press OK to delete. 4.5 Position your camera in TEST MODE The camera Motion indicator light will Blink once the camera triggered in TEST mode.
-
Page 11: Advanced Operations
5 Advanced Operations From the basic operations of the camera previewed in the previous chapter, we know that the camera has three basic operation modes: 1. OFF mode: Power switch to OFF position. 2. ON mode: Power switch to ON position. 3. - Page 12 Capture This parameter affects the number of pictures Number taken for each triggering in Photo mode. It has 9 values: 1~9 Photos. Press ▲ or ▼ to change the value. Video size The available options for video resolution are as follows: 1920×1080,1280×720 or 640×360;...
- Page 13 lower sensitivity outdoor environment with lots of interference like hot wind, smoke, near window etc. Furthermore, the sensitivity of the PIR is strongly related to the temperature. Higher temperature leads to lower sensitivity. Therefore it is suggested to set a higher sensitivity high...
- Page 14 photos. Coordinate Set it to ON and input the latitude and longitude, Input it will display on the photo information bar automatically, and it is easy for user to distinguish the camera display area. Photo stamp This parameter used to set the stamp on to the photos or videos, when set ON, the photos or video will have the time stamp, otherwise OFF don't play a time stamp.
-
Page 15: Mounting And Positioning
6 Mounting and Positioning After you′ve set up the camera′s parameters to your personal preferences at home or in your truck, you′re ready to take it outside and slide the power switch to ″ON″. When setting up the camera for scouting game or other outdoor applications, you must be sure to mount it in place correctly and securely. - Page 16 you can mount the camera a bit higher and angle it down. Most animals do not often look up and therefore are less likely to notice the camera if it’s mounted above eye level. 2. We recommend that you mount your camera about chest height and angle it slightly downward.
-
Page 17: Two Year Limited Warranty
To obtain warranty service, please contact us to determine the nature of problem before return the product under this warranty (with a written description of the problem and print samples) for repairing or exchanging. RADIX TRAIL CAMERAS 12486 ROUTE J40 MILTON, IA 52570... - Page 18 Appendix I: Technical Specifications Lens F/NO=2.8, FOV(Field of View)=45° IR Flash 85feet/25m(No glow 940nm IR LED) LCD Display 2” TFT color screen Memory Card Up to 256 GB 7680*4320 = 32MP 6144*3456 = 20MP Image size 5376*3024 =16MP 3840*2160 = 8MP 3072*1728 = 5MP Photo burst 1,2,3,4,5,6,7,8,9 Picture Burst...
- Page 19 Date and Time, Moon Phase, Battery Photo stamp Level, Temperature, camera name, latitude and longitude; Power Supply 6 × AA (Lithium batteries are best) Stand-by Current < 0.13mA 6×AA or 7.4V-12V AC/DC or solar power External Battery Jack supply Microphone/speaker Mounting Rope/Belt/Python lock Dimensions...
- Page 20 Battery Optional Solar panel Optional...
Need help?
Do you have a question about the GEN-600 and is the answer not in the manual?
Questions and answers