
Related Manuals for Draminski iScan

Summary of Contents for Draminski iScan
- Page 1 portable diagnostic ultrasound scanner with an electronic probe instruction manual ISO 9001 25.04.2017r.
-
Page 2: Table Of Contents
TABLE OF CONTENTS I. INTRODUCTION ......................3 II. EQUIPMENT ........................ 4 III. CONSTRUCTION ......................4 IV. FUNCTION KEYS DESCRIPTION (Right hand keyboard) .......... 7 V. FUNCTION KEYS DESCRIPTION (Left hand keyboard) ..........8 VI. MENU STRUCTURE ....................10 VIII. PREPARATION TO WORK..................18 IX. -
Page 3: Introduction
Durable and robust housing makes it possible for the iScan to be used in the harshest conditions. The ultrasound scanner is very light and handy, which makes working with it very easy and convenient. -
Page 4: Equipment
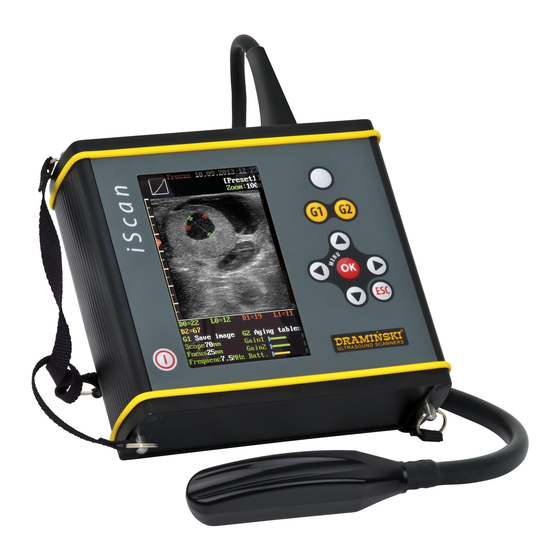
II. EQUIPMENT Item Name and description Standard Prestige Housing with the LCD and LED screens and membrane keyboard Electronic linear probe, rectal, fixed permanently Carrying belt External Li-ion power package 14,1V / 3,1Ah Special charger for the battery pack with cables USB cable for image transmission Software for image and cine loops saving on the PC Transport case with foam insulation... - Page 5 (head) is designed mainly for rectal examinations of cows and mares, tendon and ophthalmological examinations. iScan cooperates with a broadband probe (4-9 MHz) with main frequency of 7.5 MHz and with working width of 60mm. Photo 5. Electronic linear probe 7,5 MHz...
- Page 6 Pic. 2. 2. Preparation for work Before turning iScan on, unscrew the cap from top B socket (see pic. 2.). Next connect the goggle cable and screw the connector. Note you may turn the scanner on. To turn on the goggles press OK button for 3 seconds. „GOGGLE VGA ON!!!” message will appear.
-
Page 7: Function Keys Description (Right Hand Keyboard)
FUNCTION KEYS DESCRIPTION (Right hand keyboard) 1. Image freeze 2. Rescan 3. Turning the device off (after pressing and holding the button) G1 + = signal amplification adjustment in the closer field G2 + = signal amplification adjustment in the further field 1. -
Page 8: Function Keys Description (Left Hand Keyboard)
FUNCTION KEYS DESCRIPTION (Left hand keyboard) 1. Image freeze 2. Rescan 3. Turning the device off (after pressing and holding the button) G1 + = signal amplification adjustment in the closer field G2 + = signal amplification adjustment in the further field 1. - Page 9 SCREEN APPEARANCE Messages and information Exemplary screenshot from the iScan with loaded cine with messages and displayed pieces of information: Gamma level stan pracy aktualna data wskaźnik poziomu Work status Date poziom zoom Zoom level indicator gamma preset direction set for displayed image wskaźnik focus...
-
Page 10: Menu Structure
Settings Presets Rules of scrolling through the Menu The iScan menu has 2 levels: level I – main menu options level II – submenu options (presentation shown on diagrams in chapter VI) In order to go from option to option in menu you can use navigation buttons ;... - Page 11 MENU STRUCTURE Menu options: Image. Option to save images to memory, to show them on screen - load. Image Image 1. Save. Option to save images. Cine After freezing the image you can save it in the device’s Save memory under consecutive index number from 1 to 200. Under Measure Load the saved image a message with suggested index number...
- Page 12 keys (play video). 3.Search. An option of searching saved cine loop by its name. Measurements. Option of measuring objects on frozen image. After choosing this menu option a white marker appears on the image, which can be moved with navigation buttons: ...
- Page 13 Method Species Measured dimension Fetus age range abbr. Skull-tail length From 30 to 80 days Ear-to-ear head diameter From 65 to 200 days sheep Skull-tail length From 30 to 70 days horse Fetus bag size From 9 to 45 days Head diameter From 90 to 200 days Eye diameter...
- Page 14 Image Frequency. Option of changing signal frequency from head in order to optimise the image. Cine Option enables filtering of frequency generated from a Measure broadband head, in range from 4MHz to 9MHz. Frequency Grid value is shown under the image in the lower part of the screen. The higher the frequency, the shorter the wave, so scanning is Mode shallower.
- Page 15 system automatically changes into the chosen language version. Erase memory. Option of erasing saved images from memory. After choosing this option the system shows a message with question „erase memory” 3 times. This activity erases the device’s memory completely and causes a loss of saved images.
- Page 16 VII. MOST COMMONLY USED FUNCTIONS during an examination After pressing this button the image is frozen and in the upper Image freezing part of the screen appears the message “Frozen”. After longer hold the device turns off. MENU / MEASURE. After freezing the image can be Measuring measured by using cursors (markers).
- Page 17 MEASURING WITH CURSORS Distance, depth After freezing the image you should press “OK” to open a dialogue window of the main menu. Out of the shown options you have to confirm the “Measurements” position with the “OK” button. A marker (cursor) appears in the middle of the screen.
-
Page 18: Preparation To Work
It is for the best if it works in full cycles i.e. full charge – complete discharge. Dramiński iScan has a graphic indicator of battery condition in the lower part of the screen. Shortening and change of colour of battery condition indicator, from green to yellow, informs about battery discharge in ca. - Page 19 d) watch the diode in charger – change in colour from red to green means proper and full charge. Charging a completely discharged battery takes ca. 2 hours 30 minutes. After fully charging the battery the charger automatically stops charging. Warning It is forbidden to conduct repair of the charger by the user and device disassembly by unauthorized personnel.
-
Page 20: Device And Probe Maintenance
Device is especially designed to work in harsh conditions, where during usage it can get significantly dirty. The iScan ultrasound scanner should be cleaned with a wet cloth soaked with a delicate detergent solution directly after use. Before wet cleaning the battery pack should be disconnected from the device, because of its not waterproof housing. -
Page 21: Technical Data
If none of the basic actions helps, please contact our service at the DRAMIŃSKI Company, tel. 0–89 527–11–30 or e-mail: usgvet@draminski.com XIII. TECHNICAL DATA B Mode – live imaging, image presentation (projection) mode B+M Mode (2B Mode - Dual Mode Display), ... -
Page 22: Guarantee
Important! If there was a situation that the ultrasound scanner was stored in a temperature below 5°C before turning it on it should be warmed up. Using the iScan ultrasound scanner alternatively in extremely high or low temperatures is not recommended and may lead to its damage. -
Page 23: Software Installation Manual And Image Transmission To The Pc
Software installation manual and image transmission to the PC... - Page 24 Software is designed to transfer images and cine loops from the scanner’s memory to the computer through the USB port. Important!!! Before connecting the iScan to the computer, install software first. Run installation programme (setup.exe) from the CD attached to the device. The programme will guide you through the software installation process.
- Page 25 You have to choose a folder, in which the programme shortcut will be placed. It can be found later for example by means of command: START \ PROGRAMS\ DRAMIŃSKI iScan cine + Choose “Next” to continue Programme informs us that it is ready to be installed in the place chosen by us.
- Page 26 Choose “Install” to continue Installation programme informs about the proper course of installation. Choose “Finish” to successfully finish the installation After installation of iScan cine+ data transmission programme the computer needs to be restarted.
- Page 27 2. Transmitting images or cine loop to computer To begin transmitting images to the computer, following actions need to be performed: 1. Connect transmission cable to the socket (6 pin) at the top of the iScan housing, the second end to the computer – USB port.
- Page 28 When saving, the ultrasound monitor displays information about transmission progress To stop transmission click the “Break” button on the computer screen. A window with message “Finish” on the computer’s screen appears to confirm successful action . Images and cine loops can be deleted from ultrasound scanner’s memory by entering the menu: Settings/ Erase memory Go for it!
- Page 29 1 metre. Serial number of the product used for identification 40°C Product’s storage temperature 10°C Manufacturer: www.draminski.com Owocowa 17, 10-840 Olsztyn Tel. +48 89 527 11 30, Fax +48 89 527 84 44 e-mail: usgvet@draminski.com...
Need help?
Do you have a question about the iScan and is the answer not in the manual?
Questions and answers