Advertisement
Quick Links
EGREAT TECHNOLOGY CO.; LTD
EG-M31C quickly install guide
NO 1: How to install the hdd in to EG-M31C
1.1:please confirm you are ready before install the hdd:
1.1.1. Take out the hdd and the screw from the panel
1.1.2. SATA hdd *1pcs (format or non-format)
1.1.3. Screwdriver *1pcs
1.2:take out the cover from the unit,
1.3: follow the picture instruction; Plug the SATA HDD into the SATA interface. The
hole locations should match with the fixed column on the metal plate (picture 2);
Attention: During installing, pls don't force it avoiding destroying hdd and the other
components. Finally, pay attention to the fan: it should be connected to the case too
(picture3).
( 图二 )
1
Advertisement

Related Manuals for Egreat EG-M31C


Summary of Contents for Egreat EG-M31C
- Page 1 EGREAT TECHNOLOGY CO.; LTD EG-M31C quickly install guide NO 1: How to install the hdd in to EG-M31C 1.1:please confirm you are ready before install the hdd: 1.1.1. Take out the hdd and the screw from the panel 1.1.2. SATA hdd *1pcs (format or non-format) 1.1.3.
- Page 2 (图 三 ) 1.4:Fix the HDD with 2 screws as shown below. 1.5: The plug of the fan must install to the appointed station, as shown the picture 3, Close the case using the 4 screws, refer to the picture.
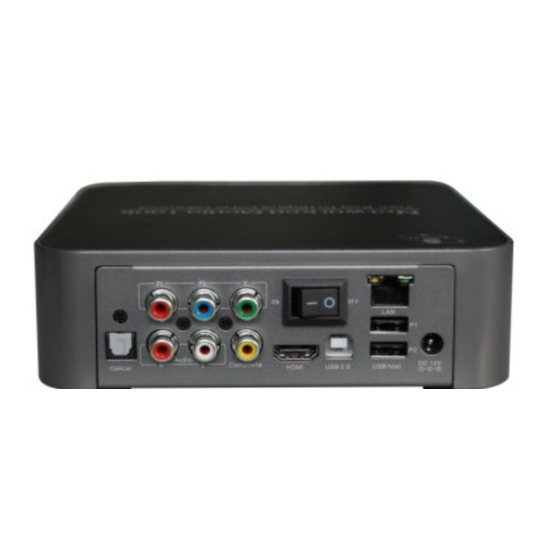
- Page 3 NO 2:M31C connecting method 2.1: Connector indication ※ DC 12V the power port ※ OFF/ON control the power ※ OPTICAL 5.1 digital audio optical output ※ Y/PB/PR digital ypbpr output ※ HDMI 1.3 digital HDMI output ※ R/L right/left stereo imitation output ※...
- Page 4 2.2 How to connect with device 2.2.1 Power adapter connecting (picture 1) Warning: please use the 12V power adapter that provide by factory! If you need to change the power adapter, please contact with the local reseller. 2.2.2: YPbPr connecting (picture 2)
- Page 5 2.2.3: AV connecting (picture 3) 2.2.4: HDMI connecting...
- Page 6 2.2.5:Optical connecting (picture 2.2.6: Network connecting...
- Page 7 2.2.7: USB device connecting...
- Page 8 NO 3:Remote control definition 3.1:Key-press definition 3.1.1: power turn on/off 3.1.2: TV mode selection, work with number key to switch video output mode.
- Page 9 Detail is as below: Number Output mode Number Output mode Number Output mode (AUTO) YPBPR HDMI/ 720p/60Hz /720P/60Hz AV/NTSC/480i/ YPBPR HDMI/1080i/59.94Hz 60Hz /1080i/60Hz YPBPR HDMI/1080P/59.94Hz /PAL/576i/50H /1080P/60Hz (Notice: when you have connect with computer via USB,there is no signal on the screen.) 3.1.3:...
- Page 10 3.1.10: Info key: during playback, press this button to show all the information of this movie: play process, file name, video format, audio format and so on. Under file mode, you can use this button to check file size. 3.1.11: ,Under playback, use those two button to select previous or next 、...
- Page 11 3.1.24: pause 3.1.25: subtitle: ※ If the movie has subtitle, press this key to display or cancel subtitle; User can use up/down key to adjust color/size/location of the subtitle. ※ During no playing, press this button to display local time (premise is network is in normal use, and time zone is GMT+8 or other correspond time zone) 3.1.26:...
- Page 12 ※During playing back contents from HDD inside or USB device, press these hotkeys for playing movie/music/photo/files.. ※ During use web server function, you can press these hotkeys for playing MOVIE, MUSIC and PHOTO. Notice: 1. Remote control definition will be changed along with FW upgrade. After update FW, pls notice the extra explain list.
- Page 13 HDTV:480P/576P/720P/1080i/1080P、1366X768,1280X768、TV PAL:576i/576P NTSC:480i/480P、Analog projector: Y PbPr-AV Video、 Show Digital projector: HDMI 720P/1080P equipment Size 160 x160 x 55mm Power adapter ( 12V/3A)/1PCS 、 AC cable/1PC 、 Remote coutrol/1PCS 、 Accessory CD/1PCS 、 Quickly install book/1PCS 、 HDMI cable/1PCS 、 USB Extension list cable/1PCS、USB cable/1PCS,screws/1package Notice: new firmware/NMT software/other tooling software will be upload into our...
Need help?
Do you have a question about the EG-M31C and is the answer not in the manual?
Questions and answers