Table of Contents
Advertisement
Quick Links
Advertisement
Table of Contents

Related Manuals for Honda MVCI

Summary of Contents for Honda MVCI
-
Page 1: Modular Vehicle Communication Interface User Guide
Modular Vehicle Communication Interface User Guide Page 1 v2.1... -
Page 2: Compliance
The right is reserved to make changes at any time without obligation to notify any person or organization of such revisions or changes. Further, Honda Canada shall not be liable for errors contained herein or for incidental or consequential damages (including lost profits) in connection with the furnishing, performance, or use of this material. -
Page 3: Table Of Contents
12.1 - Automatic Firmware Updates ......................... 13 12.2 - Manual Firmware Updates ..........................14 13 - Connecting the MVCI to the Vehicle ........................15 14 - User Config – Explanations, Set-up and Customizing Settings ................16 14.1 - DLC Voltage ..............................16 14.2 - MVCI Setup .............................. - Page 4 14.4.2 - SDIO-2 ..............................19 14.4.3 - Battery Charger ............................19 14.4.4 - Host Status ............................... 20 14.5 - Software Version ............................. 20 14.6 - Hardware Test ..............................20 14.6.1 - Beep Test ..............................20 14.6.2 - LED Test ..............................21 14.6.3 - LCD Test ..............................
-
Page 5: Safety
The MVCI unit is designed to operate within -4°F to 140°F (-20°C to 60°C) ambient temperature range. The surface of the MVCI could appear warm after extended periods of use - this is normal. Users should be careful when holding a unit that has been exposed to very high ambient temperatures, over 104°F (40°C) for example. -
Page 6: Mvci Maintenance And General Care
4 - MVCI Maintenance and General Care If you need to clean your MVCI, you can clean the unit by wiping it with a soft cloth. The soft cloth can be slightly damp with water or water and diluted mild detergent. Be sure to firmly wring excess water from the cloth. Do not use harsh chemical cleaners (benzene, thinner, rubbing alcohol, household cleaners, cosmetics, etc.) as these may damage the... -
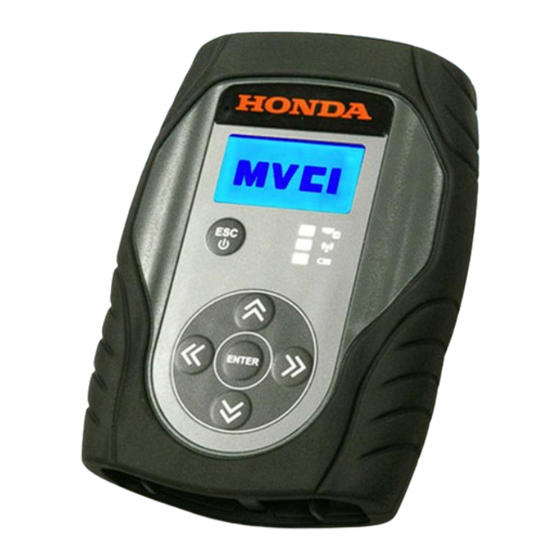
Page 7: Mvci Component Descriptions
6 - MVCI Component Descriptions Page 7 v2.1... -
Page 8: Cables And Cable Connections
7 - Cables and Cable Connections To avoid damaging the MVCI, the cards, or the cables, use the following information to help when attaching cables or connectors to the MVCI, or plugging in the SDIO or the SD memory cards:... -
Page 9: Sd Card Removal/Installation
These batteries are charged whenever the MVCI is connected to a vehicle and receiving power from the vehicle or plugged in using the AC power adapter. Use the supplied AC Power Adapter only. If the batteries need replacing, use 2000mAh NiMH AA batteries. -
Page 10: Battery Icon Descriptions
10.1 - Battery Icon Descriptions The battery icon displays as an internal charging symbol when the MVCI is powered by an external power source. NOTE: The MVCI battery charger employs a temperature-controlled charging algorithm. It is normal to display battery charging animation when the MVCI is powered by an external power source, even if the batteries are fully charged. -
Page 11: Mvci Led Descriptions
10.2 - MVCI LED Descriptions Page 11 v2.1... -
Page 12: Software
CD. The software and updates are included in the HDS software, and are installed to your PC with the HDS software. You will be prompted to update your MVCI when you use it with the HDS software on your PC. -
Page 13: Hds Mvci Firmware Update
12 - HDS MVCI Firmware Update The MVCI software can be updated automatically or manually. If the MVCI does not have the latest software installed, the HDS automatically takes you to the MVCI reprogramming screen. IMPORTANT: Do NOT unplug the external power plug while the MVCI is being reprogrammed. -
Page 14: Manual Firmware Updates
2. To start a new vehicle diagnostic session, click the Program the SPX-MVCI button. 3. A screen that states the “SPX-MVCI software needs to be updated” appears when the MVCI needs its firmware updated. Click YES to continue. If the MVCI has the latest software installed, this screen does not appear. -
Page 15: Connecting The Mvci To The Vehicle
2. When you plug the MVCI into the vehicle’s DLC and turn the ignition switch to ON (II), the MVCI automatically boots 3. To turn off the MVCI, disconnect it from the DLC, then press and hold the ESC button for about 5 seconds. The MVCI also turns off after being disconnected from an external power source for 30 seconds. -
Page 16: User Config - Explanations, Set-Up And Customizing Settings
The DLC Voltage screen checks the vehicle’s 12V battery state-of-charge. To do this: 1. Power up the MVCI by connecting it to the vehicle diagnostic link connector (DLC) and turning the ignition switch to ON (II). After the MVCI boots up, press ENTER to access the User Config screen. -
Page 17: Contrast Control
To display large font, hold the right arrow for at least one second. The MVCI changes to large font. To display small font, hold the left arrow for at least one second. The MVCI changes back to small font. 14.3 - User Customize From the User Config menu, select User Customize and press ENTER. -
Page 18: Beep Menu
CMU Notice - The MVCI indicates when the CM reprogramming is complete. • Low Voltage - The MVCI indicates that it has disconnected from the DLC and the vehicle battery state-of-charge is low. To change the beep settings, select Beep Menu under User Customize. -
Page 19: Sdio-2
14.4.2 - SDIO-2 The SDIO-2 slot has the MVCI wireless card inserted. It allows the MVCI to communicate on a wireless network. NOTE: Do not remove the MVCI wireless card unless it is faulty and needs to be replaced. -
Page 20: Host Status
Kernel(A):1.0 Kernel:1.0 RFS(A):1.1 14.6 - Hardware Test The MVCI includes several hardware tests that can check to make sure your MVCI is operating properly. From the User Config menu, select Hardware Test and press ENTER. These options are available: •... -
Page 21: Led Test
1. Make sure the MVCI is not connected to a vehicle. Select Device Loopback Test and press ENTER. 2. A warning screen directing you to remove the DLC cable from the MVCI appears. Remove the cable and press ENTER to start the test, or press ESC to exit. - Page 22 Select the SDMEM Card Test and press ENTER. SDMEM Test SDMemory Card Test in Progress… When the test is complete, a results screen appears, indicating if the SD card passed, or if there is an error. Page 22 v2.1...
-
Page 23: Troubleshooting
15.1 - Cannot Communicate with PC 1. Check that the MVCI is connected correctly to the vehicle OBD II connector with the DLC cable and that it is powered 2. Check that the proper MVCI has been selected from the MVCI Connection Manager (colours are associated to MVCIs within a dealership, and serial numbers should correspond between the HDS software and the MVCI itself). -
Page 24: Frequently Asked Questions
Why does the MVCI power off if I didn’t press the ESC button? The MVCI is not designed to run on its internal batteries. The batteries act as a backup power source in case the MVCI is accidentally disconnected or loses power. It must be connected to a vehicle or an external power source. The MVCI powers off after 60 seconds without external power. -
Page 25: Specifications
18 - Software The MVCI’s internal software is proprietary, confidential information of SPX and protected under copyright law. Users have no right in or title to Unit software other than a limited right of use revocable by SPX. Users shall not (a) transfer or... - Page 26 Page 26 v2.1...
Need help?
Do you have a question about the MVCI and is the answer not in the manual?
Questions and answers